
The Okta/Bullhorn JobScience SAML integration currently supports the following features:
For more information on the listed features, visit the Okta Glossary.
Login to your JobScience account.
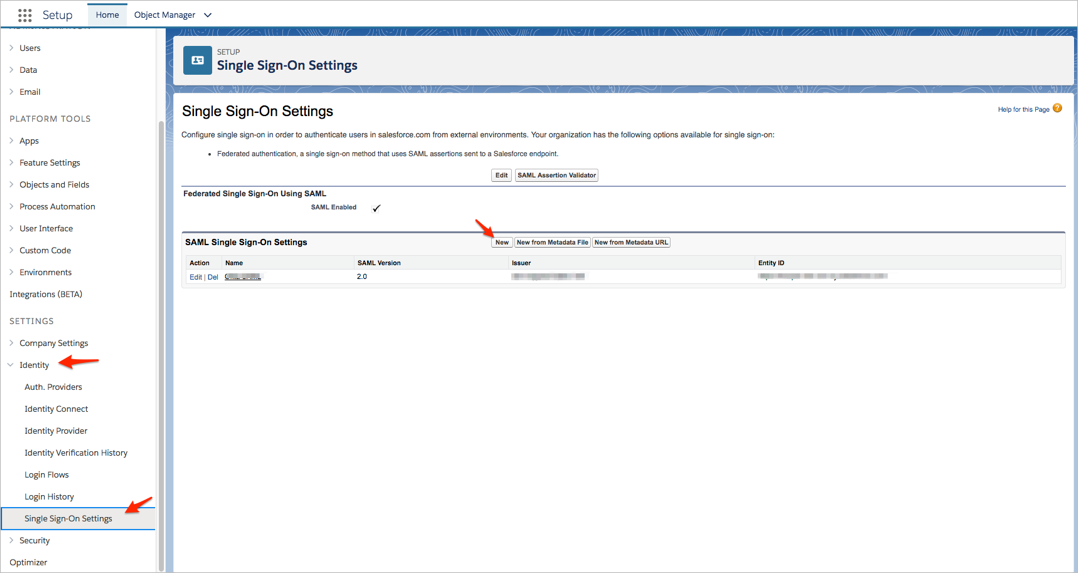
Navigate to Identity, select Single Sign-On Settings, then click New.
Note: Make sure that the SAML Enabled option under Federated Single Sign-On Using SAML is checked.
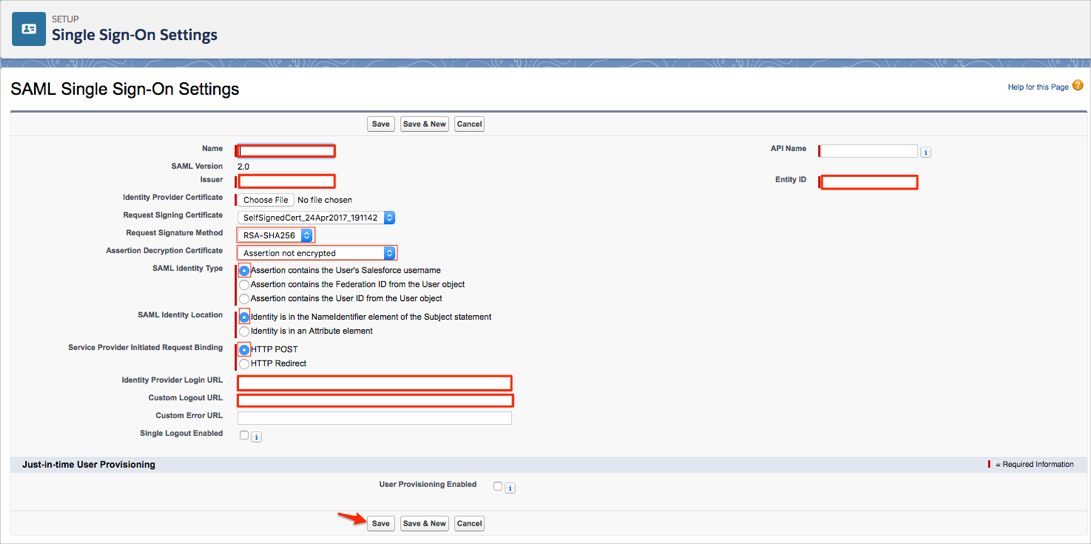
Follow the steps below:
Name: Enter a configuration name.
Issuer: Copy and paste the following:
Sign into the Okta Admin Dashboard to generate this variable.
For example, if the above value is http://www.acme.com/abc123efg456, then your Issuer value is abc123efg456.
Entity ID: Enter https://saml.salesforce.com .
Identity Provider Certificate: Download the following certificate, then use Choose File to upload it to JobScience:
Sign into the Okta Admin Dashboard to generate this variable.
Request Signature Method: Enter RSA-SHA256
Assertion Decryption Certificate: Enter Assertion not encrypted.
SAML Identity Type: Select Assertion contains the User's Salesforce username.
SAML Identity Location: Select Identity is in the NameIdentifier element of the Subject statement.
Service Provider Initiated Request Binding: Select HTTP POST.
Identity Provider Login URL: Copy and paste the following:
Sign into the Okta Admin Dashboard to generate this variable.
Custom Logout URL: Copy and paste the following:
Sign into the Okta Admin Dashboard to generate this variable.
Click Save.
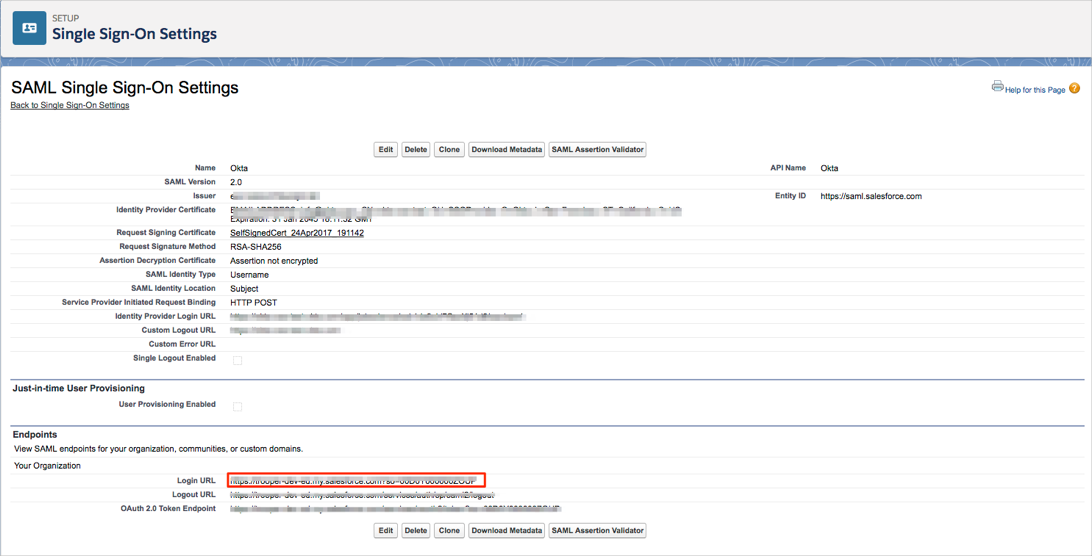
Still on the SAML Single Sign-On Settings page, make a copy of the Login URL value:
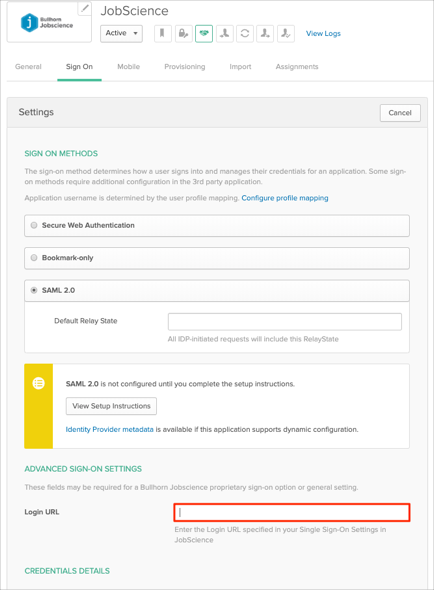
In Okta, select the Sign On tab for the Bullhorn JobScience SAML app, then click Edit.
Paste the Login URL value you made a copy of in step 4 into the corresponding field.
Click Save.
Done!
Please note: Delegated authentication is an optional integration that can be used in addition to SAML 2.0.
Delegated authentication enables various integrations with JobScience — like the Microsoft Outlook plugin — as well as giving you the ability to lock a user out of JobScience. Unlike SAML 2.0 single sign-on, delegated authentication is turned on at the user profile level. You have the ability to enable delegated authentication for a single user or large group; it all depends on who has the user profile where the Is Single Sign-On Enabled permission is enabled.
Where can I find this feature in my version of JobScience?
You can't see this form until JobScience has enabled delegated authentication for your organization. Once enabled, the delegated authentication form is located on the Single Sign-On Settings page in JobScience — the same place where you configure SAML 2.0.
Contact your JobScience Systems Account representative and ask them to enable delegated authentication for your organization. You can also do this by opening a case in the JobScience systems customer service applications.
Once JobScience systems enables delegated authentication you can proceed with the steps below.
Go to the Single Sign-On Settings page located in the Setup > Security Controls section of JobScience, then click the Edit.
Login to your JobScience account.
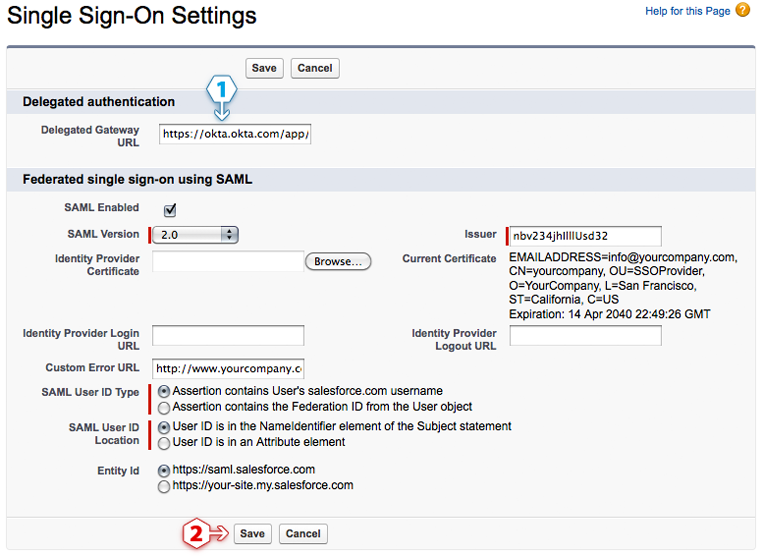
Copy and paste the URL below into the Delegated Gateway URL field:
Please sign-in to the Okta Admin app to have your organization specific variables generated for you. You might not be able to complete the setup without these generated variables.Navigate to Identity, select Single Sign-On Settings, then click New.
Note: Make sure that the SAML Enabled option under Federated Single Sign-On Using SAML is checked.

Click Save.
We recommend creating a test user profile so you can experiment with this feature on a single user. If you feel comfortable with this feature then you can skip to the next section.
Go to the Profiles page located in the Setup > Manage Users section of JobScience
Open a User Profile you would like to experiment with
Click the Clone button to make a copy of this profile. Using a cloned profile allows you to avoid impacting any other users who have the original profile.
Give the cloned profile a name
Click Save
IMPORTANT: Enabling single sign-on for a user profile will affect every user who is assigned that user profile. If you want to experiment with a single user first, we reccomend creating a cloned profile (see above) to test with.
Go to the Profiles page located in the Setup > Manage Users section of JobScience
Click Edit on the user profile and scroll down to the General User Permissions section
Check the Is Single Sign-On Enabled checkbox
Click Save
IMPORTANT: Do not enable delegated authentication for the JobScience user used by Okta to connect to the JobScience User Management APIs. The API user is specified in the User Management settings. Go to Okta User Management settings for JobScience.
Go to the Users page located in the Setup > Manage Users section of JobScience
Click Edit for a user you want to enable single sign-on for
Select a Profile that has delegated authentication single sign-on enabled (use the cloned profile if you are experimenting)
Click Save
In Okta, go to the users list and click a person's name to open their profile
Click Assign Application
Select JobScience from the list and enter a JobScience username that has delegated authentication enabled
Click Save
Login to Salesforce to go to the JobScience login page
Enter the JobScience username you used in the previous section
Enter the Okta password for the Okta user assigned the JobScience username above
Click Login
Assuming you logged in successfully, you can use these credentials for JobScience client application integrations like the Microsoft Outlook plugin and other APIs.
Your users are ready to single sign-on to JobScience!
You can assign JobScience access to users from their user profile.
Go to the Login URL you copied in step 4.
Click the Configuration Name you specified in step 3.
