The DocuSign Enterprise Edition is required to use SAML. In addition, DocuSign charges a one-time activation fee for SAML. Contact your DocuSign sales representative for pricing details.
We have two sets of instructions, one for older DocuSign tenants, one for newer tenants. It should be clear when you log in to DocuSign what functionality is available for you.
You will need some of the following auto-generated variables for your SAML configuration, for both New and Old DocuSign tenants:
Identity Provider Issuer: Copy and paste the following:
Sign into the Okta Admin Dashboard to generate this variable.
Identity Provider Login URL/Redirect URL: Copy and paste the following:
Sign into the Okta Admin Dashboard to generate this variable.
Identity Provider Logout URL/Portal URL: Copy and paste the following:
Sign into the Okta Admin Dashboard to generate this variable.
Identity Provider Certificate: Click here to download and save your Identity Provider certificate.
Log into Okta admin app to have this variable generated for you.If you have a new DocuSign tenant, follow the steps below to set up SAML:
Log into your DocuSign Tenant's admin section as a user with administrator privileges.
Go to Identity Providers > ADD IDENTITY PROVIDER.
Note that if you are unable to see these options, you probably have an older DocuSign tenant, see Old DocuSign Tenants for instructions.
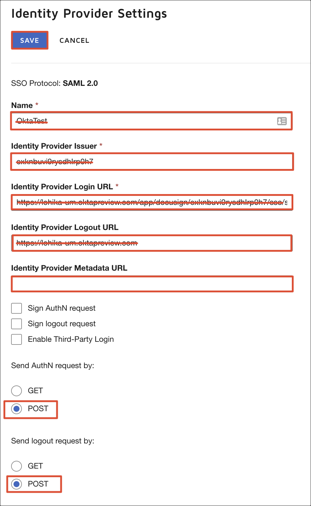
Enter the following:
Name: Enter a name for the Identity Provider.
Identity Provider Issuer: Copy and paste the value from the Variables section, above.
Identity Provider Login URL: Copy and paste the value from the Variables section, above.
Identity Provider Logout URL: Copy and paste the value from the Variables section, above.
For Send Authn Request by, select POST.
For Select Send Logout Request by, select POST.
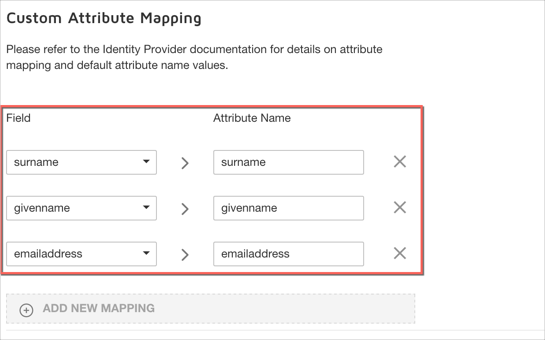
Scroll down to the Custom Attribute Mapping section, click ADD NEW MAPPING then add the following three mappings:
Select surname from the Field dropdown menu, then type surname in the Attribute field.
Select givenname from the Field dropdown menu, then type givenname in the Attribute field.
Select emailaddress from the Field dropdown menu, then type emailaddress in the Attribute field.
In the Identity Provider Certificates section:
First download your x.509 certificate in .cert Format. Go to the Variables section, above, to download this certificate.
Click ADD CERTIFICATE, then upload the certificate you just downloaded.
Click SAVE.

Back in the Identity Providers section, select Endpoints from the ACTIONS dropdown menu for the Identity Provider you just created.
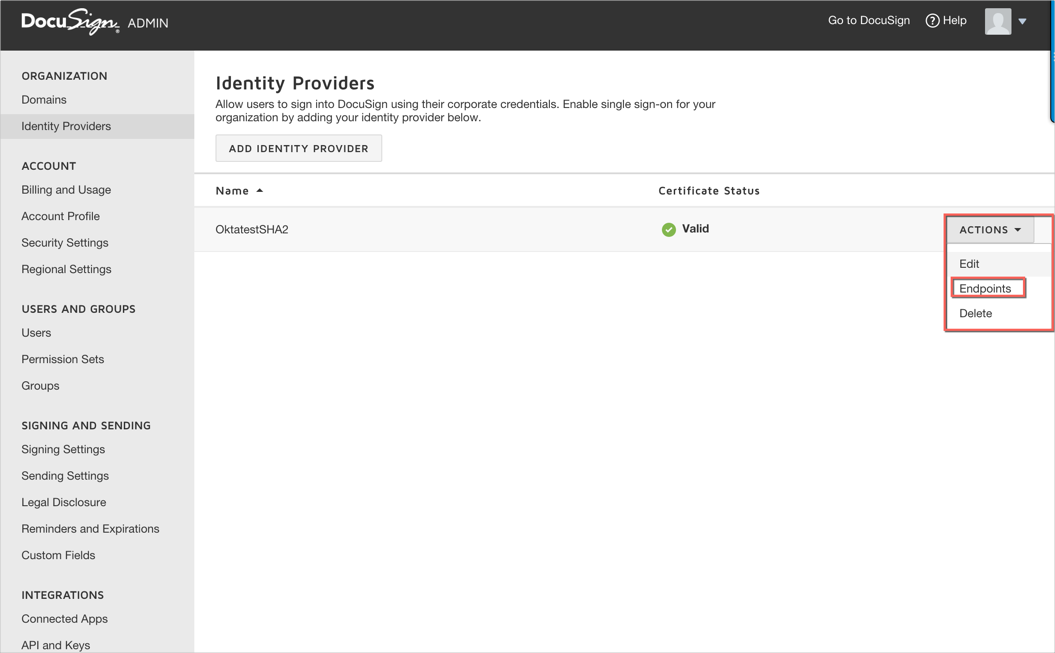
Make a copy of the values for the Service Provider Issuer URL and the Service Provider Assertion Consumer Service URL as shown below, then click CLOSE:

In Okta, select the General tab for the DocuSign app, click Edit.
Assertion Consumer Service URL: Enter the value you copied from DocuSign (step 7).
Service Provider Issuer URL: Enter the value you copied from DocuSign (step 7).
Click Save.
Please contact your DocuSign account manager to get your DocuSign account setup for SAML 2.0 access. Copy and paste the fields below to compose the message, substituting your company name for <YOUR COMPANY>.
Subject:
Enable SAML 2.0 for <YOUR COMPANY>.Message:
Please enable SAML 2.0 access for <YOUR COMPANY>. The certificate for this account is attached.Identity Provider Issuer:
Copy and paste the value from the Variables section, above.Redirect URL:
Copy and paste the Identity Provider Login URL/Redirect URL value from the Variables section, above.Portal URL:
Copy and paste the Identity Provider Logout URL/Portal URL value from the Variables section, above.Download your Identity Provider Certificate and attach it to your email. Go to the Variables section, above to download this certificate.
Send the email and wait for further instructions from DocuSign on how to enable SAML for your organization.