The Okta/iiPay GPMS SAML integration currently supports the following features:
For more information on the listed features, visit the Okta Glossary.
Send an email to the iiPay GPMS Support team and request that they enable SAML 2.0 for your account.
Include the following with your email:
GPMS Instance: Select one of:
Production (Admin)
Production (Self-Service)
Pre-Production (Admin)
Pre-Production (Self-Service)
Metadata URL: Copy and paste the following:
Sign into the Okta Admin dashboard to generate this value.
The iiPay GPMS Support team will contact you once the setup is complete and provide you with IDP ID and Client ID values.
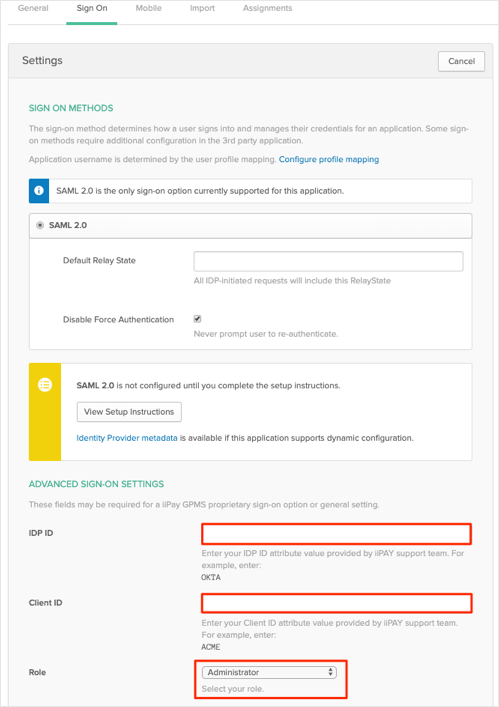
In Okta, select the Sign On tab for the iiPay GPMS app, then click Edit.
Enter your IDP ID and Client ID values provided to you by iiPay GPMS support into the corresponding fields.
Select your Role.
Note:
For the role Administrator, Okta sends the value: SP_USER,SP_MANAGED_USER
For the role Self-Service, Okta sends the value: SS_USER
Click Save:
Done!
Make sure you selected the correct Instance under the General tab. Guidelines for your Instance:
https://admin-unsfed.iipaysp.com: Select Production (Admin)
https://pay-unsfed.iipaysp.com: Select Production (Self-Service)
https://sandbox-unsfed.iipaysp.com: Select Pre-Production (Admin)
https://sandbox-ess-unsfed.iipaysp.com: Select Pre-Production (Self-Service)
The following SAML attributes are supported:
| Name | Value |
|---|---|
| IDPID | Comes from IDP ID field (step 4) |
| CLIENTID | Comes from Client ID field (step 4) |
| USERID | user.userName |
| user.userName | |
| ROLE | Comes from Role field (step 4) |
Make a note of yourEntity ID:
Sign into the Okta Admin Dashboard to generate this variable.
Open one of the following URLs:
Production (Role = Administration):
Login URL: https://admin-fed.iipaysp.com?EntityId=[entityIdValue]
Production (Role = Self-Service):
Login URL: https://pay-fed.iipaysp.com?EntityId=[entityIdValue]
Pre-Production (Role = Administration):
Login URL: https://sandbox-fed.iipaysp.com?EntityId=[entityIdValue]
Pre-Production (Role = Self-Service):
Login URL: https://sandbox-ess-fed.iipaysp.com?EntityId=[entityIdValue]