The Okta/Zoom SAML integration currently supports the following features:
For more information on the listed features, visit the Okta Glossary.
Log into your Zoom account.
Go to Advanced > Single Sign-On, then click Enable Single Sign-On.
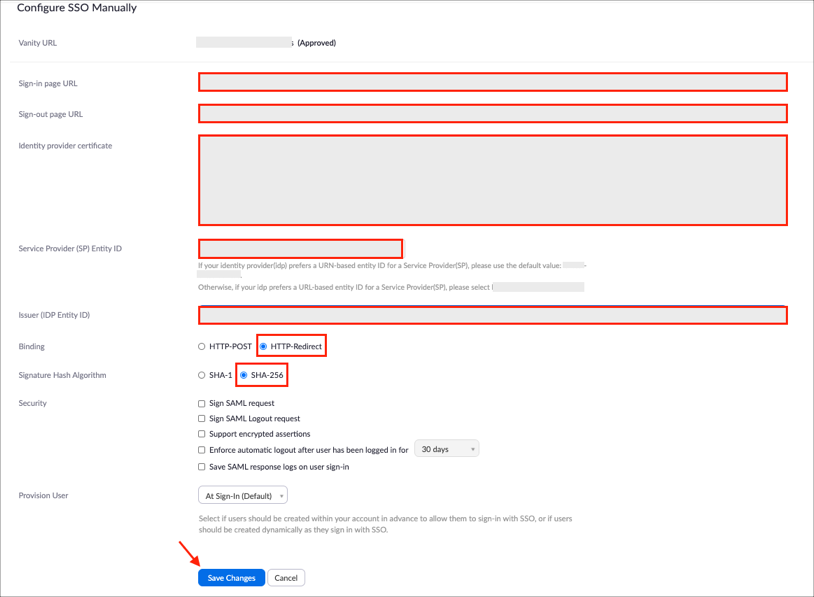
Enter the following:
Sign-in Page URL:
Sign in to the Okta Admin app to have this variable generated for you.Sign-out Page URL:
Sign in to the Okta Admin app to have this variable generated for you.Identity provider certificate:
Sign into the Okta Admin Dashboard to generate this variable.
Service Provider (SP) Entity ID: Select a URN-based entity ID for a Service Provider(SP):
[your-subdomain].zoom.us
Issuer (IDP Entity ID):
Sign in to the Okta Admin app to have this variable generated for you.Binding: Select HTTP-Redirect.
Signature Hash Algorithm: Select SHA-256.
Click Save Changes:
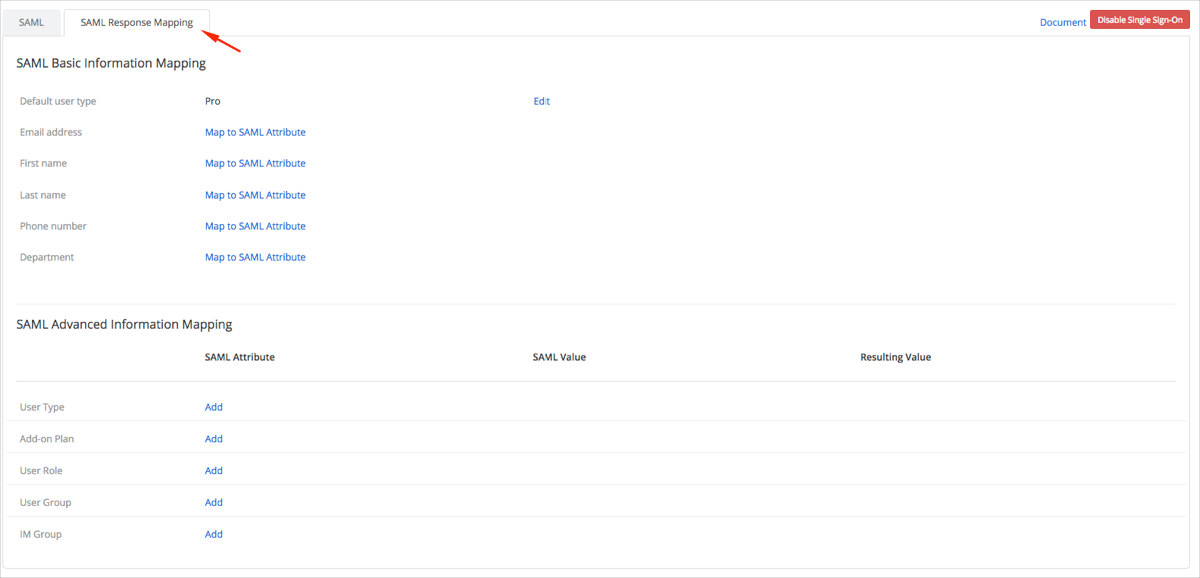
Select the SAML Response Mapping tab:
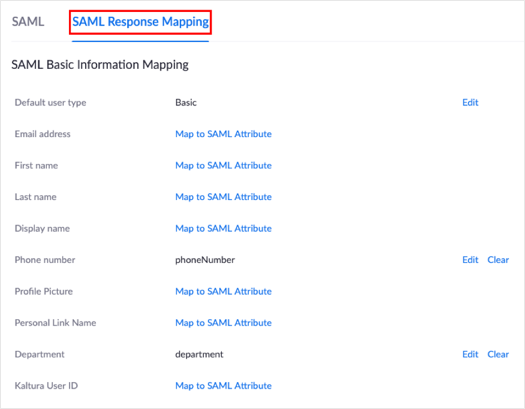
Click Edit for the following attributes and use the following corresponding values:
| Display Name | Variable Name |
|---|---|
| Phone number | phoneNumber |
| Department | department |
After entering the correct mapping, click Save Changes.
Optional: Group Attribute Steps:
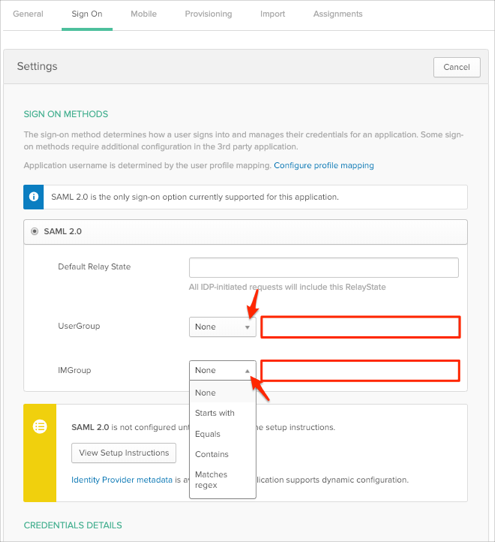
To send group attributes (UserGroup, IMGroup) as a part of SAML assertion, in Okta select the Sign On tab for the Zoom SAML app, then click Edit.
Select the appropriate filter from the drop-down menus, then type the preferred value.
Click Save.
Note: To send all groups a user is assigned to, select Regex and type .* (dot and asterix):
Go back to the Single Sign-On in Zoom and select the SAML Response Mapping tab.
Scroll down to either SAML Advanced Information Mapping or SAML Auto Mapping (whichever is more appropriate for you).
SAML Advanced Information Mapping:
Click Add for User Group:
SAML Attribute: Enter UserGroup. (This group attribute is passed by Okta.)
SAML Value: Enter the appropriate group for UserGroup.
Resulting Value: select the Group that will be assigned to a user in Zoom.
For example: In the screenshot below, the SAML value is User_Group_Test and the Resulting Value is User_Group_Test. This means that a user will be added to the User_Group_Test group in Zoom.

You can add multiple User Groups by clicking Add. Once you have completed, click Save Changes.
Click Add for IM Group:
SAML Attribute: Enter IMGroup. (This group attribute is passed by Okta.)
SAML Value: Enter the appropriate group for IM Group.
Resulting Value: Select the IM Group that will be assigned to a user in Zoom.
For example: In the screenshot below, the SAML value is IMGroup_Test and the Resulting Value is IMGroup_Test. This means that a user will be added to the IMGroup_Test group in Zoom:

You can add multiple IM Groups by clicking Add. Once you have completed, click Save Changes:
After you complete the steps above, you should see a similar list this:

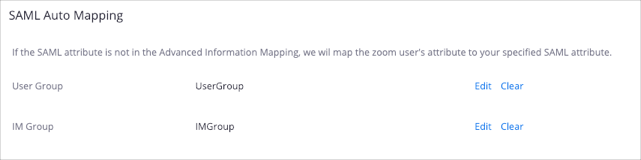
SAML Auto Mapping:
Click Map to SAML Attribute for User Group:
SAML Attribute: Enter UserGroup. (This group attribute is passed by Okta.)
Click Save Changes:

Click Map to SAML Attribute for IM Group:
SAML Attribute: Enter IMGroup. (This group attribute is passed by Okta.)
Click Save Changes:

After you complete the steps above, you should see a similar list this:
Done!
Make sure that you entered the correct value in the Subdomain field under the General tab in Okta. Using the wrong value will prevent you from authenticating via SAML to Zoom.
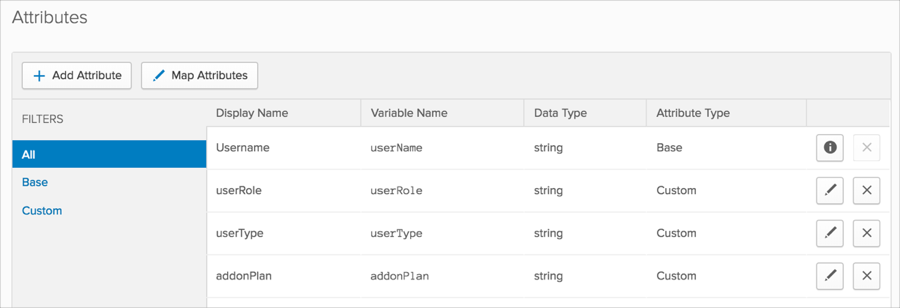
The following SAML attributes are supported:
| Name | Value |
|---|---|
| urn:oid:2.5.4.42 | user.firstName |
| urn:oid:2.5.4.4 | user.lastName |
| userType | appuser.userType |
| addonPlan | appuser.addonPlan |
| userRole | appuser.userRole |
| phoneNumber | user.primaryPhone |
| department | user.department |
| UserGroup | This will be configured in the app UI; see Group attribute instructions (step 4) above. |
| IMGroup | This will be configured in the app UI; see Group attribute instructions (step 4) above. |
Go to: https://[your-subdomain].zoom.us.
Click SIGN IN.
OPTIONAL
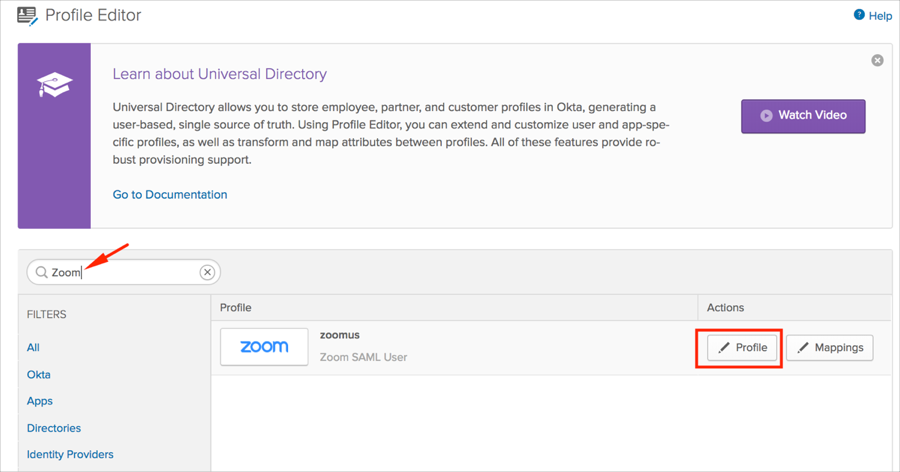
By default Okta only sends 2 SAML attributes in the SAML assertion: firstname and lastname. To send custom attributes (User Type, Add-on Plan, User Role), follow the steps below:
| Display Name | Variable Name |
|---|---|
| userType | userType |
| addonPlan | addonPlan |
| userRole | userRole |
Note: If SCIM is enabled or will be enabled for this integration, only add the addonPlan and userRole attributes, as the userType attribute is automatically added once SCIM is set up.
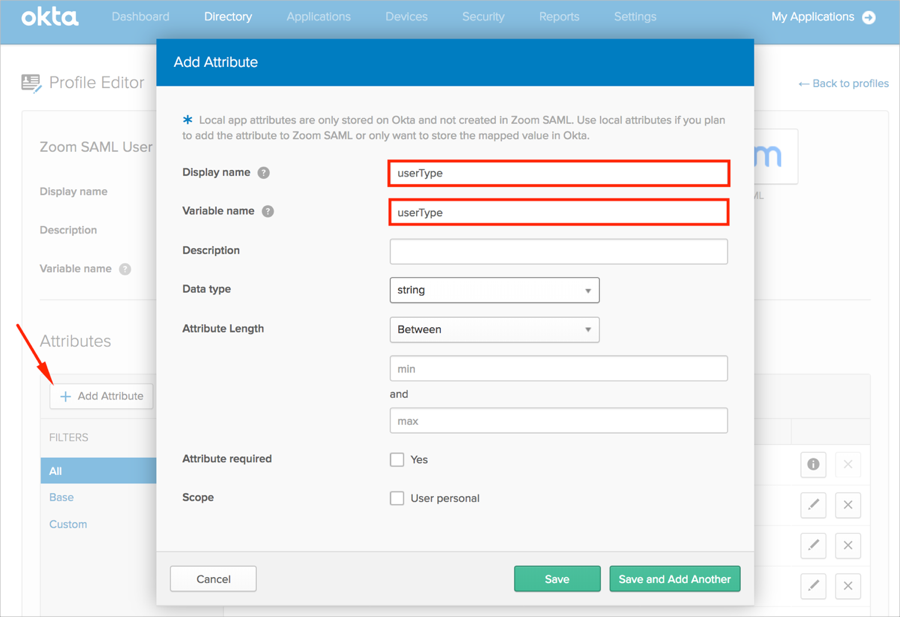
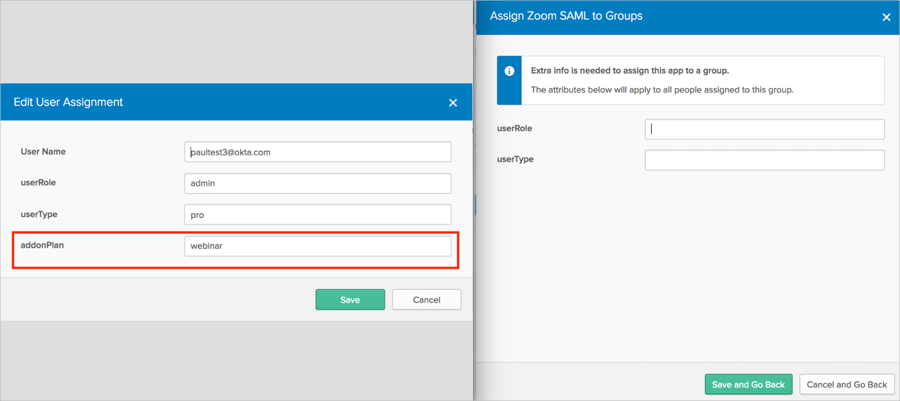
Scope: If you check User personal, the current attribute will be available once you assign a single user to the Zoom app and will not be available once you assign a group to the Zoom app. For example, in the following screenshot, the User personal Scope was applied to the addonPlan attribute:
Go back to your SAML configuration in Zoom and select the SAML response Mapping tab.
Note: For more information, refer to Advanced SAML Mapping.
Go to SAML Advanced Information Mapping and do the following:
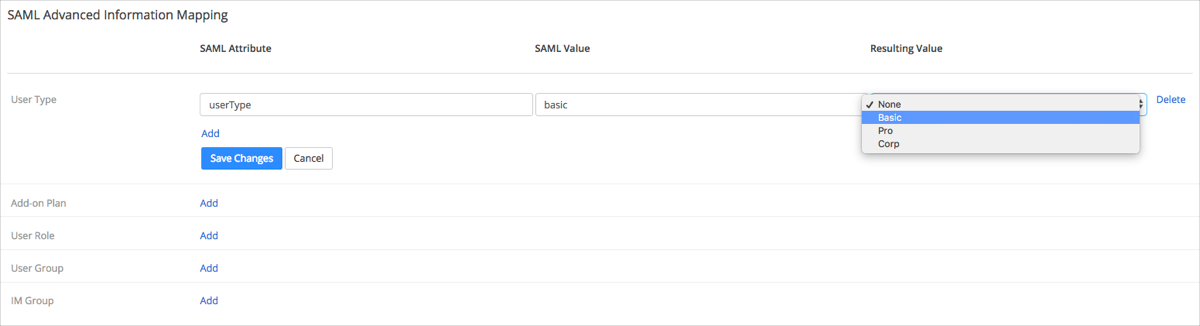
Click Add for UserType:
SAML Attribute: Enter userType. (This attribute is being passed by Okta.)
SAML Value: Enter the appropriate value for User Type.
Resulting Value: Select Basic, Pro, Corp, or None.
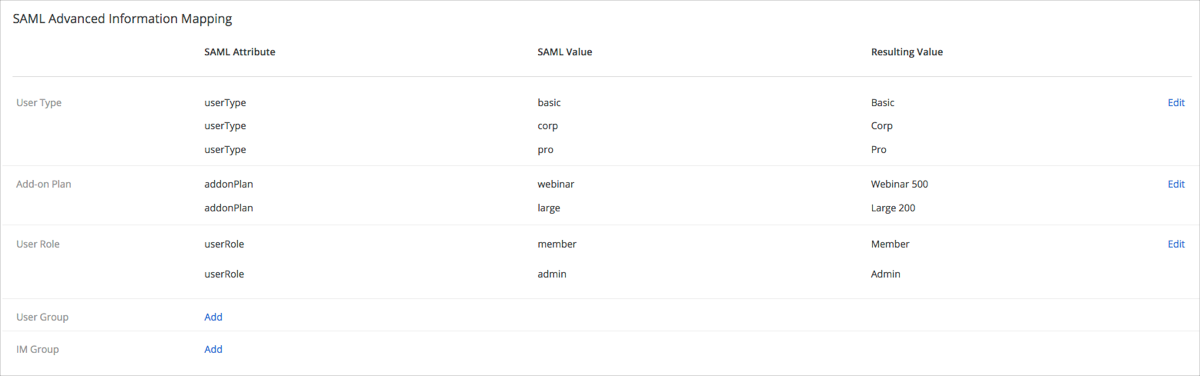
For example: In the screenshot below, the SAML value is basic and the Resulting Value is Basic. This means that a user should receive the Basic User Type.
You can add multiple User Types by clicking Add. Once you have completed, click Save Changes.
Click Add for Add-on Plan:
SAML Attribute: Enter addonPlan. (This attribute is being passed by Okta.)
SAML Value: Enter the appropriate value for Add-on Plan.
Resulting Value: Select Webinar or Large Meeting License.
For example: In the screenshot below, the SAML value is webinar and the Resulting Value is Webinar 500. This means that a user should receive the Webinar Add-on Plan.

You can add multiple Add-on Plans by clicking Add. Once you have completed, click Save Changes.
Click Add for User Role:
SAML Attribute: Enter userRole. (This attribute is being passed by Okta.)
SAML Value: Enter the appropriate value for User Role.
Resulting Value: Select admin, member, or a customized role (for more information see: Role Management).
For example: In the screenshot below, the SAML value is member and the Resulting Value is Member. This means that a user should receive the Member Add-on Plan.

You can add multiple User Roles by clicking Add. Once you have completed, click Save Changes.
After you complete the steps above, you should see a similar list this:
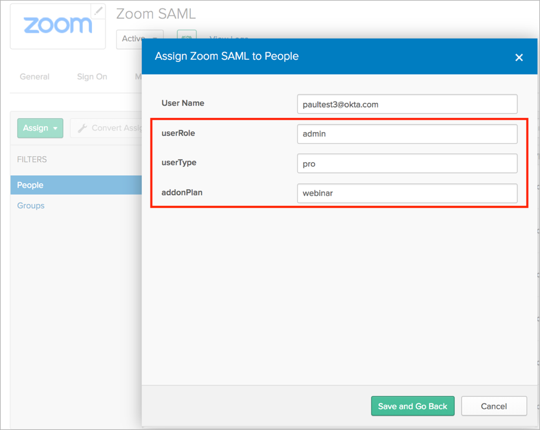
Now you can assign users to the Zoom SAML app with the appropriate attributes values.
Note: Make sure that the values for the attributes you specified in Okta are the same as the ones you’ve set in the SAML Advanced Information Mapping window in Zoom.
Done!