The Okta/Zscaler 2.0 SAML integration currently supports the following features:
Log into the Zscaler application.
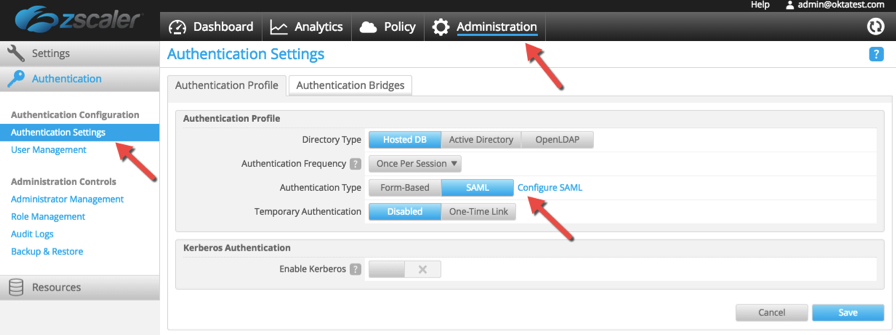
Select the Administration tab, then go to Authentication Settings. For Authentication Type, click SAML, then click Configure SAML.
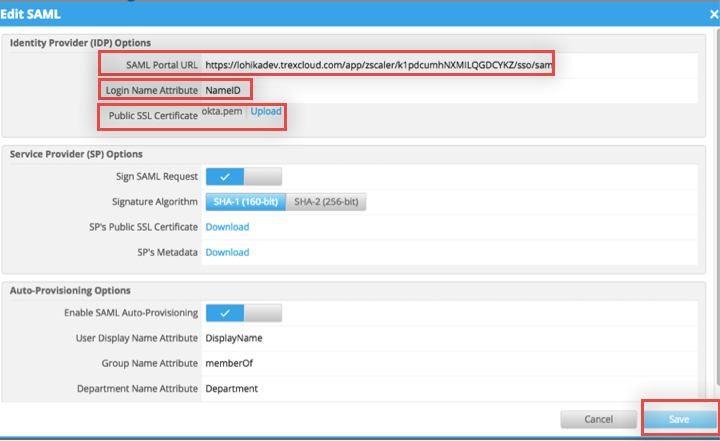
In the Identity Provider (IDP) Options section of the SAML Configuration screen, enter the following:
SAML Portal URL: Copy and paste the following:
Sign in to the Okta Admin app to have this variable generated for you.
Login Name Attribute: Enter NameID.
Public SSL Certificate: First click here to download the certificate for upload:
Sign in to the Okta Admin app to have this variable generated for you.
Then click Upload to upload it to Zscaler.
Click Save.
Done!
On the Zscaler Administration page, complete the following steps.
Click Manage Users & Authentication.
Click Edit, then click Configure SAML Single Sign-On parameters.
Click Enable SAML Auto-Provisioning.
For Attribute containing User Display Name enter the following:
DisplayName
For Attribute containing Group Name enter the following:
memberOf
For Attribute containing Department Name enter the following:
Department
Click Done.
Click Save.
In Okta, select the Sign On tab for the Zscaler Private Access 2.0 SAML app, then click Edit.
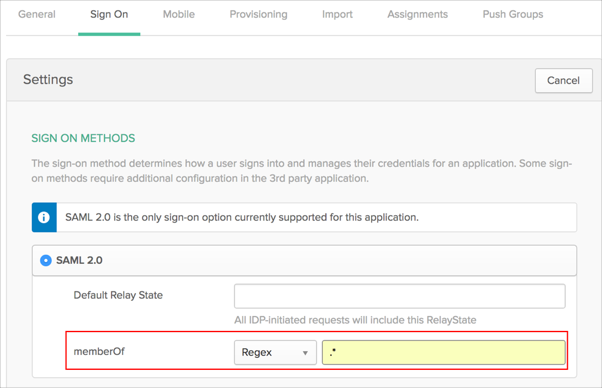
In the memberOf field, use the drop-down menu to select the type of condition and then enter the expression that specifies the groups to that you would like to send in your SAML assertion.
In the example above, the condition is a regular expression (Regex) and the expression specified is .*. This means that all groups that the user belongs to will be sent in the assertion. You can modify the condition as needed.
Click Save.
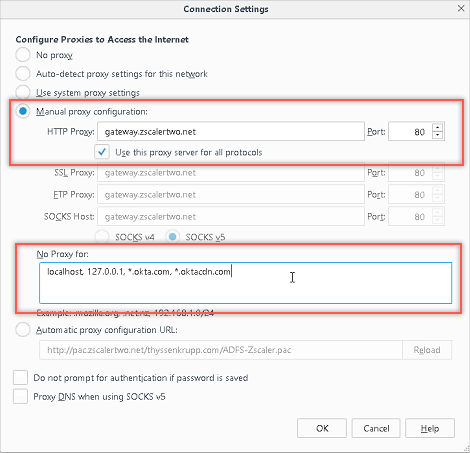
Set your browser proxy to gateway.[ yourZscalerDomain]:80.
For example if your Zscaler Domain is Zscalerbeta.net; use gateway.Zscalerbeta.net:80 proxy.
Add your Okta URL host ([yourSubdomain].okta.com) and *.oktacdn.com to the proxy bypass list.
For example if you log into https://acme.okta.com/; enter acme.okta.com.
Here is an example, shown in a Firefox browser:
Your users are ready to single sign-on to Zscaler.
Make sure that you entered the correct value in the Your Zscaler Domain field under the General tab in Okta. Using the wrong value will prevent you from authenticating via SAML to Zscaler.
The following SAML attributes are supported:
| Name | Value |
|---|---|
| DisplayName | user.firstName + ' ' + user.lastName |
| Department | user.department |
| memberOf | This will be configured in the app UI; see step 9 under the Setup SAML Auto-Provisioning Options section. |
Enter your User Name, then click Sign In.