Enabling SAML will affect all users who use this application, which means that users will not be able to sign in through their regular sign-in page. They will be able to access the app through the Okta service.
Backup URL: Templafy doesn't provide a backup sign-in URL where users can sign in using their regular username and password. You can contact Templafy Support to turn off SAML, if necessary.
If you are a new customer onboarding on HIVE or an existing customer upgrading to HIVE, please note that Templafy has introduced regional data clusters for hosting the Templafy solution. These will be reflected in the SAML endpoints based on the geographical location. To use the ACS URL in Okta based on your region, go to the Sign On tab of the application, check Upgrade to Templafy HIVE, and enter the respective Assertion Consumer Service value:
The Okta/Templafy SAML integration currently supports the following features:
Contact the Templafy Support team at support@templafy.com and request that they enable SAML 2.0 for your organization.
Provide the following Metadata URL with your request:
Sign into the Okta Admin dashboard to generate this value.
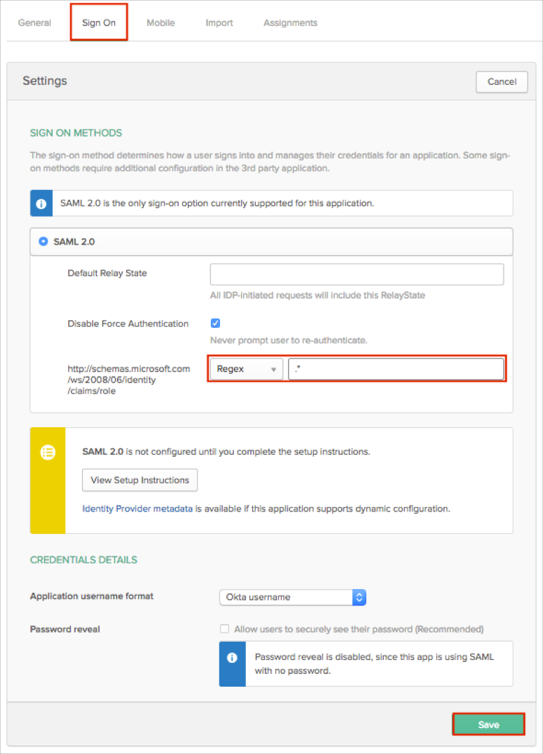
OPTIONAL: If you want pass Okta groups as part of the SAML response:
In Okta, select the Sign On tab for the Templafy app, then click Edit.
Select your preferred group filter from the http://schemas.microsoft.com/ws/2008/06/identity/claims/role dropdown list (the Regex rule with the value ".*" in order to send *all* Okta groups to the Templafy instance we used in our example) for the attribute.
Click Save.
In Okta, select the Sign On tab for Templafy SAML app, then click Edit:
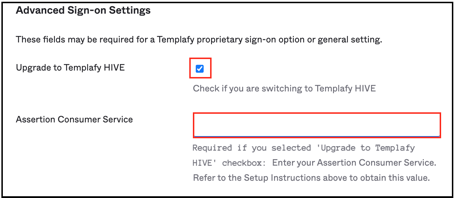
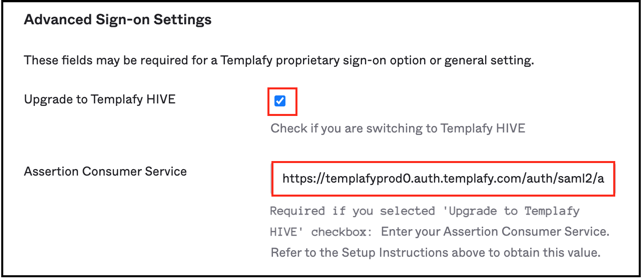
Scroll down to ADVANCED SIGN-ON SETTINGS.
Check Upgrade to Templafy HIVE.
Enter your Assertion Consumer Service based on your location. Guidelines for your location:
Click Save
The Templafy Support team will process your request. After receiving a confirmation email, you can start assign people to the application.
Done!
The following SAML attributes are supported:
| Name | Value |
|---|---|
| http://schemas.xmlsoap.org/ws/2005/05/identity/claims/givenname | user.firstName |
| http://schemas.xmlsoap.org/ws/2005/05/identity/claims/surname | user.lastName |
| http://schemas.xmlsoap.org/ws/2005/05/identity/claims/emailaddress | user.email |
| http://schemas.microsoft.com/ws/2008/06/identity/claims/role | This will be configured in the app UI; see groups attribute instructions (step 3) above. |
In addition to the default attributes, Okta supports the following custom attributes:
| Name | Value |
|---|---|
| http://schemas.templafy.com/2016/06/identity/claims/jobtitle | appuser.title |
| http://schemas.xmlsoap.org/ws/2005/05/identity/claims/mobilephone | appuser.mobilePhone |
| http://schemas.templafy.com/2016/06/identity/claims/phonenumber | appuser.primaryPhone |
| http://schemas.xmlsoap.org/ws/2005/05/identity/claims/streetaddress | appuser.streetAddress |
| http://schemas.templafy.com/2016/06/identity/claims/city | appuser.city |
| http://schemas.xmlsoap.org/ws/2005/05/identity/claims/stateorprovince | appuser.state |
| http://schemas.xmlsoap.org/ws/2005/05/identity/claims/postalcode | appuser.zipCode |
| http://schemas.templafy.com/2016/06/identity/claims/preferredlanguage | appuser.preferredLanguage |
| http://schemas.templafy.com/2016/06/identity/claims/department | appuser.department |
| http://schemas.xmlsoap.org/ws/2005/05/identity/claims/country | appuser.country |
| http://schemas.templafy.com/2016/06/identity/claims/customclaim1 | appuser.customClaim1 |
| http://schemas.templafy.com/2016/06/identity/claims/customclaim2 | appuser.customClaim2 |
| http://schemas.templafy.com/2016/06/identity/claims/customclaim3 | appuser.customClaim3 |
Here is an example describing how to add and use the additional Department attribute:
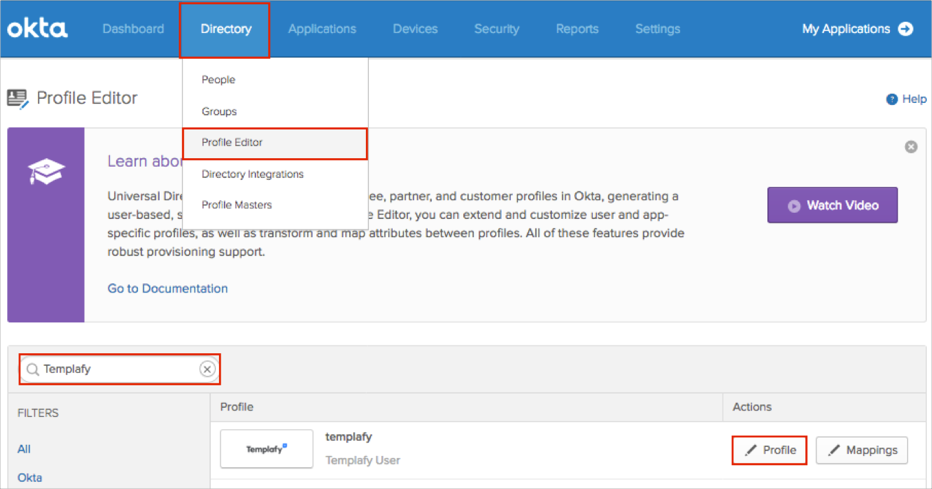
In Okta, navigate to Directory > Profile Editor.
Search for the Templafy app, then click Profile:
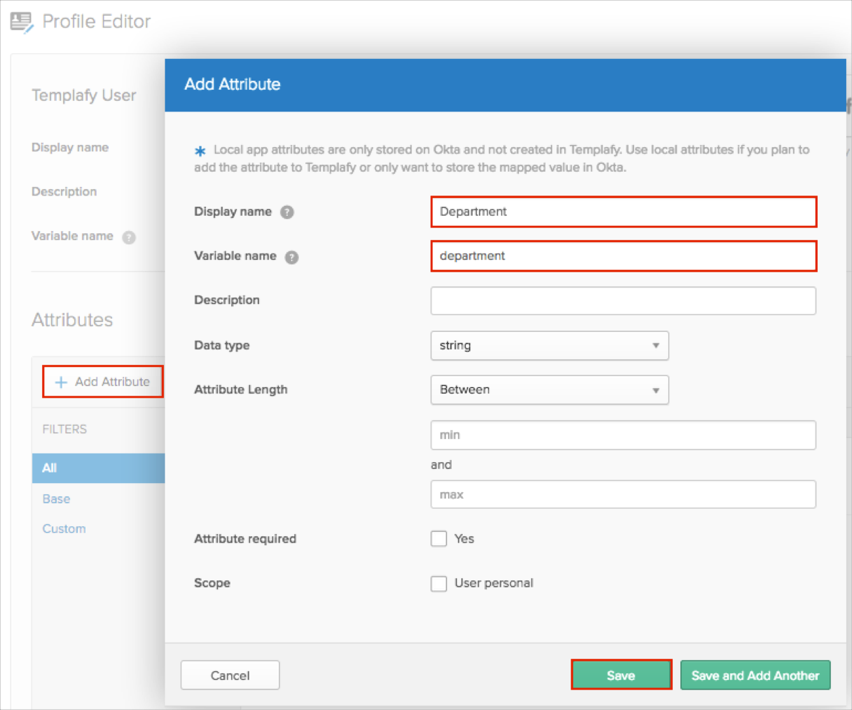
Click Add Attribute, then enter the following:
Display Name: Enter a preferred attribute name. In our example, we used Department.
Variable Name: Enter department.
Important: In our example we are adding the department attribute. You must use the following variable names (case-sensitive) for the custom attributes: title, mobilePhone, primaryPhone, streetAddress, city, state, zipCode, preferredLanguage, department, country, customClaim1, customClaim2, customClaim3.
Click either Add Attribute or Save and Add Another.
Note: Scope (optional): If you check User personal, the current attribute will be available once you assign the user to the Templafy application and will not be available once you assign the group to the app.
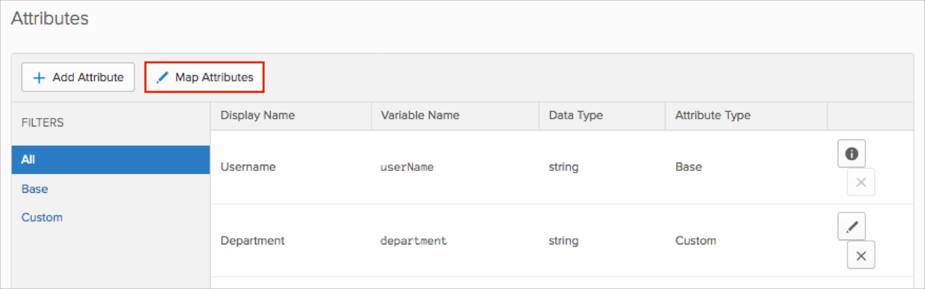
Click Map Attributes:
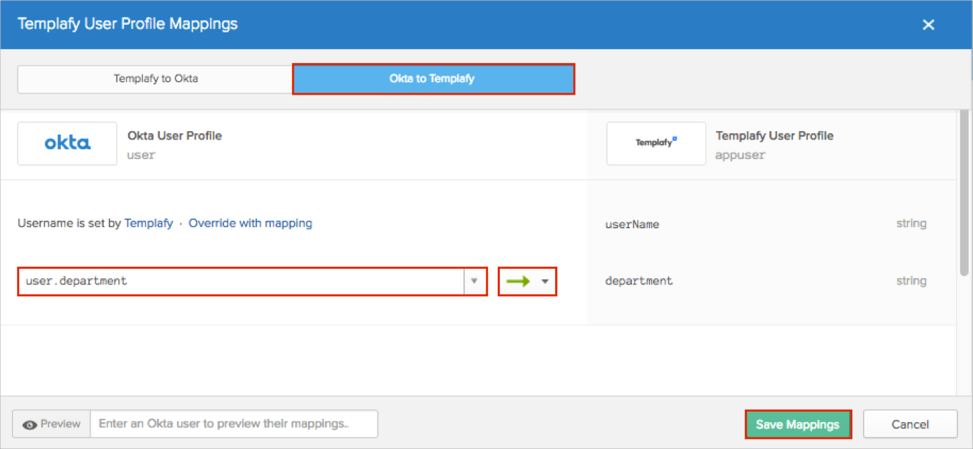
Select the Okta to Templafy tab.
Start typing the required attribute from the Okta Base User profile (or use the dropdown list) and select the attributes you want to map.
Note: In our example, we have selected the Department attribute, and then use the green arrows (Apply mapping on user create and update).
Click Save Mappings:
Click Apply updates now:
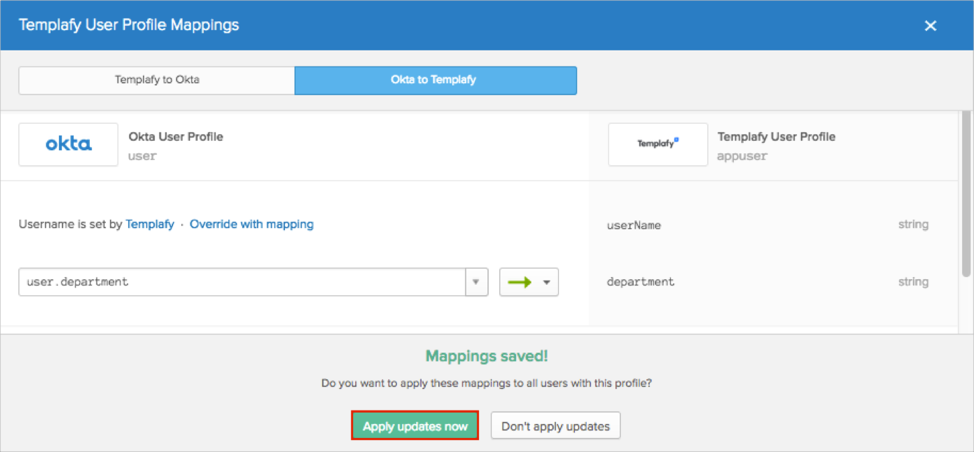
Okta will now pass the Department attribute with the value of the Department field from the Okta Base User Profile.
Open the following URL: https://[yourSubDomainValue].templafy.com/.