These SAML instructions contain Single Log-Out (SLO) configuration steps that are optional. If you are not going to use SLO, skip the steps that are marked as [Optional SLO] and highlighted in blue font.
The Okta/Tableau Server SAML integration currently supports the following features:
For more information on the listed features, visit the Okta Glossary.
Save the following file as idp_metadata.xml.
Sign into the Okta Admin dashboard to generate this value.
SAML Configuration:
For v2018.2 and higher: Follow the steps described in Tableau's SAML Configuration Overview.
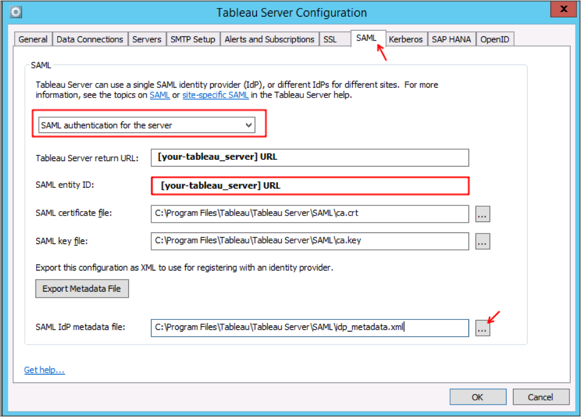
For v2018.1 and lower: Open the Tableau Server Configuration Utility and enter the following information:
Select SAML authentication for the server.
SAML entity ID: Make a copy of this value.
SAML IdP metadata file: Click Browse files to locate and upload the idp_metadata.xml file you saved in step 1 to Tableau Server.
Click OK.
In Okta, select the Sign On tab for the Tableau Server app, then click Edit.
[Optional SLO]: Check Enable Single Logout.
[Optional SLO]: Upload your Tableau Server Certificate to Okta.
Enter the SAML Entity ID value you made a copy of in step 2 into the corresponding field.
Click Save:

Done!
The following SAML attributes are supported:
| Name | Value |
|---|---|
| username | user.userName |
Go to: [your-tableau_server] URL.