Enabling SAML will affect all users who use this application, which means that users will not be able to sign-in through their regular log-in page. They will only be able to access the app through the Okta service.
Backup URL
Successfactors does not provide backup log-in url where users can sign-in using their normal username and password. You can call Successfactors Customer Support to turn off SAML, if necessary.
The Okta/SuccessFactors SAML integration currently supports the following features:
For more information on the listed features, visit the Okta Glossary.
You will need these auto-generated values for your configuration:
SAML Issuer: Copy and paste the following:
Sign into the Okta Admin Dashboard to generate this variable.
SAML Verifying Certificate: Copy and paste the following:
Sign into the Okta Admin Dashboard to generate this variable.
The redirect URL when logout: Copy and paste the following:
Sign into the Okta Admin Dashboard to generate this variable.
Single sign on redirect service location (to be provided by idp): Copy and paste the following:
Sign into the Okta Admin Dashboard to generate this variable.
Contact SuccessFactors' Customer Support and ask them to enable SAML 2.0 Single Sign-On for your account.
Include the following information with your request:
SAML Issuer: Copy and paste the Issuer value from the Variables section.
Relying Party Description: localhost
Require Assertion Signature: Yes
Enable SAML Flag: Enabled
Login Request Signature: No
Login Response Signature: Yes
SAML Profile: Browser/Post Profile
Enforce Certificate Valid Period: Yes
SAML Verifying Certificate: Copy and paste the Certificate value from the Variables section.
The redirect URL when logout: Copy and paste the Redirect value from the Variables section.
Enable sp initiated login (AuthnRequest): Yes.
Default issuer: the checkbox is checked.
Single sign on redirect service location (to be provided by idp): Copy and paste the Single sign on redirect service location value from the Variables section.
Send request as Company-Wide issuer: Yes.
SuccessFactors' Customer Support team will process your request and will provide you with SAML URL and Audience Restriction (if you have your custom value) values.
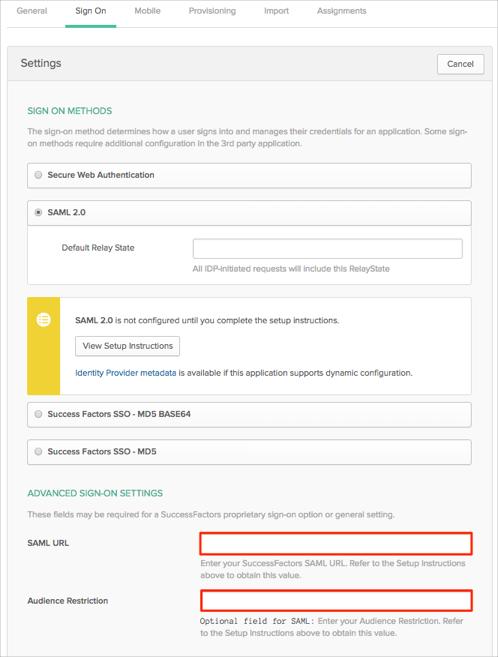
In Okta, select the Sign On tab for SuccessFactors SAML app, then click Edit:
Enter the SAML URL and Audience Restriction values provided to you by SuccessFactors into the corresponding fields.
Click Save:
Done!
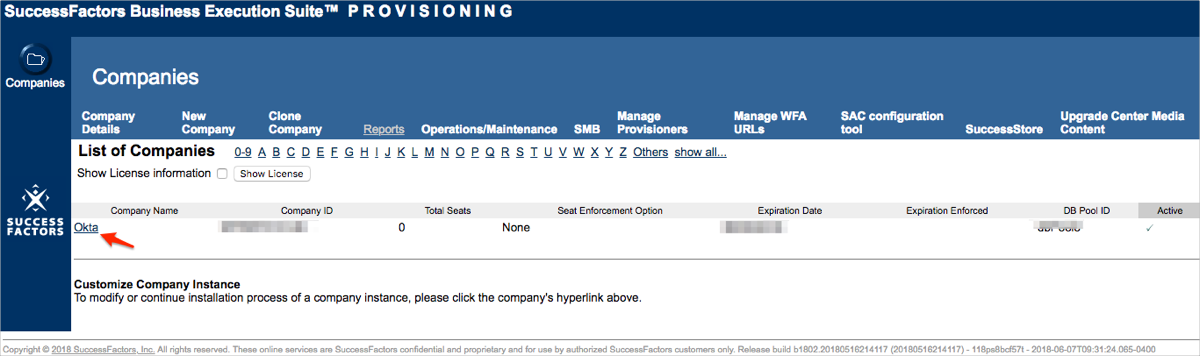
Important!: The access to provisioning is restricted to either SAP SuccessFactors support or their implementation partner.
Login to your SAP SuccessFactors Provisioning tool.
Select your company:
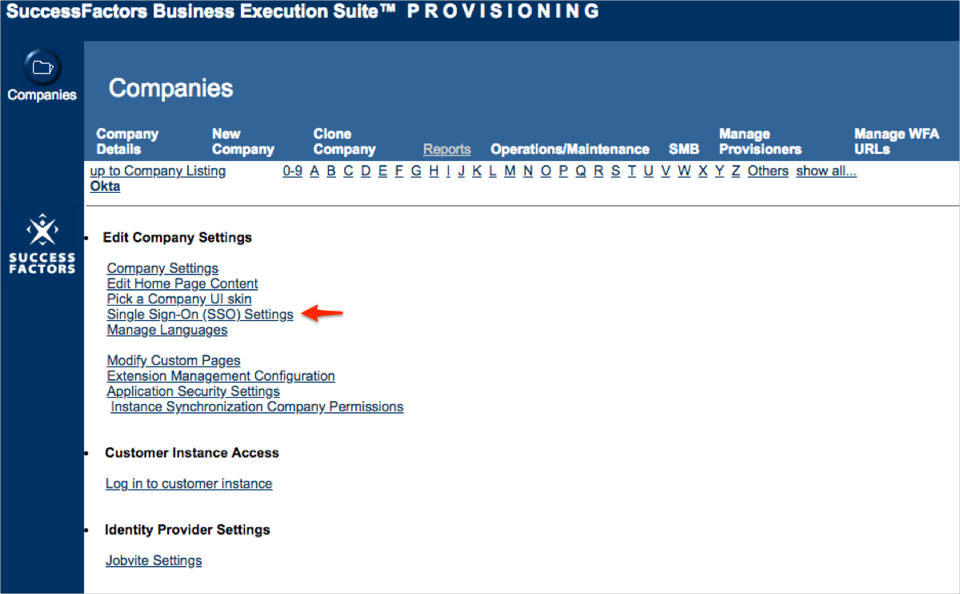
Select Single Sign-On (SSO) Settings:
Follow the steps below:
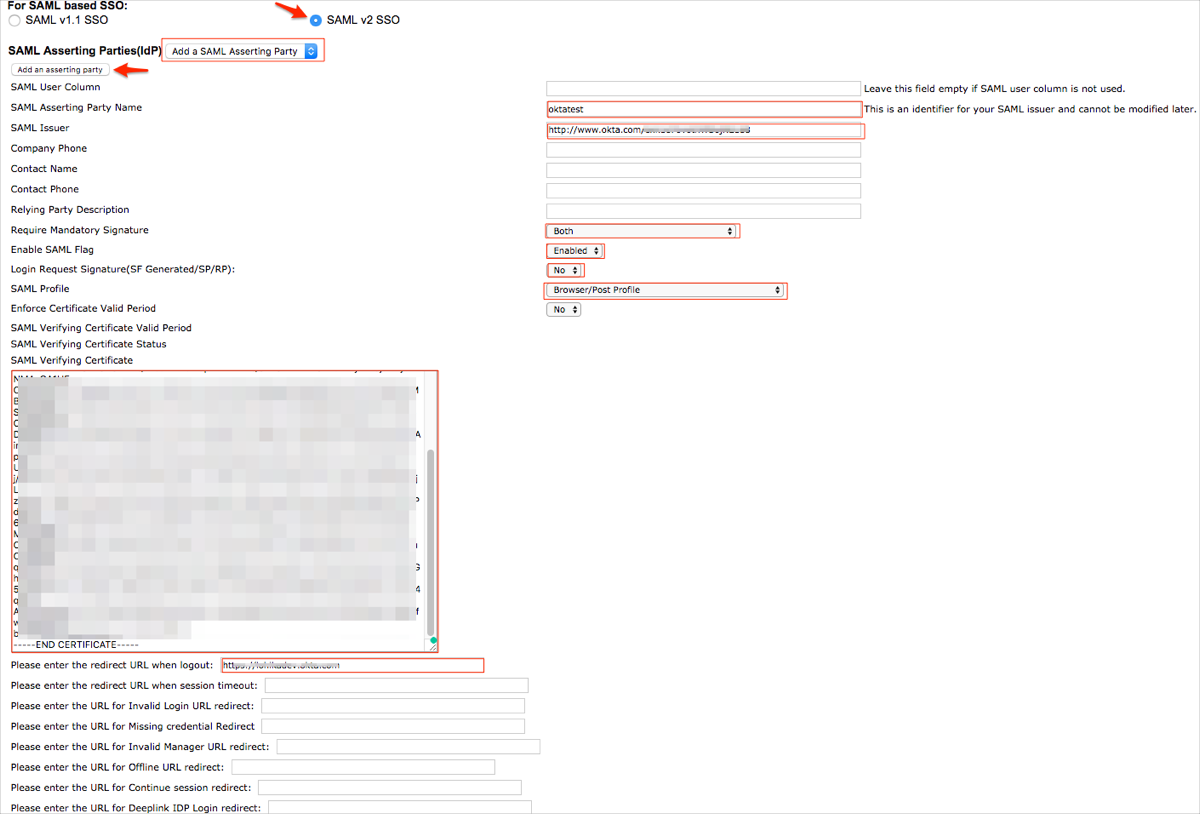
Scroll down and select SAML v2 SSO.
SAML Asserting Parties(IdP): Select Add a SAML Asserting Party from the dropdown.
SAML Asserting Party Name: Enter a preferred name. It should be a unique identifier.
SAML Issuer: Copy and paste the Issuer value from the Variables section.
Require Mandatory Signature: Select Both.
Enable SAML Flag: Select Enabled.
Log in Request Signature(SF Generated/SP/RP): Select No.
SAML Profile: Choose Browser/Post Profile.
SAML Verifying Certificate: Copy and paste the Verifying Certificate value from the Variables section.
Please enter the redirect URL when logout: Copy and paste the Redirect URL value from the Variables section.
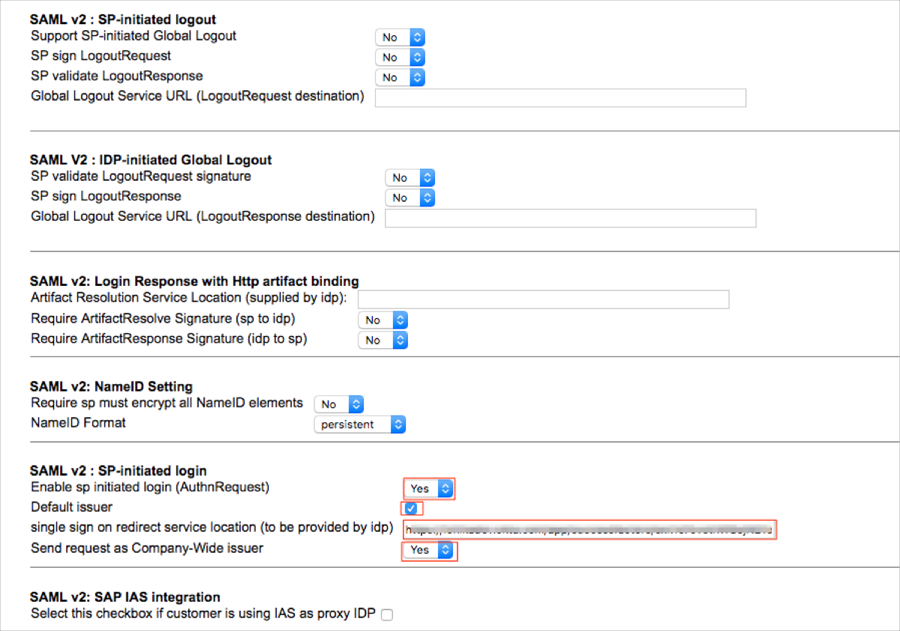
Scroll down to the SAML v2 : SP-initiated login section and enter the following:
Enable sp initiated login (AuthnRequest): Select Yes.
Default issuer: Select the checkbox.
single sign on redirect service location (to be provided by idp): Copy and paste the Single sign on redirect service location value from the Variables section.
Send request as Company-Wide issuer: Select Yes.
Click Add an asserting party.
Select your recently saved Assertion Party from the dropdown menu:

Navigate to Single Sign On Features:
Enter a user-defined token in the Reset Token field, for example, 123.
Note: For SAML 2, you can type anything in the token. The Reset Token feature is only used as the ON or OFF switch. If any value is saved, the SAML SSO is switched on. If a blank value is saved, the SAML SSO is switched off.
Click Save Token.

In Okta, select the Sign On tab for the SuccessFactors SAML app, then click Edit:
SAML URL: Enter your SAML URL value.
Note: This should be provided to you by SuccessFactors and look similar to:
https://performancemanager.successfactors.com.
Audience URI (optional): Enter your custom Audience Restriction (for example: acme.example.com).
Note: If you don’t have your custom value leave the field as blank.
Click Save.
Done!
Make sure that you entered the correct value in the Company ID field under the General tab. Using the wrong value will prevent you from authenticating via SAML to SuccessFactors.
Go to [your-successsfactors-site-url].