Okta

How to Configure SAML 2.0 for Roambi Business

Before you begin

Read this before you enable SAML

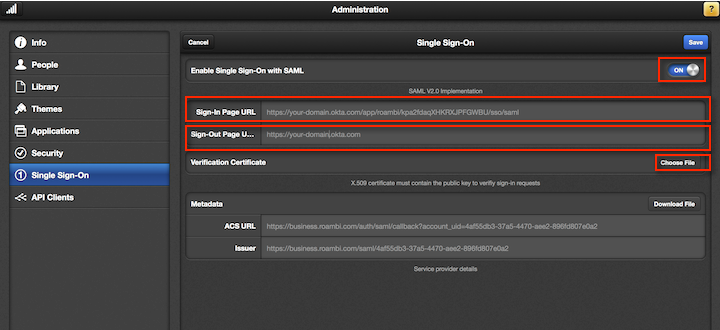
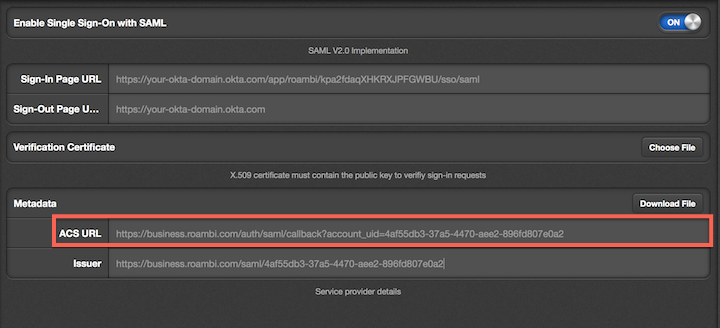
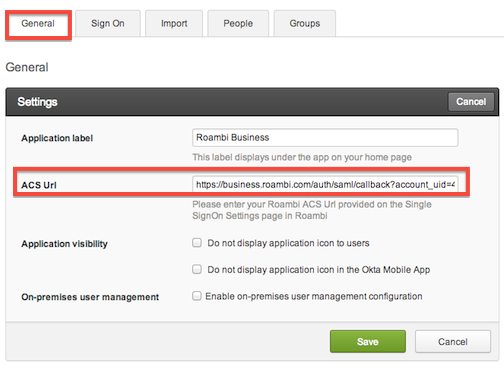
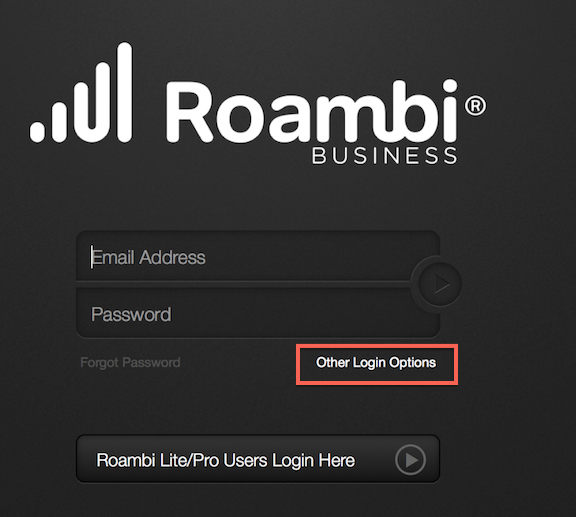
Roambi Business supports a SP-initiated SAML flow. Before completing the SAML setup, be sure to read the Understanding the Roambi Business SAML Flow section at the end of this document. Okta recommends a Bookmark app for Roambi Business to simulate an IDP-initiated flow.

  1. Log in to Roambi Business and select Invite Users.
  2. On the left menu, select Single Sign-On.

    Roambi_1.png
  3. Set Enable Single Sign-On with SAML to ON.
  4. Copy and paste the following in the Sign-in Page URL field:

    Sign into the Okta Admin dashboard to generate this value. 
  5. Copy and paste the following in the Sign-Out Page URL field:

    Sign into the Okta Admin dashboard to generate this value.
  6. Download the following certificate. Select Choose File in the Verification Certificate field and choose the file you just downloaded.

    Sign into the Okta Admin dashboard to generate this value.
  7. Copy the ACS URL on the Roambi Single Sign-On page.
    Screen_Shot_2014-04-07_at_4.51.08_PM.png

  8. In Okta, go to the General tab and paste the URL you copied in Step 7 into the ACS Url field.
    Screen_Shot_2014-04-07_at_4.53.33_PM.png

  9. Save the settings in both Okta and Roambi.
  10. Done!

Understanding the Roambi Business SAML Flow

  1. Roambi Business currently supports the SP-initiated SAML flow. After you set up SAML for your account, go to https://business.roambi.com/login to authenticate with SAML.
  2. Select Other Login Options.

    Screen_Shot_2014-04-07_at_3.25.09_PM.png
  3. Select Single Sign-On, enter your Email Address, and select Enter.
  4. If you already have an active session in Okta, you are directly logged into Roambi Business. If you do not have an active session in Okta, you are redirected to Okta to enter Okta credentials. After you have entered your Okta credentials, you are logged into Roambi Business.
  5. For the convenience of your end users, Okta recommends that you hide the Roambi app and set up a Bookmark app with the Roambi logo. For instructions on setting up a Bookmark app and hiding the original app, see Simulating an IDP-initiated Flow with the Bookmark App.