
The Okta/RStudio Connect SAML integration currently supports the following features:
For more information on the listed features, visit the Okta Glossary.
Follow the instructions in the RStudio Connect: Admin Guide to install RStudio Connect to install RStudio Connect.
Configure SAML as described in the configuration guide.
For the IdPMetaData value, use the metadata URL below:
Sign into the Okta Admin dashboard to generate this value.
Complete the SAML configuration. Your RStudio Connect configuration file should look like the following:
[Server]
SenderEmail = test@example.com
; Replace Address with the value you specified in the Server.Address field under the General tab in Okta.
Address =

[Http]
Listen = :3939

[Authentication]
Provider = saml

[SAML]
Logging = true
; Replace IdPMetaData with the value from step 3
IdPMetaData =
IdPAttributeProfile = Okta
SSOInitiated = IdPAndSP
GroupsAutoProvision = true
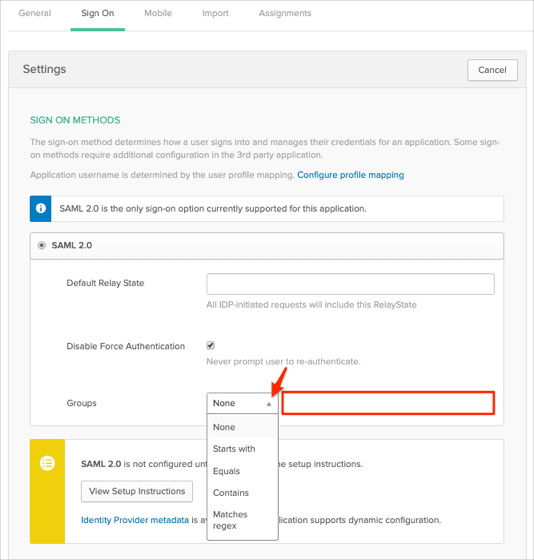
Optional: Group Attribute Steps: To send groups as a part of SAML assertion, in Okta select the Sign On tab for the RStudio Connect app, then click Edit.
Select the appropriate filter from the Groups drop-down menu, then type the preferred value into the field.
Click Save.
Note: To send all groups a user is assigned to, select Regex and type .* (dot and asterix).

Make sure that you entered the correct value in the Server.Address field under the General tab in Okta. Using the wrong value will prevent you from authenticating via SAML to RStudio Connect.
The following SAML attributes are supported:
| Name | Value |
|---|---|
| FirstName | user.firstName |
| LastName | user.lastName |
| user.email | |
| Username | user.userName |
| Groups | This is configured in the app UI; see Group attribute instructions (step 5) above. |
Go to your Server.Address.
Click Log in:
