Enabling SAML will affect all users who use this application, which means that users will not be able to sign in through their regular log in page. They will only be able to access the app through the Okta service.
Backup URL: OutSystems does not provide a backup log in URL where users can sign in using their normal username and password. You can change the authentication mechanism and the configuration, by logging into the users application, through the login page (https://[YOUR DOMAIN]/Users/Login.aspx) using your administrator credentials.
These SAML instructions contain Single Log-Out (SLO) configuration steps that are optional. If you are not going to use SLO, skip the steps that are marked as [Optional SLO], and highlighted in blue font.
The Okta/OutSystems SAML integration currently supports the following features:
For more information on the listed features, visit the Okta Glossary.
Log in to OutSystems.
Navigate to Configure Authentication, then select OKTA from the Authentication dropdown.

Follow the steps below:
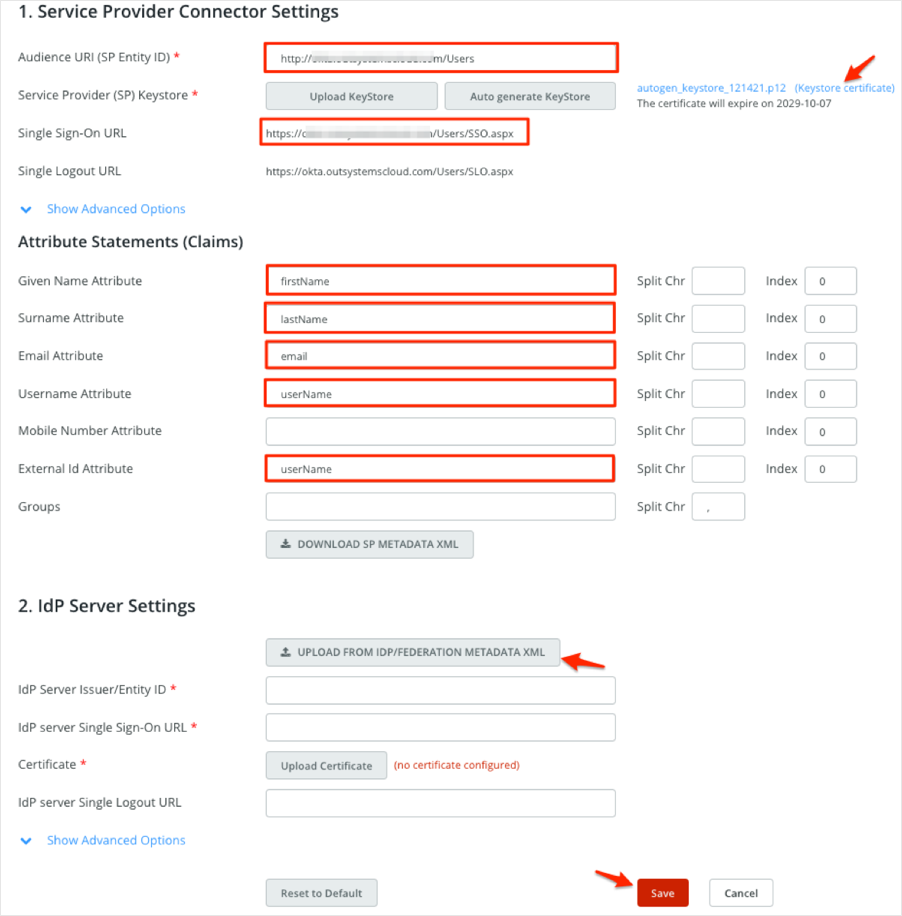
Service Provider Connector Settings
Audience URI (SP Entity ID): Make a copy of this value.
[Optional SLO]: Service Provider (SP) Keystore: Click Keystore certificate to download the SP certificate.
Single Sign-On URL: Make a copy of this value.
[Optional SLO]: Single Logout URL: Make a copy of this value.
Attribute Statements (Claims)
Given Name Attribute: Enter given
Surname Attribute: Enter surname
Email Attribute: Enter email
Username Attribute: Enter username
External Id Attribute: Enter username
IdP Server Settings
Click UPLOAD FROM IDP/FEDERATION METADATA XML and upload the following metadata file:
Sign into the Okta Admin dashboard to generate this value.
Click Save:
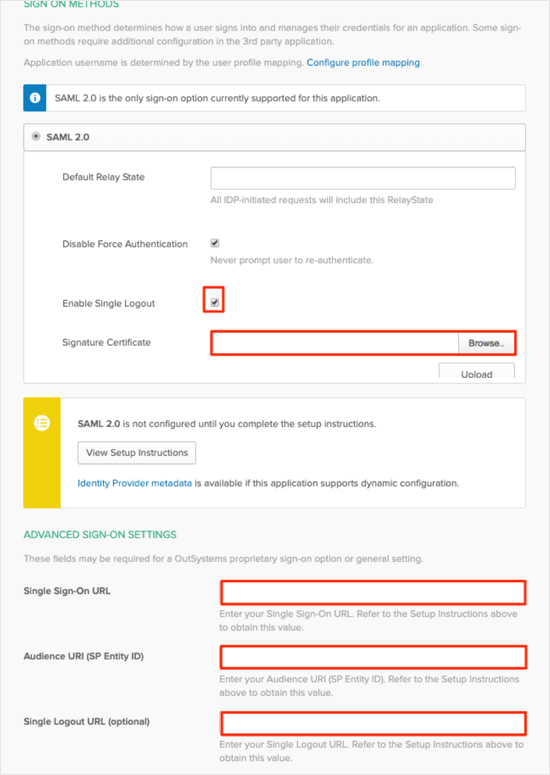
In Okta, select the Sign On tab for the OutSystems SAML app, then click Edit
[Optional SLO]: Check Enable Single Logout.
[Optional SLO]: Upload the SP certificate (Keystore certificate) you saved in step 3 to the Signature Certificate field.
Single Sign-On URL: Enter your Single Sign-On URL you made a copy of in step 3.
Audience URI (SP Entity ID): Enter your Audience URI (SP Entity ID) you made a copy of in step 3.
[Optional SLO]: Single Logout URL (optional): Enter your Single Logout URL you made a copy of in step 3.
Click Save:
[Optional SLO]: Go back to the Configure Authentication page in OutSystems and follow the steps below:
Download the Okta metadafile again from step 3. Notice that the SAML Metadata now includes the SingleLogoutService:

In IdP Server Settings, click UPLOAD FROM IDP/FEDERATION METADATA XML and upload your new Okta Metadata. Notice that the field Single Logout Response URL is now populated.
Click Save:
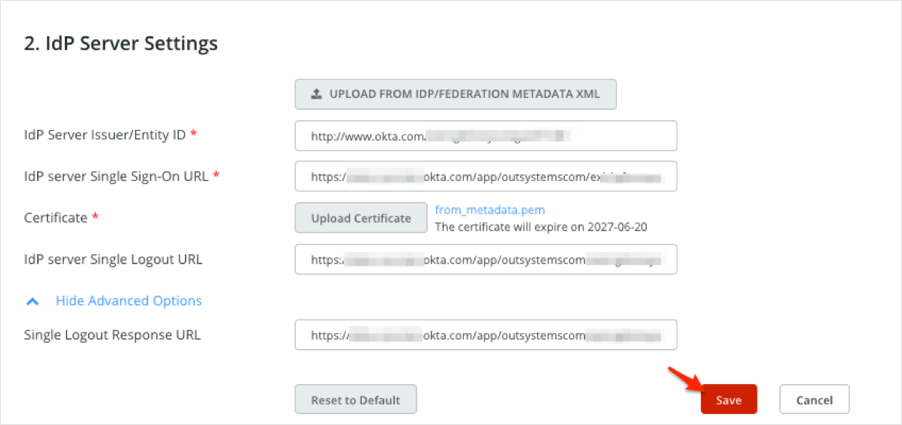
Done!
The following SAML attributes are supported:
| Name | Value |
|---|---|
| given | user.firstName |
| surname | user.lastName |
| user.email | |
| username | user.userName |
Go to Audience URI (SP Entity ID) you made a copy of in step 3.