Read this before you enable SAML
Enabling SAML will affect all users who use this application, which means that users will not be able to sign-in through their regular log-in page. They will only be able to access the app through the Okta service.
Backup URL
NetScaler Gateway does not provide a backup log-in URL where users can sign-in using their normal username and password.
The Okta/Netscaler Gateway SAML integration currently supports the following features:
For more information on the listed features, visit the Okta Glossary.
You will need to copy some of the following variables to use during your Citrix Gateway SAML integration configuration:
x.509 Certificate: Save the following in .cert format
Sign into the Okta Admin Dashboard to generate this variable.
Redirect URL: Copy and paste the following:
Sign into the Okta Admin Dashboard to generate this variable.
Single Logout URL: Copy and paste the following:
Sign into the Okta Admin Dashboard to generate this variable.
Issuer Name: Copy and paste the following:
Sign into the Okta Admin Dashboard to generate this variable.
Select the appropriate configuration instructions:
Login to the Citrix NetScaler admin interface as an administrator.
Navigate to Traffic Management > SSL > Certificates > CA Certificates.
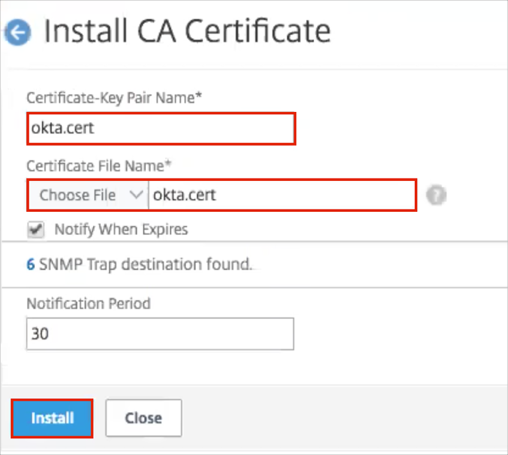
Click Install:

Certificate-Key Pair Name: Enter okta.cert.
Save the x.509 Certificate as described in Variables, then select Choose File > Local to locate the okta.cert file.
Click Install:
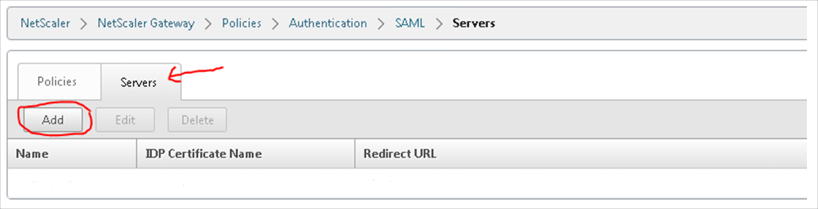
Navigate to NetScaler Gateway > Policies > Authentication > SAML.
In the main body of the SAML configuration page, select Servers, then click Add:

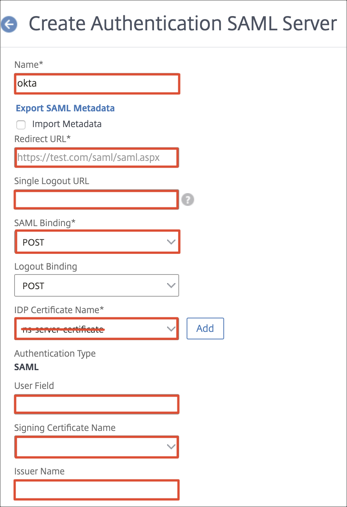
A Create Authentication SAML Server form opens.
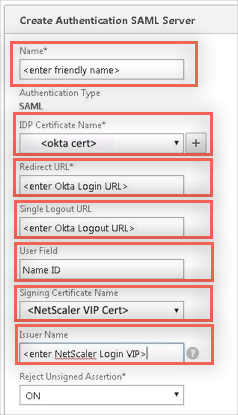
Enter the following:
Name: Enter any name to define the server settings. We used okta in our example.
Redirect URL: Copy and paste this value from the Variables section above.
Single Logout URL: Copy and paste this value from the Variables section above.
SAML Binding: Select POST.
IDP Certificate Name: select okta.cert certificate from the dropdown list.
User Field: Enter NameID.
Signing Certificate Name: Select the name of the certificate bound to your Citrix Gateway VIP.
Issuer Name: Copy and paste this value from the Variables section above.
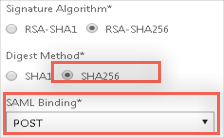
Signature Algorithm: Select RSA-SHA256.
Digest Algorithm: Select SHA256.
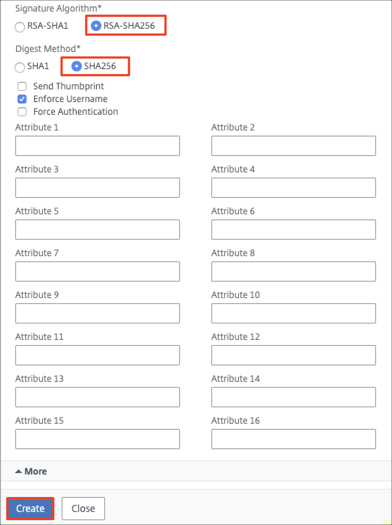
Click Create.
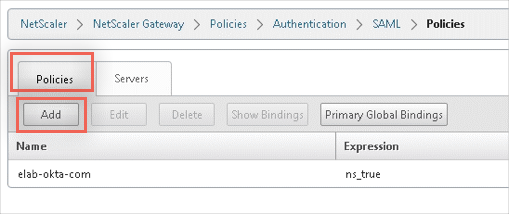
Select Policies.
Click Add to add new policy.

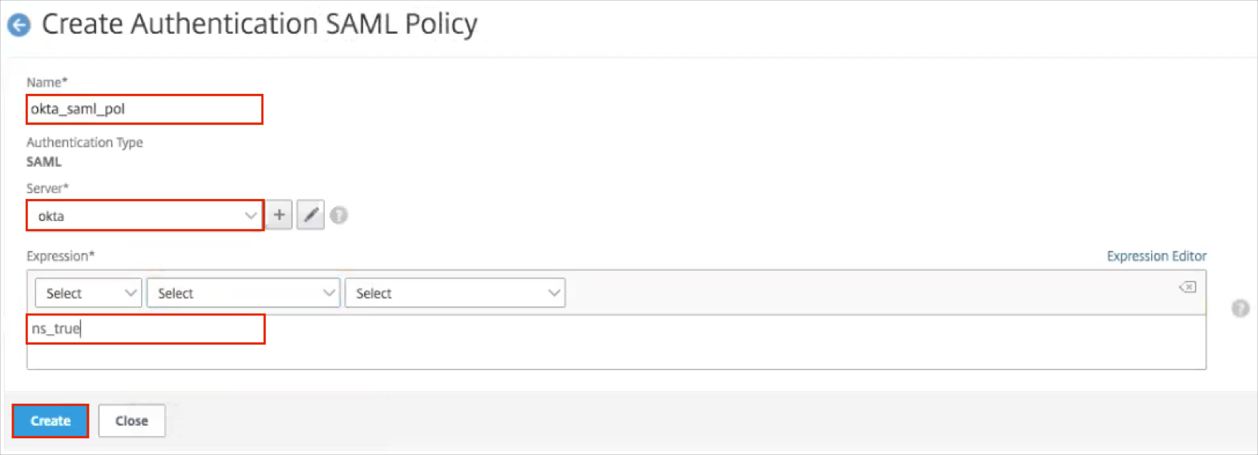
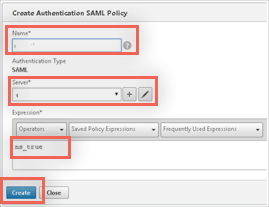
A Create Authentication SAML Policy form opens.
Enter the following:
Name: Name your policy.
Server: Use the dropdown menu to select the Server Entry you just created. It may be added by default if it is the only one that exists.
Expression: Enter ns_true.
This enables this policy to always be active when bound to a VIP. A more restrictive expression can be created to allow for more control of when this SAML policy is used and should be based on the customers need.
Click Create.
You now need to add this SAML authentication policy as the primary authentication policy:
Navigate to NetScaler Gateway > Virtual Servers.
Select a required one:

In the Properties of your NetScaler VIP, edit the Basic Authentication settings:

Unbind any authentication policies:

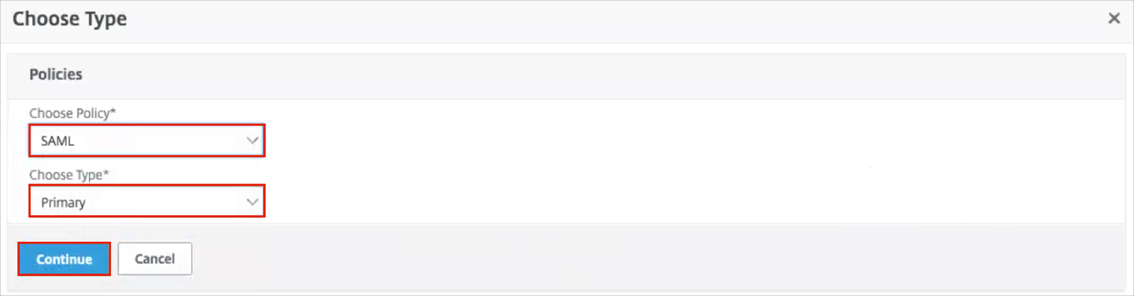
Click the + (plus) button:

Choose Policy: Select SAML.
Choose Type: Select Primary.
Click Continue:
Under Policy Binding select the policy that we created in the steps 12-14 above.
Click Bind.

As result the only SAML policy will appear under the Basic Authentication section:

Scroll down to the bottom of the page.
Click DONE.
Done!
Login to the Citrix NetScaler admin interface as an administrator.
Navigate to NetScaler Gateway > Policies > Authentication SAML.
In the main body of the SAML configuration page, select Servers, then click Add:
A Create Authentication SAML Server form opens.
Enter the following:
Name: Enter any name to define the server settings.
SAML - IDP Certificate Name: Click the plus (+) sign next to the text field, then do the following:
Save the x.509 Certificate as described in Variables.
Click Browse to locate the certificate you just saved, then click Upload.
Select Local.

Redirect URL: Copy and paste this value from the Variables section above.
Single Logout URL: Copy and paste this value from the Variables section above.
User Field: Enter NameID.
Signing Certificate Name: Select the name of the certificate bound to your Citrix Gateway VIP. This is the one you uploaded earlier.
Issuer Name: Copy and paste this value from the Variables section above.
Scroll down to the Signature Algorithm section and enter the following:
Digest Method: Set this to SHA256.
SAML Binding: Select POST.
Click OK to save the server definition.
Back in the SAML section, select the Policies tab, then click Add:
A Create Authentication SAML Policy form opens.
Enter the following information:
Name: Name your policy.
Server: Use the dropdown menu to select the Server Entry you just created. It may be added by default if it is the only one that exists.
Expression: Enter ns_true.
This enables this policy to always be active when bound to a VIP. A more restrictive expression can be created to allow for more control of when this SAML policy is used and should be based on the customers need.
Click OK.
You now need to add this SAML authentication policy as the primary authentication policy:
In the Properties of your NetScaler VIP, edit the Authentication settings.
Remove any other policies and add SAML as the Primary policy as shown below.
Save your chances.

Done!
A policy expression can be created to control use of SAML for authentication.
Open your portal login URL.