Enabling SAML will affect all users who use this application, which means that users will not be able to sign-in through their regular log-in page. They will only be able to access the app through the Okta service.
Backup URL
Miro (formerly RealtimeBoard) does not provide backup log-in URL where users can sign-in using their normal username and password. You can email Miro Support (support@miro.com) to turn off SAML, if necessary.
The Okta/Miro (formerly RealtimeBoard) SAML integration currently supports the following features:
For more information on the listed features, visit the Okta Glossary.
Login to Miro as a company administrator.
Click on your account icon, then select Settings.
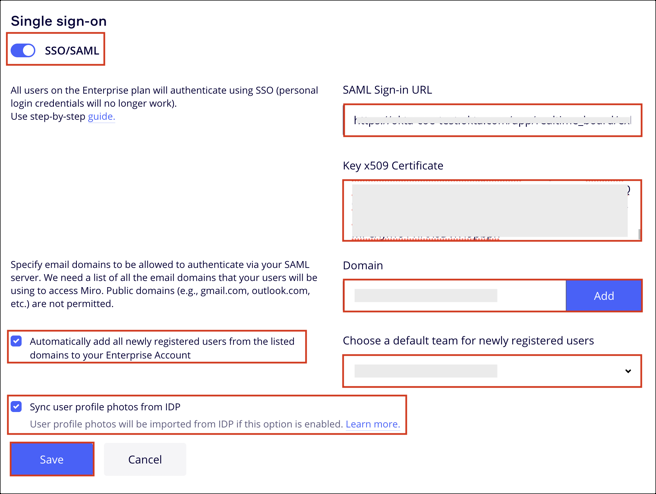
Go to Enterprise Integrations, then under Single sign-on, follow the steps below:
Switch on Enable SSO/SAML.
SAML Sign-in URL: Copy and paste the following:
Sign into the Okta Admin Dashboard to generate this variable.
Key x509 Certificate: Copy and paste the following:
Sign into the Okta Admin Dashboard to generate this variable.
Domain: Specify the email domains to be allowed to authenticate via your SAML server.
Optional: Automatically add all newly registered users from the listed domains to your Company Account (optional): Check this to enable Just In Time (JIT) Provisioning, then select the appropriate team from Choose a default team for newly registered users.
Optional: Sync user profile photos from IDP: Uncheck this if you don't need to sync user profile.
Note: If you need to sync user profile, see Learn more for the details.
To add and map the ProfilePicture attribute in the Okta OIN application, see How to define and configure a custom SAML attribute statement.
Click Save:
Done!
The default ACS URL value is https://miro.com/sso/saml. If you have a custom ACS URL value, contact the Miro Support team to get this value. Then enter your custom ACS URL obtained from Miro under the Sign On tab in Okta (Advanced Sign-on Settings section).
The default Entity ID value is https://miro.com/. If you have a custom Entity ID value, contact the Miro Support team to get this value. Then enter your custom Entity ID obtained from Miro under the Sign On tab in Okta (Advanced Sign-on Settings section).
The following SAML attributes are supported:
| Name | Value |
|---|---|
| FirstName | user.firstName |
| LastName | user.lastName |
Go to: https://miro.com/sso/login/
Enter your email, then click Sign in.