The Okta/Mural SAML integration currently supports the following features:
For more information on the listed features, visit the Okta Glossary.
In Okta, select the Sign On tab for the Mural SAML app, then click Edit.
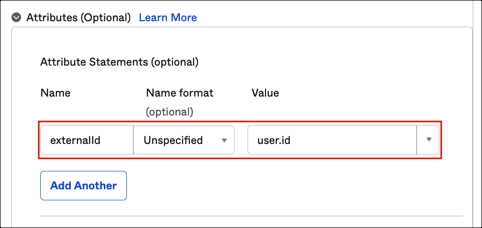
[Optional, if you want to pass Okta user id to the Mural]:
In the Attributes (Optional) section, add the externalId attribute and set the following value: user.id
Scroll down to Advanced Sign-on Settings and enter:
Entity ID: https://app.mural.co (for both Production and Scim environments)
Assertion Consumer Service URL:
Production: https://api.mural.co/api/v0/authenticate/saml2/callback
Scim: https://scim.mural.engineering/api/v0/authenticate/saml2/callback
Application username format: Select Email.
Click Save.
Still in Okta, select the Assignments tab and assign a user to the application.
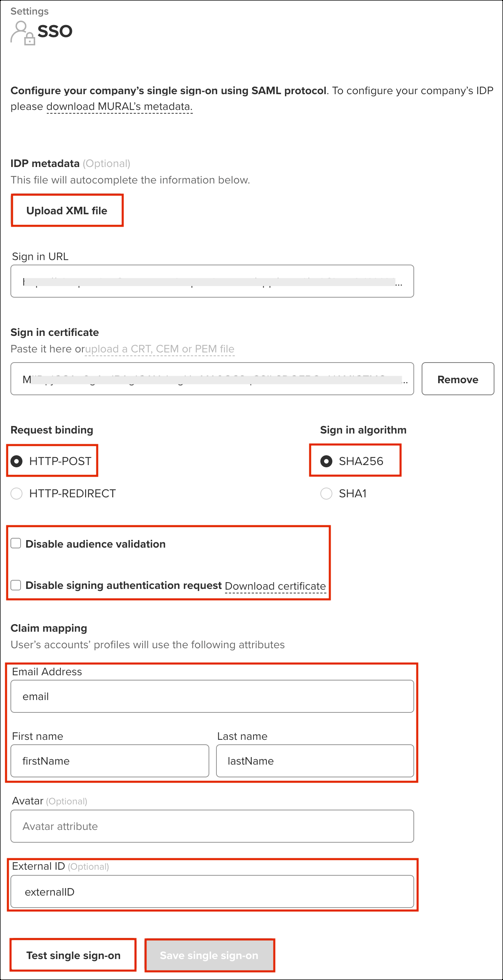
Sign in to your Mural account as an administrator.
Go to Company Dashboard > SSO.
Under SSO settings, enter the following:
IDP metadata: Save the following as metadata.xml, then upload it:
Sign in to Okta Admin app to have this variable generated for you.
Request binding: Select HTTP-POST
Sign in algorithm: Select SHA256
Leave Disable audience validation and Disable signing authentication request unchecked.
In the Claim mapping section enter the following:
Click Test single sign-on.
After successful testing, click Save single sign-on.
The application now supports SP-initiated SSO. If you want to enable IdP-initiated flow:
Contact the Mural Support team and ask them to provide you with the Default Relay State value.
Enter the Default Relay State value under the Sign On tab for the Mural SAML app in Okta.
Note: You need to activate IdP-initiated SSO in order for JIT (Just In Time) Provisioning to work properly.
Done!
The following SAML attributes are supported:
| Name | Value |
|---|---|
| user.email | |
| firstName | user.firstName |
| lastName | user.lastName |
| externalId | user.id (steps 1a, and 5) |
Open your Mural Login URL.
Enter your Work email.
Click Sign In.