The Okta/IntSights SAML integration currently supports the following features:
For more information on the listed features, visit the Okta Glossary.
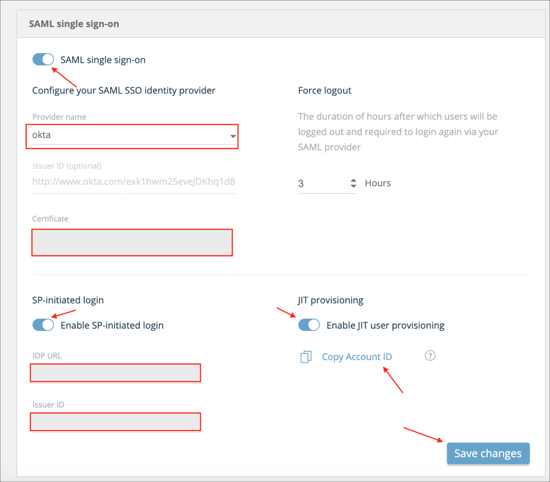
Log in to IntSights platform as an administrator.
Go to Settings > Authentication > SAML single sign on.
Enter the following:
Check SAML single sign on.
Provider name: Select okta.
Certificate: Save the following certificate as okta.cert, then upload it to IntSights:
Sign into the Okta Admin Dashboard to generate this variable.
Check Enable SP-initiated login.
IDP URL: Copy and paste the following:
Sign into the Okta Admin Dashboard to generate this variable.
Issuer ID: Copy and paste the following:
Sign into the Okta Admin Dashboard to generate this variable.
OPTIONAL: Enable JIT User Provisioning to enable JIT and click Copy Account ID (this is your intsightsAccountId value that will be used in step 4 below).
Click Save changes:
Note: The following steps are only required if you wish to enable JIT Provisioning
In Okta, select the Sign On tab for the IntSights SAML app, then click Edit.
SAML attributes (Optional): By default, Okta supports email, firstName, lastName SAML attributes which are required for SAML authentication. If you are going to support JIT, you need to configure the following additional attributes and their values (mappings) under the Attributes (Optional) section of SAML.
| Name | Value |
|---|---|
| intsightsAccountId | Enter your intsightsAccountId value you made a copy of in step 3 |
| intsightsRole | appuser.intsightsRole |
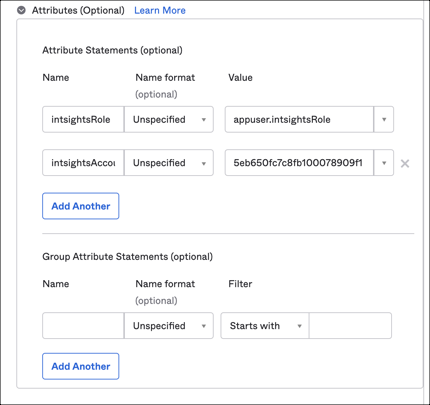
Click Save.
Now you have to add the attributes you added above to an IntSights user profile. Still in Okta, go to Directory > Profile Editor, search for your IntSights app, then select it.
Click Add Attribute.
Add the following attributes:
| Display Name | Variable Name |
|---|---|
| intsightsRole | intsightsRole |
Click the checkbox for Enum and then entire the following values:
| Display Name | Value |
|---|---|
| Admin | Admin |
| Analyst | Analyst |
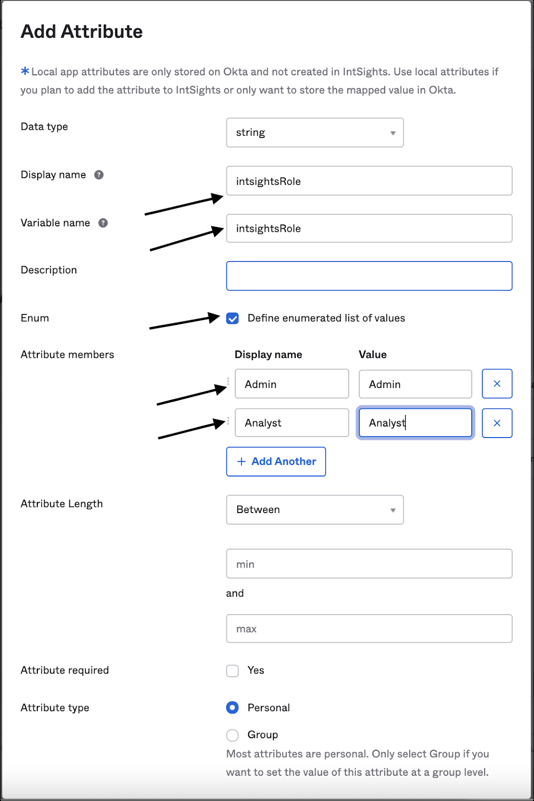
Click Save.
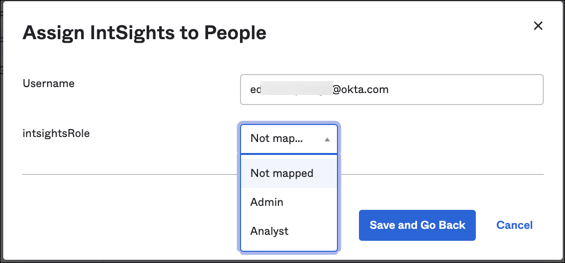
In Okta, select the IntSights app under Applications > Applications, then select the Assignments tab.
When assigning IntSights to a user, you'll see the following drop-down options which are required for all users when JIT provisioning is enabled:
Done!
Make sure that you entered the correct value in the BaseURL field under the General tab in Okta. Using the wrong value will prevent you from authenticating via SAML to IntSights.
The following SAML attributes are supported:
| Name | Value |
|---|---|
| user.userName | |
| firstName | user.firstName |
| lastName | user.lastName |
Go to your IntSights login URL.
Click Log In with SSO.
Enter your login email address.
Click Log In with SSO.