The Okta/BeyondTrust SAML integration currently supports the following features:
For more information on the listed features, visit the Okta Glossary.
Download and save the following certificate as okta.cer:
Sign into the Okta Admin Dashboard to generate this variable.
Copy okta.cer (step 1) to the following folder on the Beyondinsight server:
C:\Program Files (x86)\eEye Digital Security\Retina CS\WebSiteSAML\Certificates
Open saml.config in text editor.
saml.config is located here: C:\Program Files (x86)\eEye Digital Security\Retina CS\WebSiteSAML\saml.config
Edit saml.config as follows:
Edit the PartnerIdentityProvider Name to:
Sign into the Okta Admin Dashboard to generate this variable.
Edit the SingleSignOnServiceUrl to:
Sign into the Okta Admin Dashboard to generate this variable.
Edit the SingleLogoutServiceUrl to:
Sign into the Okta Admin Dashboard to generate this variable.
Edit the PartnerCertificateFile to:
Certificates\okta.cer
For example:
PartnerIdentityProvider Name="http://www.okta.com/abcd1234"
                             Description="Okta"
                             SignAuthnRequest="true"
                             SignLogoutRequest="true"
                             SignLogoutResponse="true"
                             WantSAMLResponseSigned="true"
                             WantLogoutRequestSigned="true"
                             WantLogoutResponseSigned="true"
                             SingleSignOnServiceBinding="urn:oasis:names:tc:SAML:2.0:bindings:HTTP-POST"
                             SingleSignOnServiceUrl="https://account.okta.com/app/beyondtrust/abcd1234/sso/saml"
                             SingleLogoutServiceBinding="urn:oasis:names:tc:SAML:2.0:bindings:HTTP-POST"
                             SingleLogoutServiceUrl=" https://account.okta.com"
                             PartnerCertificateFile="Certificates\okta.cer"/>
Save saml.config.
Open web.config in text editor.
web.config is located here: C:\Program Files (x86)\eEye Digital Security\Retina CS\WebSiteSAML\web.config
Edit web.config as follows:
Edit the PartnerIdP key value to the same value as the value you entered for PartnerIdentityProvider Name in step 4a, above.
For example:
<add key="PartnerIdP" value="http://www.okta.com/abcd1234"/>
Save web.config.
In order to pass Okta groups as part of the SAML response:
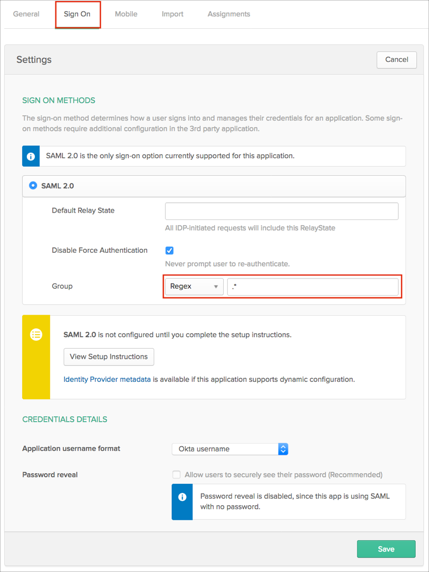
In Okta, select the Sign On tab for the BeyondTrust app, then click Edit.
Select your preferred group filter from the Group dropdown list (the Regex rule with the value ".*" in order to send *all* Okta groups to the BeyondTrust instance we used in our example) for the attribute.
Click Save.
Important: A Group in Okta must match a BeyondInsight Local Group by name. Members of this Group in Okta will be assigned the permissions associated to the corresponding group in BeyondInsight. Okta users must be members of the Group in Okta, and the Group must be passed in SAML response.
Done!
Make sure that you have entered the correct value in the Base URL field under the General application tab in Okta. Using the wrong value will prevent you from authenticating via SAML to BeyondTrust.
The following SAML attributes are supported:
| Name | Value |
|---|---|
| Name | user.userName |
| user.email | |
| GivenName | user.firstName |
| Surname | user.lastName |
| Group | This will be configured in the app UI; see groups attribute instructions above (step 9). |