The Okta/Aspera Faspex V4 SAML integration currently supports the following features:
For more information on the listed features, visit the Okta Glossary.
Login to your Aspera Faspex tenant as an Admin.
In your dashboard, navigate to Server > Authentication > SAML Integration:
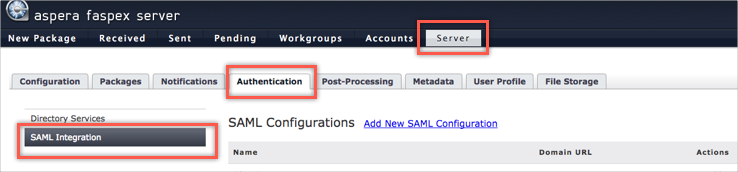
Click on Add New SAML Configuration to add a new IdP configuration.
On the IdP Configuration page, under the Import Settings From Metadata section, choose one of the following three options by which to import Metadata:
Import from URL: Copy and paste the following URL:
Sign into the Okta Admin dashboard to generate this value.
Import from File: Click the link from the above option to download, then save the metadata file, then click Browse to locate that file and upload it to Aspera Faspex.
Import from Text: Copy and paste the following metadata in text form into this field:
Sign in to Okta Admin app to have this variable generated for you.
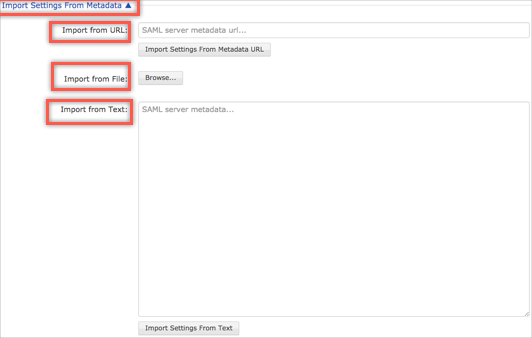
Using any of the three options above will auto-populate your SAML Settings in the corresponding section.
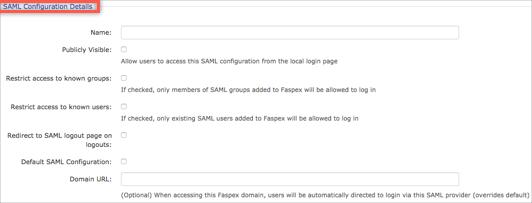
Under SAML Configuration Details section:
Enter a name for the IdP you are adding (for example: Okta) in the Name field.
To enable SP-initiated flow, check the Publicly Visible option. This allows your users to see the IdP you are configuring in your Aspera Faspex login page.
For more information on the other fields available in the SAML Configuration Details section, refer to the Aspera Faspex Admin Guide
All the other fields under the SAML Settings should have been auto-populated as a result of Step 4. If the certificate text box is empty, copy and paste the following:
Sign into the Okta Admin Dashboard to generate this variable.
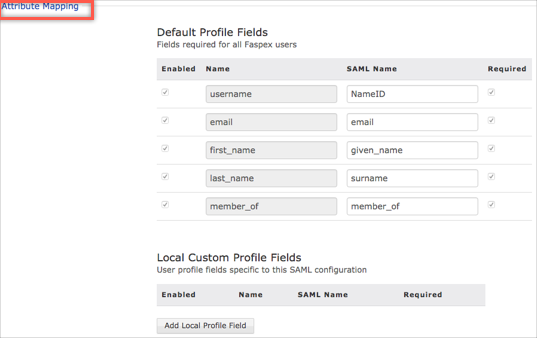
Leave all the default values in the Attribute Mapping section:
Click Create SAML Configuration.
If you are using multiple SAML providers, take note of the IdP ID value assigned to Okta. To find this value:
Go back to Server > Authentication > SAML Integration. You will see the SAML Configuration you've just added.
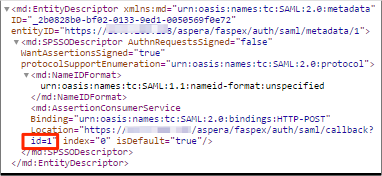
Under the Actions column, click the Metadata link:

You will be redirected to a page displaying the metadata in XML format. Locate the Location parameter and make a copy of the IdP ID value marked in red below:
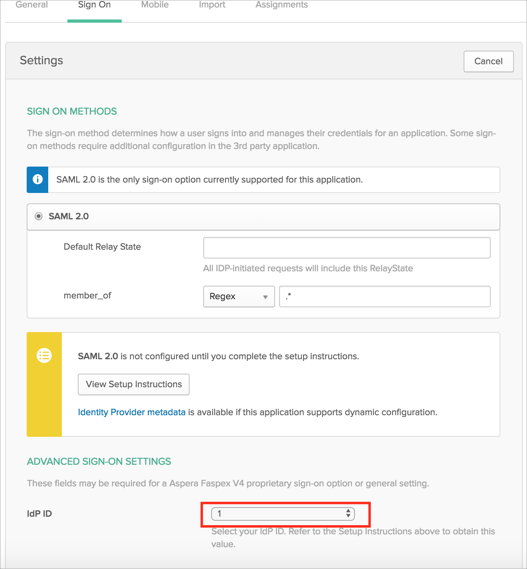
In Okta, select the Sign On tab for the Aspera Faspex V4 app, then click Edit.
Select your IdP ID value you made a copy of in step 9.
Click Save.
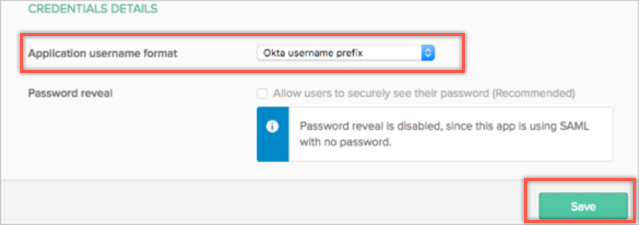
The Application username format needs to be updated to use Okta username prefix. Do not assign users to this application until you update this setting, as follows:
Still in Okta, select the Sign On tab, then click Edit.
Change the value of the Application username format to Okta username prefix.
Click Save.
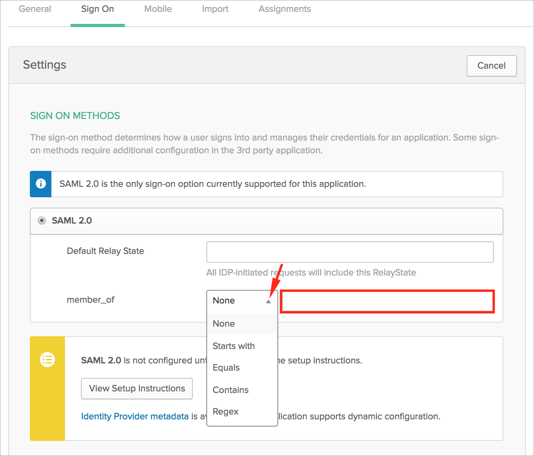
OPTIONAL: Group Attribute Steps: To send groups as a part of SAML assertion, in Okta select the Sign On tab for the Aspera Faspex V4 app, then click Edit.
Select the appropriate filter from the member_of dropdown menu, then type the preferred value into the field.
Click Save.
Note: To send all groups a user is assigned to, select Regex and type .* (dot and star sign).
Done!
Make sure that you entered the correct value in the Domain or Base URL field under the General tab in Okta. Using the wrong value will prevent you from authenticating via SAML to Aspera Faspex V4.
The following SAML attributes are supported:
| Name | Value |
|---|---|
| user.email | |
| given_name | user.firstName |
| id | user.login |
| surname | user.lastName |
| member_of | This is configured in the app UI; see Group attribute instructions (step 12) above. |
Navigate to your Aspera Faspex URL, for example: {URL}/aspera/faspex.
You will be taken to your login page. Click on your IdP to initiate a SP-initiated flow:
