The Okta/AWS Redshift SAML integration currently supports the following features:
For more information on the listed features, visit the Okta Glossary.
Okta's integration with Amazon Web Services (AWS) Redshift allows end users to authenticate to AWS Redshift accounts using single sign-on with SAML.
More information about Redshift and its SAML specific configuration can be found within the AWS docs.
In order to use SAML for AWS, you have to set up Okta as an Identity Provider in AWS and establish the SAML connection, as follows:
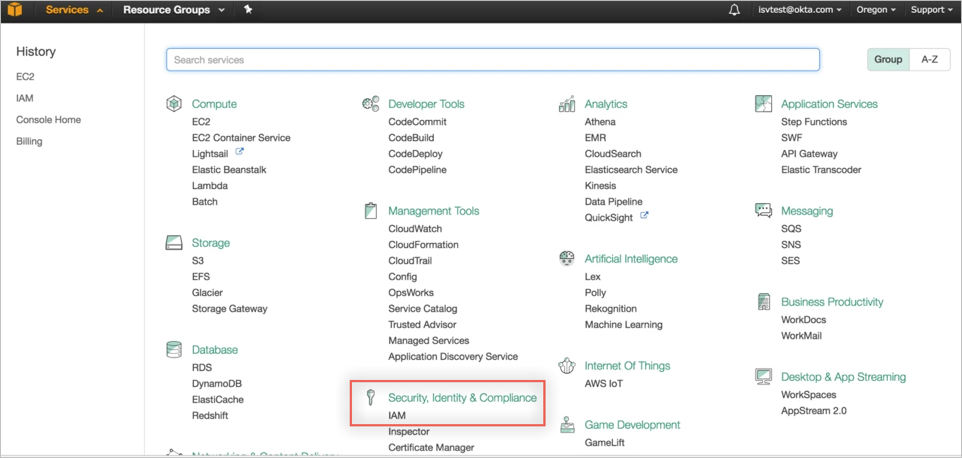
Login to your AWS Console, then select Services.
Under Security, Identity & Compliance, select IAM:
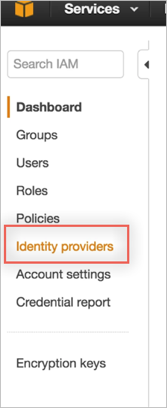
In the left menu, select Identity Providers:
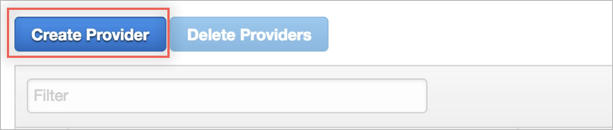
Click Create Provider:
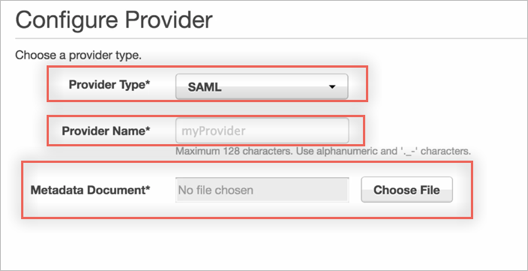
In the Configure Provider screen, enter the following:
Provider Type: Select SAML.
Provider Name: Enter a preferred name, for example Okta.
Metadata Document: Download and save the following metadata file, then click Choose File to locate and upload it to AWS.
Sign into the Okta Admin dashboard to generate this value.
Click Next.
Click the following link to download the IDP metadata in an xml file format. Upload this file in the Metadata Document field. Then click Next.
Click Create.
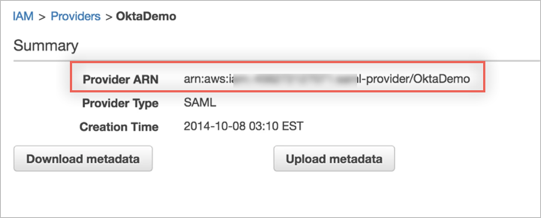
Locate the Identity Provider you just created by the Provider Name in the list of Identity Providers. Click on the name, and make a copy of the Provider ARN value. You will need it later during this configuration:
Now that you have configured Okta as the Identity Provider in AWS, you can create or update existing IAM roles so that Okta will be able to retrieve and assign to users in Okta. Note that Okta will only be able to provide SSO for your users for roles that have been configured to grant access to the Okta SAML Identity Provider you configured in the previous step.
To grant SSO access to existing roles in your account:
Navigate to Roles, then select the role to which you would like to permit Okta SSO access.
Select the Trust relationship tab for the role, then click Edit trust relationship:
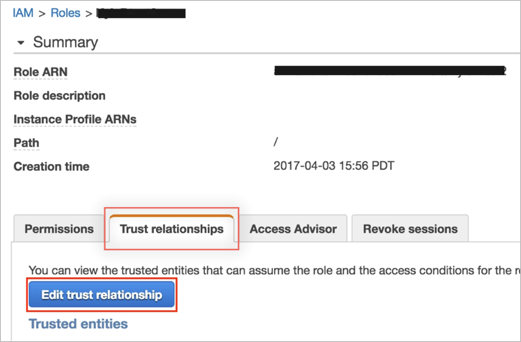
You now need to modify the IAM trust relationship policy to permit SSO into Okta using the SAML IDP you configured in the previous step:
If your policy is currently empty, you can copy and paste the following policy listed below and replace COPY & PASTE SAML ARN VALUE HERE with the ARN value you copied from Step 1: Add Okta Identity Provider as Trusted Source in your AWS Roles.
If you have a current trust relationship in place, then you may need to modify your existing policy document to also include Okta SSO access. At a minimum you will need to include everything within the Statement code block - including the configurations for Effect, Principal, Actions, and Conditions. Replace COPY & PASTE SAML ARN VALUE HERE with the ARN value you copied from Step 1: Add Okta Identity Provider as Trusted Source in your AWS Roles.
{
  "Version":   "2012-10-17",
  "Statement": [{
    "Effect":   "Allow",
    "Principal": {
      "Federated":   ""
    },
    "Action":   "sts:AssumeRoleWithSAML",
    "Condition": {
      "StringEquals": {
        "SAML:aud":   "https://signin.aws.amazon.com/saml"
      }
    }
  }]
}
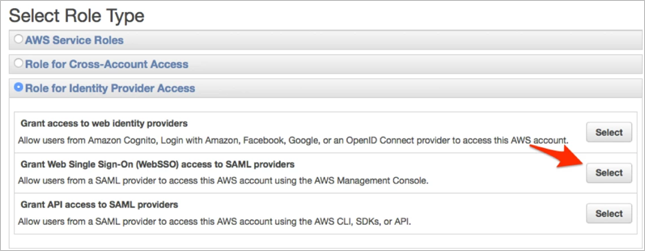
To grant SSO access to a new role:
Navigate to Roles > Create New Role.
Under Role Type, select Role for Identity Provider Access, then Grant Web Single Sign-On (WebSSO) SSO access to SAML providers:
Select Okta as your SAML provider, then click Next Step:

Click Next on the Verify role screen.
Select your preferred policy to be assigned to the role you're creating for end-users, then click Next.
Now that you have finished the required steps to be performed in the AWS console, open the Amazon Web Services Redshift integration configuration in Okta and perform the following steps to complete the set up:
In Okta, select the Sign On tab for the AWS Redshift app, then click Edit.
Paste the Idp ARN and Role ARN that you made a copy of earlier in this configuration, as comma-separated values, into corresponding fields.
For example: arn:aws:iam::1234567890:saml-provider/OKTA,arn:aws:iam::1234567890:role/SAML_ROLE
Session Duration: Set the desired session duration for users.
Provide Redshift related configuration:
DB User Format: EL expression to construct Redshift DB user:
Okta username: ${user.username} (this is the default value)
"john.doe@acme.com" format: ${user.firstName}${user.lastName}@acme.com
Static value for all users: "someCustomUsername"
Responsible for https://redshift.amazon.com/SAML/Attributes/DbUser attribute
Auto Create: AutoCreate Redshift property (Create a new database user if one does not exist)
Responsible for https://redshift.amazon.com/SAML/Attributes/AutoCreate attribute
Allowed DB Groups: This configuration determines which Okta groups (names) should be provided access to Redshift:
Empty value: no group will be sent
* (asterisk): Denotes that all Okta groups will be given access to Redshift.
Redshift Admins, RedshiftUsers: only "Redshift Admins" and/or "RedshiftUsers" in case user belongs to them
Responsible for https://redshift.amazon.com/SAML/Attributes/DbGroups attribute
Click Save / Next:

Since AWS Redshift is the SQL database, you can use SQL client tools such a SQL Workbench/J to work with it.
The following steps provides some guidance how to configure this tool to use the Okta login flow:
Download the SQL Workbench/J: https://www.sql-workbench.eu.
Download the JDBC driver for AWS Redshift: https://docs.aws.amazon.com/redshift/latest/mgmt/configure-jdbc-connection.html (JDBC 4.2–compatible driver with AWS SDK included).
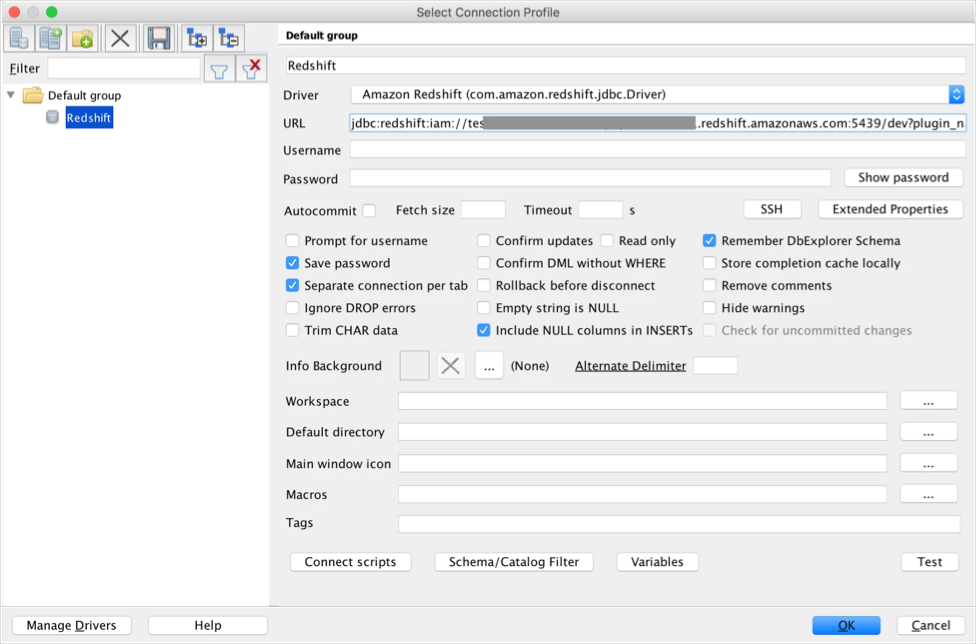
Add the Redshift driver into the SQL Workbench (File > Manage Drivers).
Open the Connect dialog and select the Amazon Redshift driver.
Now it needs to compose the URL in the following format:
jdbc:redshift:iam://[your-redshift-cluster-connection-string]?plugin_name=com.amazon.redshift.plugin.OktaCredentialsProvider&idp_host=[okta-hostname]&preferred_role=[role-arn]&user=[okta-user]&password=[okta-user-password]&app_id=[okta-redhshift-app-id]
Where:
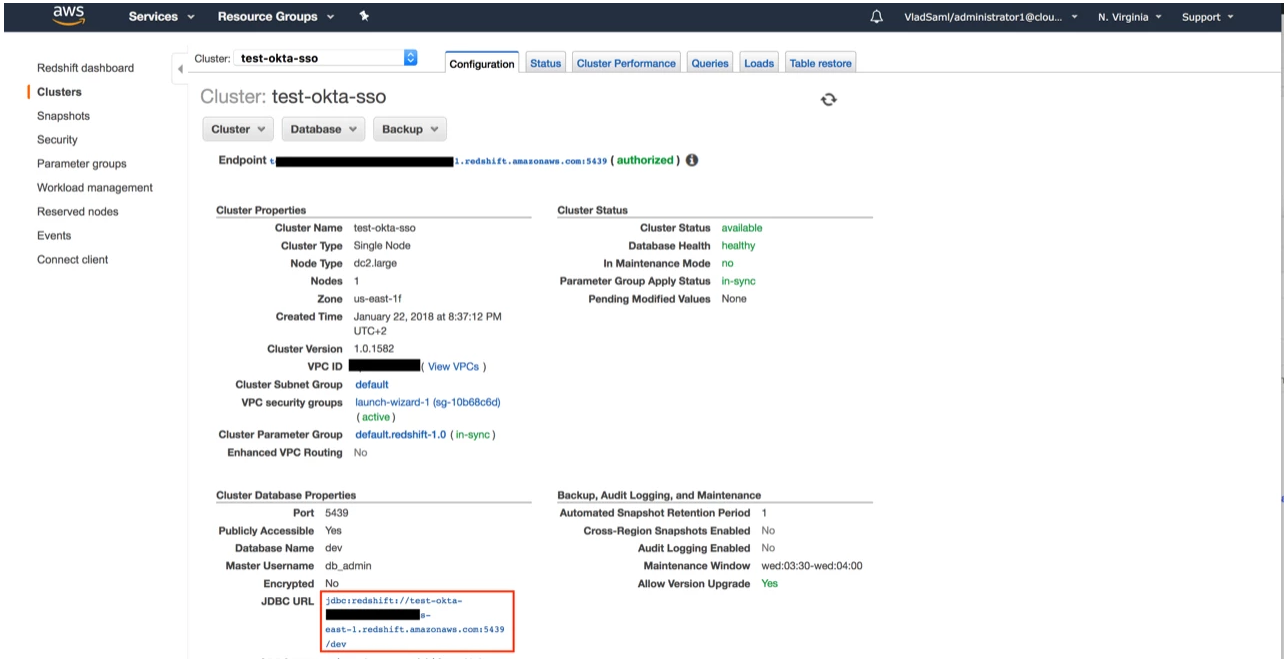
your-redshift-cluster-connection-string:
okta-hostname:
acme.oktapreview.com
role-arn:
AWS role ARN (the one which is linked to Okta SAML IdP and Redshift and used in Idp ARN and Role ARN configuration in Okta).
okta-user:
Your Okta username.
okta-user-password:
Password for this user.
okta-redhshift-app-id:
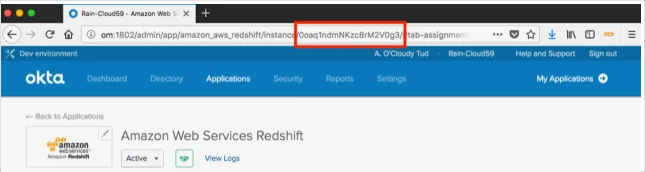
For example:
jdbc:redshift:iam://okta-sso.d3adb3af.us-east-1.redshift.amazonaws.com:5439/dev?plugin_name=com.amazon.redshift.plugin.OktaCredentialsProvider&idp_host=acme.okta.com&app_id=0oadznnasfyAEItJb8h7&preferred_role=arn:aws:iam::1234567890:role/SAML_ROLE&user=johndoe@acme.com&password=s3cr3t
Additional information about SQL Workbench J configuration can be found here: https://docs.aws.amazon.com/redshift/latest/mgmt/connecting-using-workbench.html.
The following SAML attributes are supported:
| Name | Value |
|---|---|
| https://aws.amazon.com/SAML/Attributes/Role | org.roleARN |
| https://aws.amazon.com/SAML/Attributes/RoleSessionName | user.userName |
| https://aws.amazon.com/SAML/Attributes/SessionDuration | org.sessionDuration |
| https://redshift.amazon.com/SAML/Attributes/AutoCreate | org.redshiftAutoCreate |
| https://redshift.amazon.com/SAML/Attributes/DbUser | appuser.redshiftDbUser |
| https://redshift.amazon.com/SAML/Attributes/DbGroups | appuser.redshiftDbGroups |
The main difference comparing to regular AWS SAML auth are 3 additional SAML attributes that Okta will send:
<saml2:Attribute Name="https://redshift.amazon.com/SAML/Attributes/AutoCreate" NameFormat="urn:oasis:names:tc:SAML:2.0:attrname-format:basic">
  <saml2:AttributeValue xmlns:xs="http://www.w3.org/2001/XMLSchema" xmlns:xsi="http://www.w3.org/2001/XMLSchema-instance" xsi:type="xs:string">true</saml2:AttributeValue>
</saml2:Attribute>

<saml2:Attribute Name="https://redshift.amazon.com/SAML/Attributes/DbUser" NameFormat="urn:oasis:names:tc:SAML:2.0:attrname-format:basic">
  <saml2:AttributeValue xmlns:xs="http://www.w3.org/2001/XMLSchema" xmlns:xsi="http://www.w3.org/2001/XMLSchema-instance" xsi:type="xs:string">jdoeredshift@acme.com</saml2:AttributeValue>
</saml2:Attribute>

<saml2:Attribute Name="https://redshift.amazon.com/SAML/Attributes/DbGroups" NameFormat="urn:oasis:names:tc:SAML:2.0:attrname-format:basic">
  <saml2:AttributeValue xmlns:xs="http://www.w3.org/2001/XMLSchema" xmlns:xsi="http://www.w3.org/2001/XMLSchema-instance" xsi:type="xs:string">developers</saml2:AttributeValue>
  <saml2:AttributeValue xmlns:xs="http://www.w3.org/2001/XMLSchema" xmlns:xsi="http://www.w3.org/2001/XMLSchema-instance" xsi:type="xs:string">devops</saml2:AttributeValue>
</saml2:Attribute>