Read this before you enable SAML
Customer accounts that are currently configured on the echosign.com domain will be migrated to adobesign.com in 2021.
If you already have an existing instance of Adobe Sign in your Okta tenant that uses the echosign.com domain and would like to use the adobesign.com domain, update the value for your Adobe Sign domain field in your Adobe Sign instance. Make sure to enter a value that follows the following format: acme.environment.adobesign.com.
The Okta/AdobeSign SAML integration currently supports the following features:
For more information on the listed features, visit the Okta Glossary.
Note: Adobe Sign SAML app requires that you claim your Adobe domain in order to be able to enable Single Sign On for the instance. See Adobe Sign Domain Claiming for more information.
Login to Adobe Sign as an administrator.
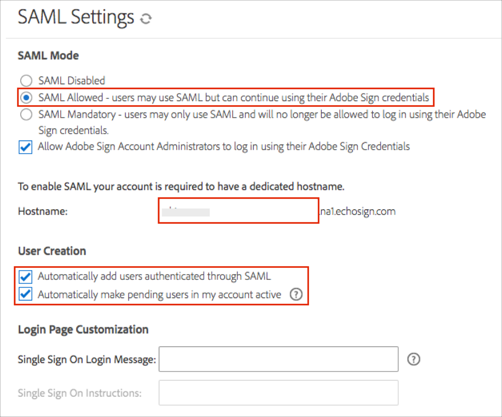
Navigate Account > Account Settings > SAML Settings:

For SAML Mode, choose either SAML Allowed or SAML Mandatory.
Note: If you choose SAML Mandatory, select the Allow Adobe Sign Account Administrators to log in using their Adobe Sign Credentials checkbox. You will still be able to login with an admin account here: Adobe Sign.
Enter a dedicated Hostname value.
The Hostname is your Adobe domain name. When entered, your hostname becomes part of the Assertion Consumer URL, the Single Log Out (SLO) URL, and Single Sign-On (Login) URL.
In the User Creation section:
Check the Automatically add users authenticated through SAML checkbox in order to enable SAML-based provisioning.
Optional: Check the Automatically make pending users in my account active checkbox.
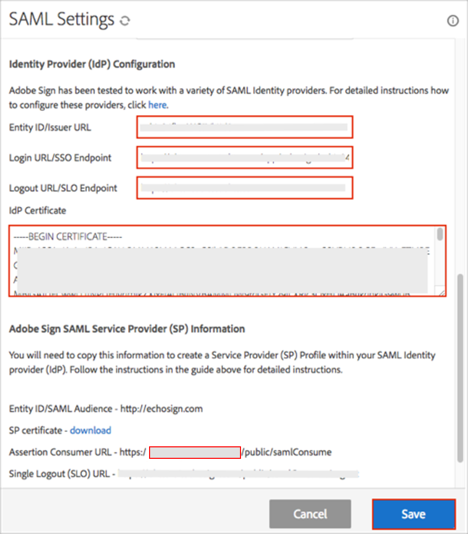
In the Identity Provider (IdP) Configuration section, enter the following:
Entity ID/Issuer URL: Copy and paste the following:
Sign in to the Okta Admin app to generate this variable.
Login URL/SSO Endpoint: Copy and paste the following:
Sign in to the Okta Admin app to generate this variable.
Logout URL/SLO Endpoint: Copy and paste the following:
Sign in to the Okta Admin app to generate this variable.
IdP Certificate: Copy and paste the following:
Sign in to the Okta Admin app to generate this variable.
In the Adobe Sign SAML Service Provider (SP) Information section save the domain value from the Assertion Consumer URL.
For example if your Assertion Consumer URL is https://acme.echosign.com/public/samlConsume, you need to save acme.adobesign.com value.
Click Save.
Done!
Make sure that you entered the correct value in the Your Adobe Sign domain field under the General tab in Okta. Using the wrong value will prevent you from authenticating via SAML to Adobe Sign.
CASE 1: SAML Mode is SAML Mandatory:
Open your login URL: https://[yourDomain]/
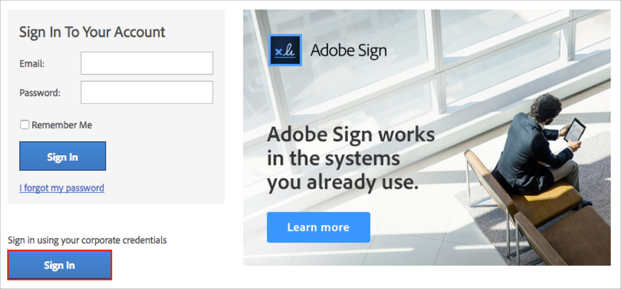
CASE 2: SAML Mode is SAML Allowed:
Open your login URL: https://[yourDomain]/
Click Sign In using your corporate credentials: