How to Configure SAML 2.0 for Adaptive Insights
This setup might fail without parameter values that are customized for your organization. Please use the Okta Administrator Dashboard to add an application and view the values that are specific for your organization.
Contents
Supported Features
The Okta/Adaptive Insights SAML integration currently supports the following features:
Configuration Steps
-
Sign in to Adaptive Insights as a user with administrator permissions.
-
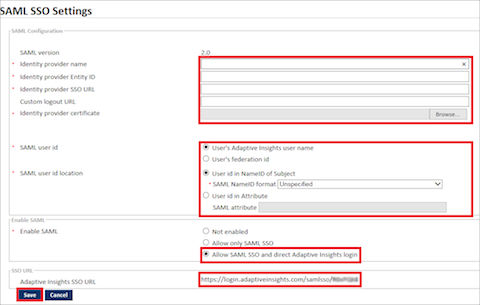
Navigate to Admin > Manage SAML SSO Settings, and enter the following information (see screen shot at end of step for reference):
- Identity provider name: Enter Okta.
-
Identity Provider Entity ID: Copy and paste the following:
Sign into the Okta Admin dashboard to generate this value.
-
Identity provider SSO URL: Copy and paste the following:
Sign into the Okta Admin dashboard to generate this value.
-
Custom logout URL: Copy and paste the following:
Sign into the Okta Admin dashboard to generate this value.
-
Identity provider certificate: Download and save the following certificate, then click Browse to locate it, then upload it to Adaptive Insights:
Sign into the Okta Admin dashboard to generate this value.
- SAML user id type: Select User's Adaptive Insights user name.
- SAML user id location: Select User id in NameID of Subject. Then select the desired name format. The format Unspecified is used in our example.
- Enable SAML: Select Allow SAML SSO and AP login.
- Click Save.
- Select Manage SAML SSO Settings again and verify that all settings are correct.
- Make a copy of the value for the Adaptive Insights SSO URL at the bottom of the page.
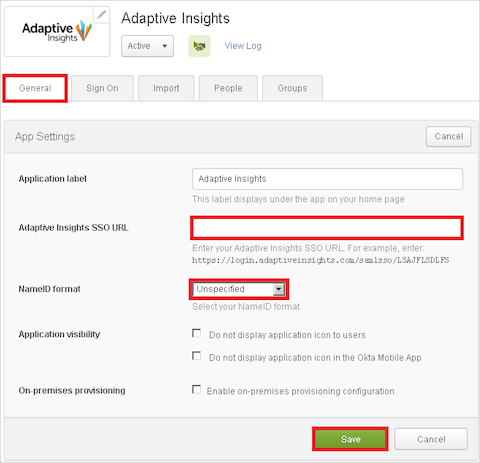
- In Okta, select the General tab for the Adaptive Insights app app, then click Edit.
- Paste the value for the Adaptive Insights SSO URL that you just made a copy of in step 2 into the corresponding field.
- NameID format: Enter the NameID format you selected in step 2. In our example we selected Unspecified.
- Select Save.
- Done!