NOTES
As of NetSuite release 2019.1, NetSuite is deprecating the Full Access role.
While using Token-Based Authentication you will be unable to create and update users with Administrator and Full Access roles due to NetSuite security restrictions.
This guide provides the steps required to configure Provisioning for NetSuite and includes the following topics:
The following provisioning features are supported:
Netsuite-specific features:
Works with Token-Based Authentication
Supports custom fields for Employees
Push, update and download employee groups
Note: If you already have set up the NetSuite application with Admin Username and Admin password authentication, your existing settings will continue to work. However if you need to change any provisioning settings, you need to switch to Token Based authentication.
Complete the following before you configure provisioning for NetSuite:
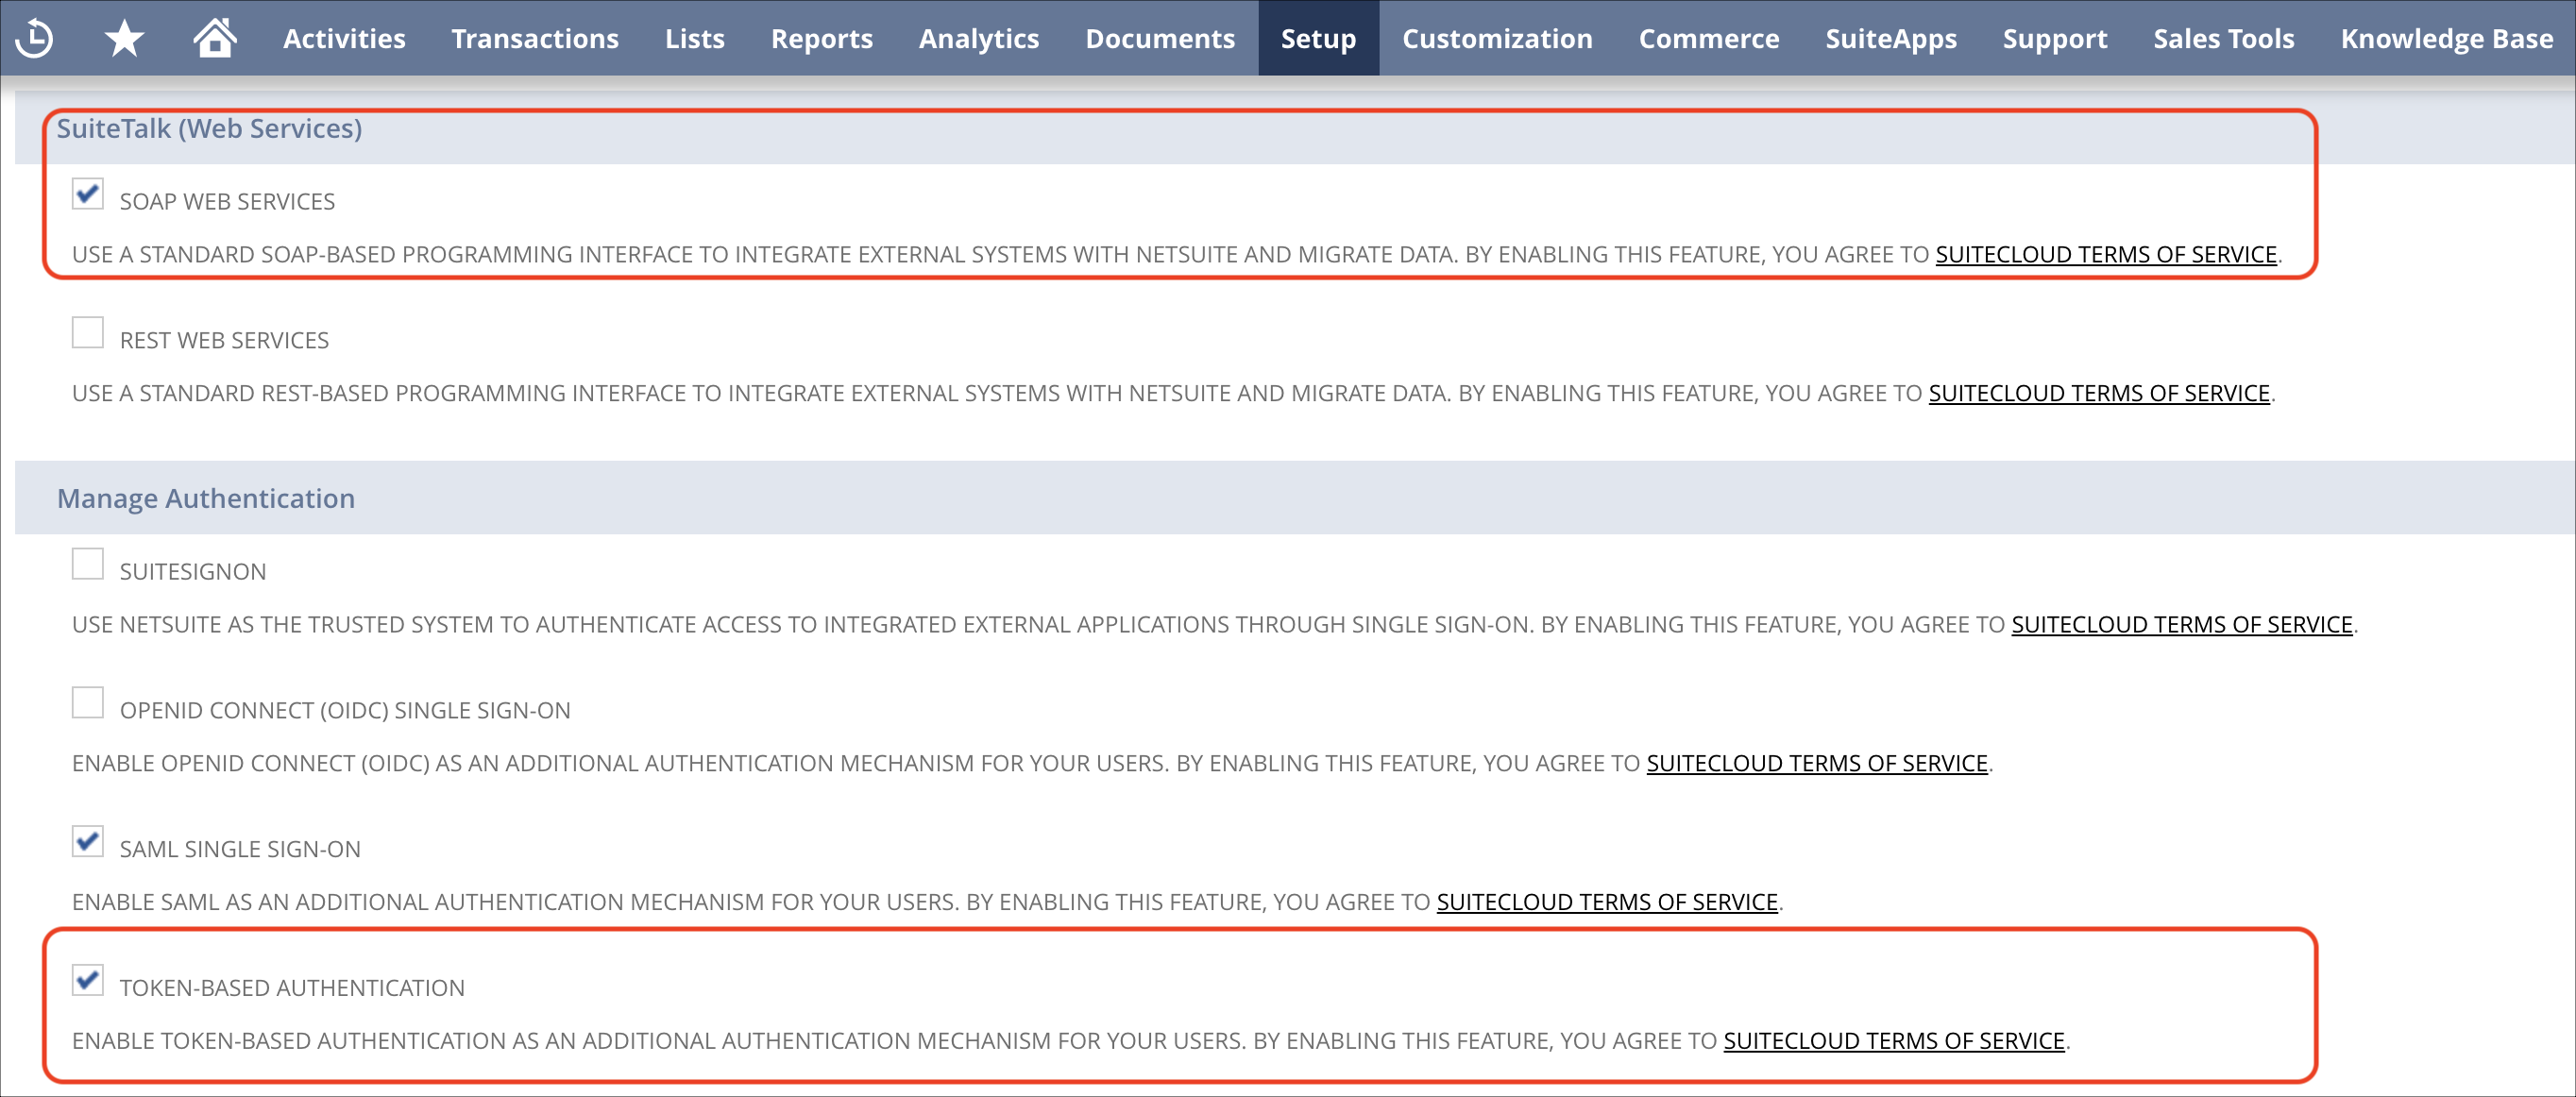
Enable the Web Services feature (the NetSuite web services feature needs to be enabled prior to submitting web services requests):
Log in to NetSuite as an administrator.
Go to Setup > Company > Enable Features.
Select the SuiteCloud subtab.
Check SOAP WEB SERVICES.
Select the Manage Authentication section.
Check TOKEN-BASED AUTHENTICATION (click I Agree on the SuiteCloud Terms of Service page if needed).
Click Save.
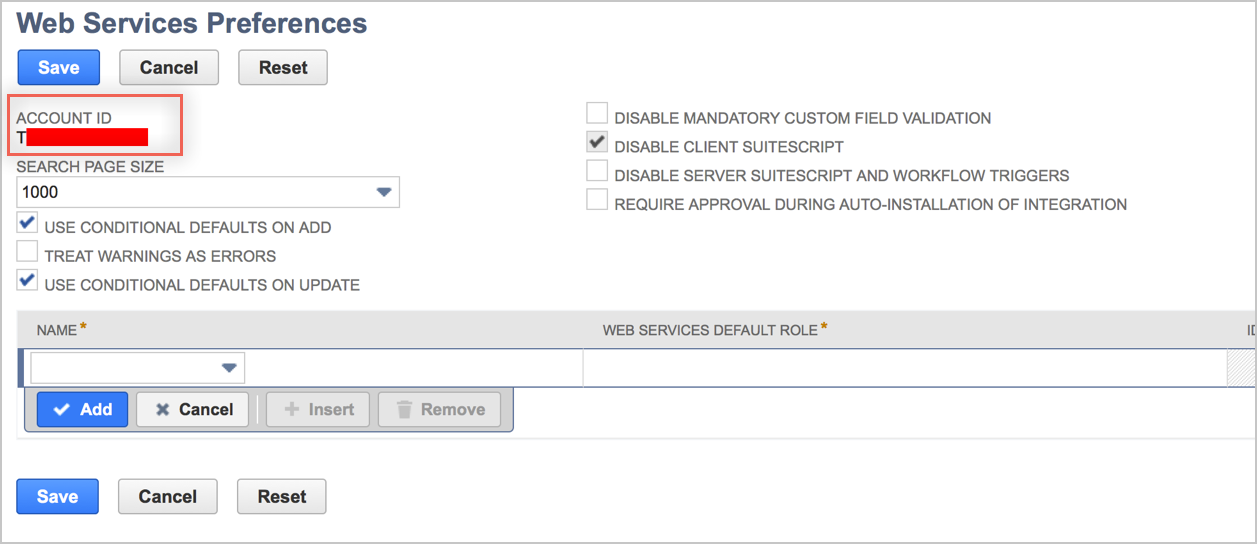
Obtain your Account ID:
Still logged into NetSuite as an administrator.
Go to Setup > Integration > Web Services Preferences.
Copy and save your Account ID.
Set Up Token-Based Authentication (TBA): (Setting Up Token-based Authentication Roles)
Note: You require a NetSuite account to access NetSuite links referenced in this document.
Go to Setup > Users/Roles > Manage Roles.
Create a new role.
In the Subsidiary Restrictions section, select all available SUBSIDIARIES:

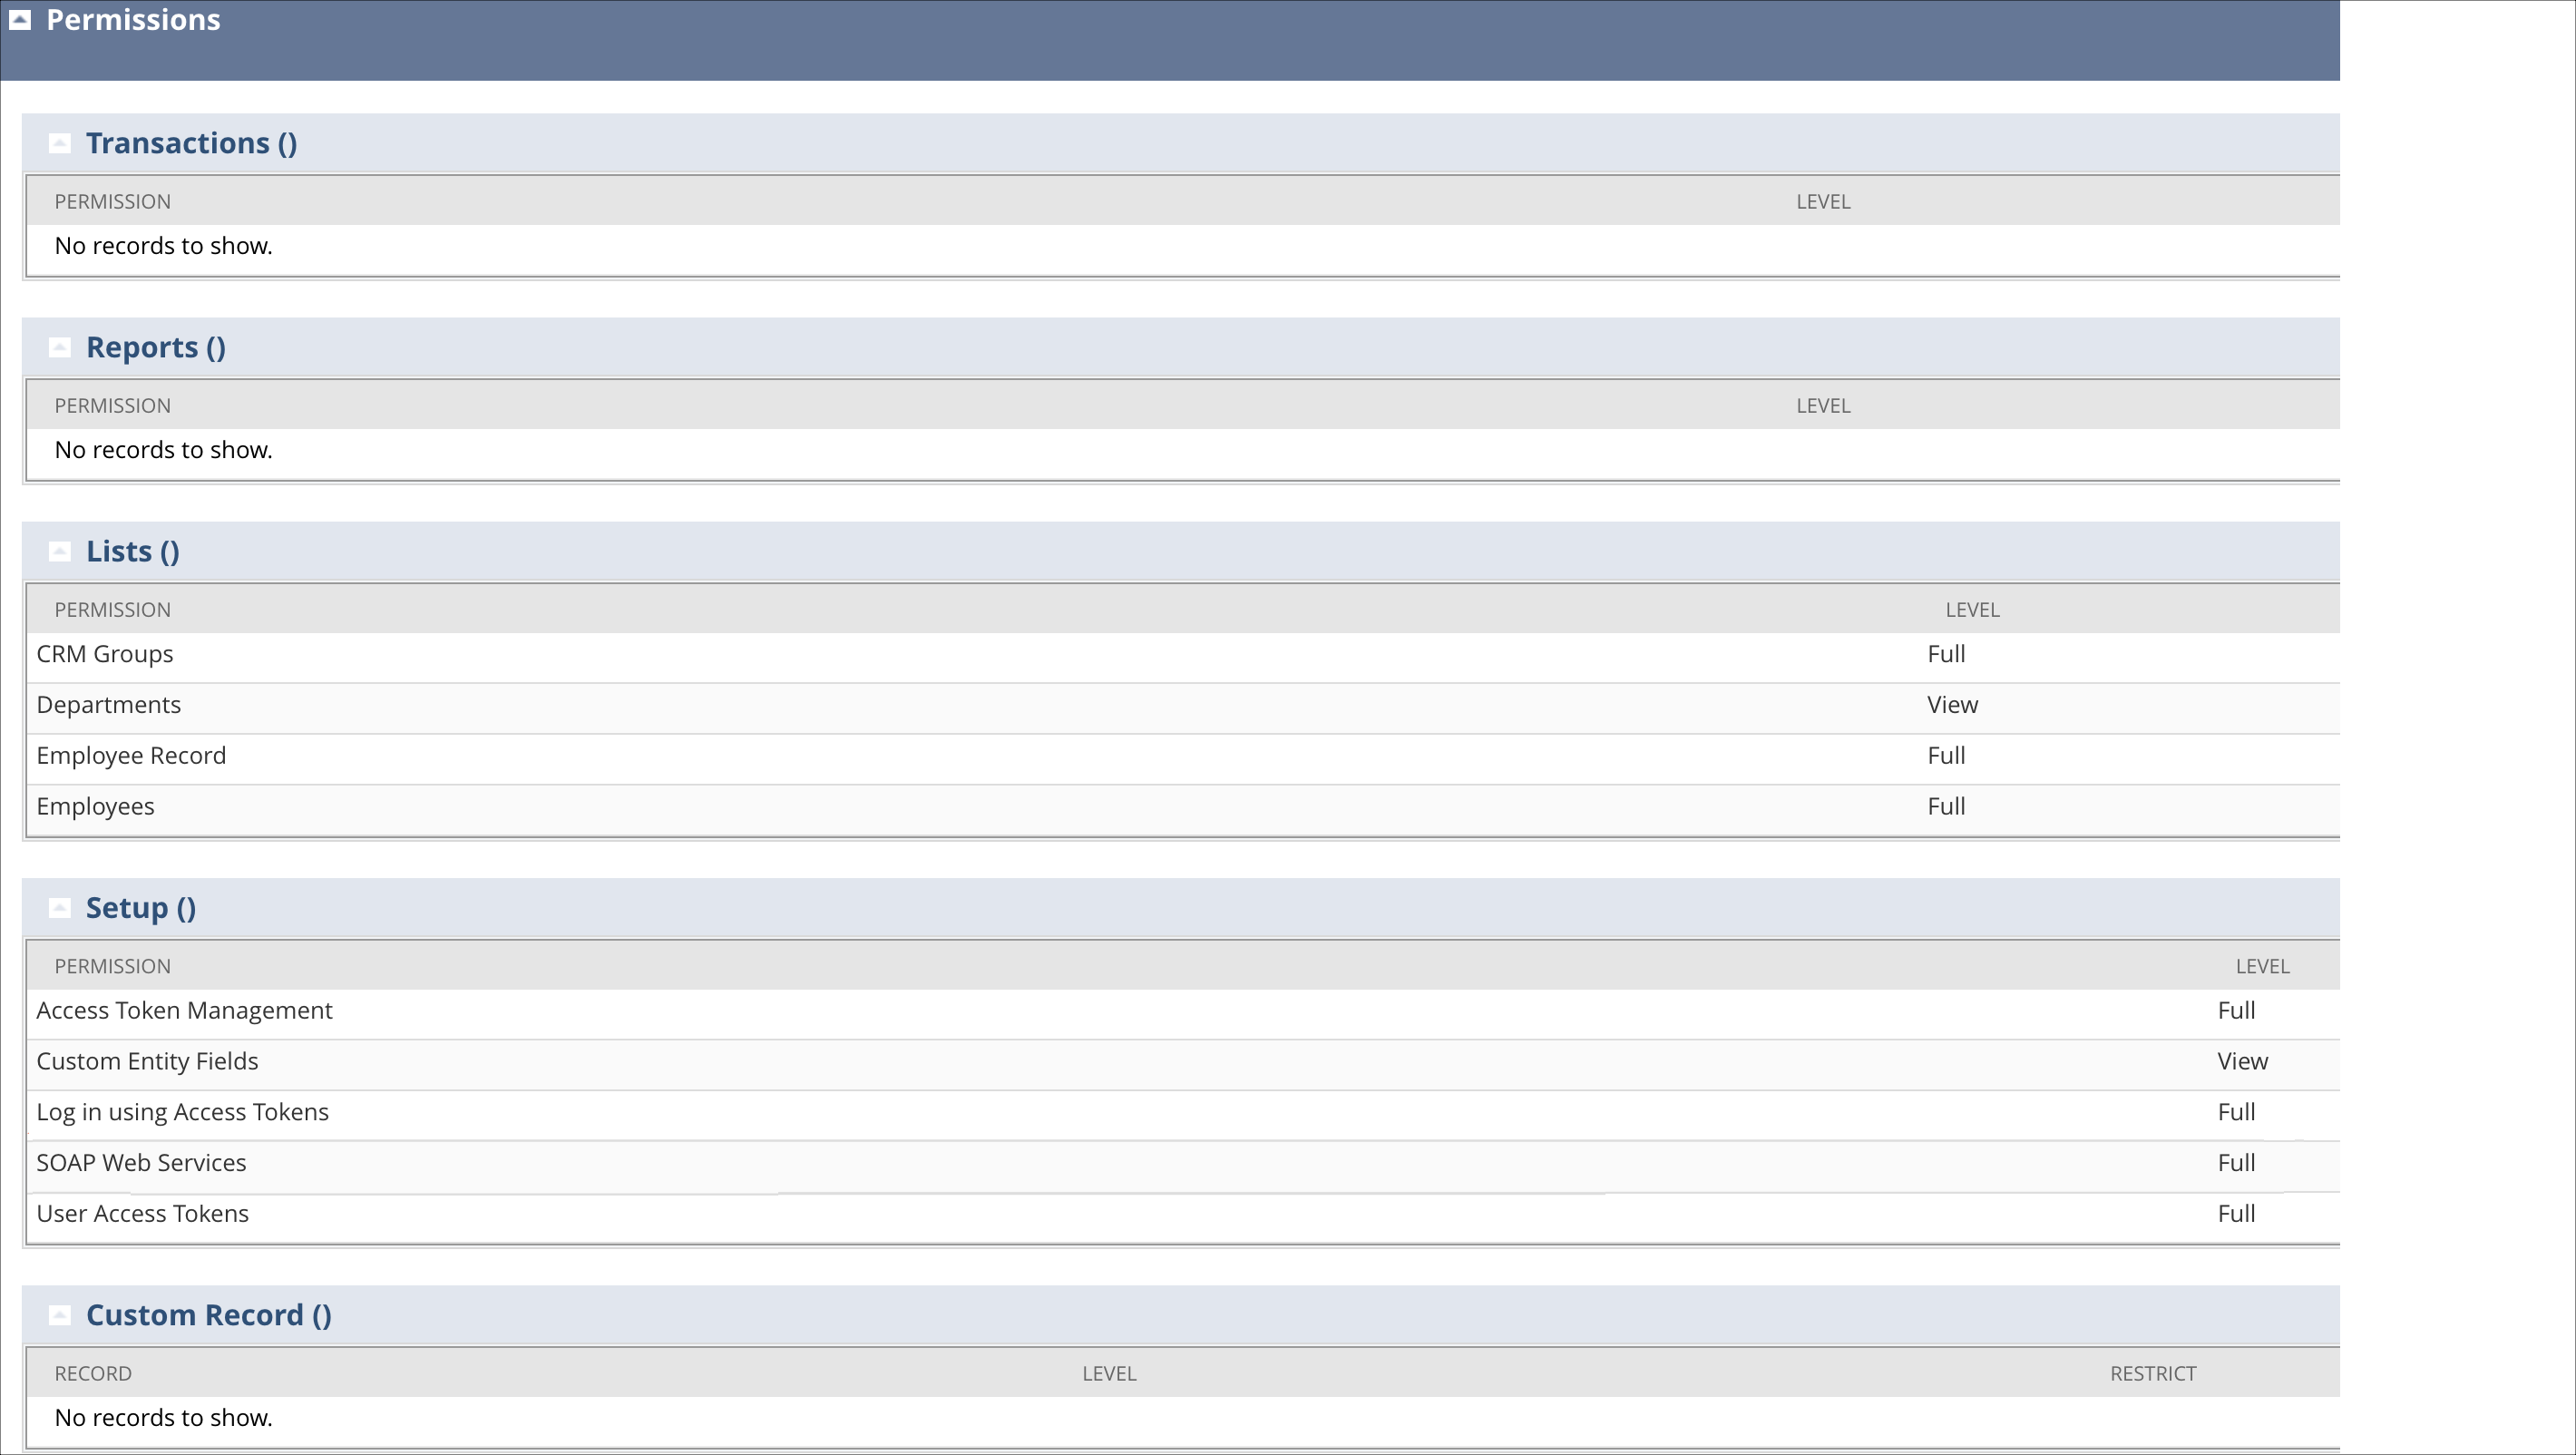
Add the following permissions to this role:
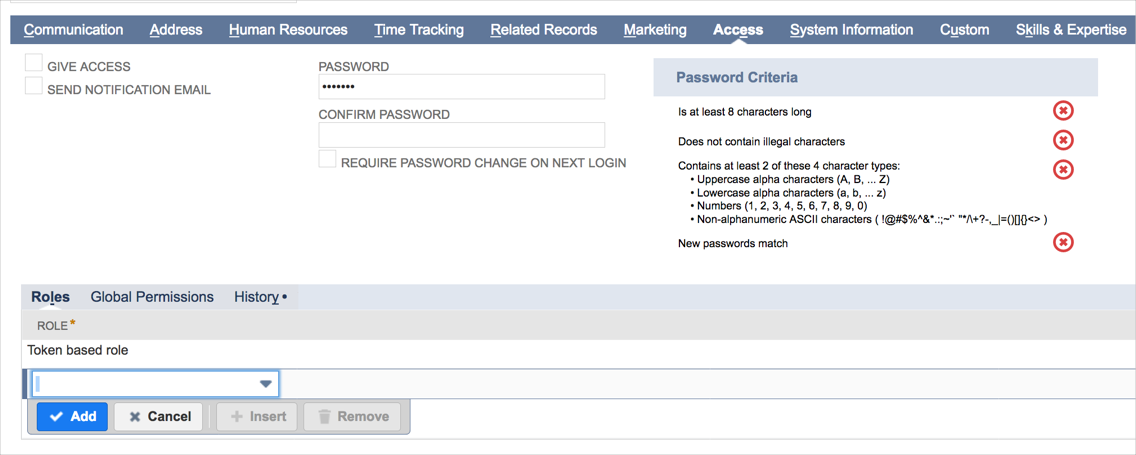
Assign a User to the Token-based Authentication Role:
Navigate to Lists > Employees > Employees.
Click Edit next to the name of the employee you want to assign the token-based authentication role.
Click the Access tab.
In the Role field, select the token-based authentication role for this employee.
Click Add.
Click Save.
Create an Application for Token-based Authentication:
Navigate to Setup > Integration > Integration Management > Manage Integrations > New.
Enter a Name for your application.
The application State is Enabled by default. (The other option available for selection is Blocked).
Check the Token-based Authentication box on the Authentication tab.
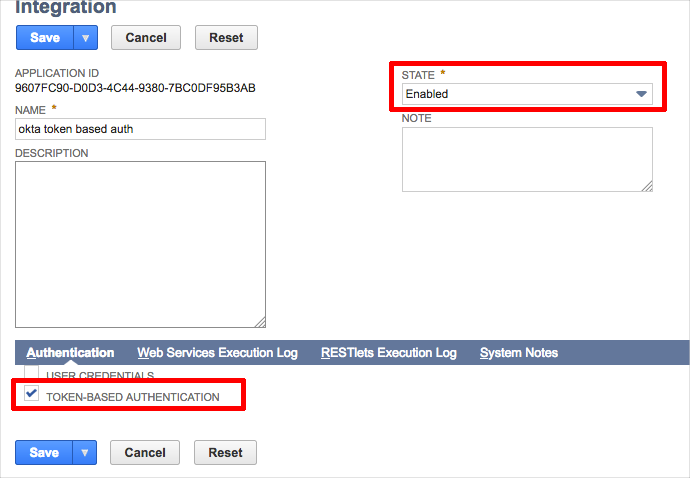
Click Save. The confirmation page displays the Consumer Key and the Consumer Secret for this application.
Important:
For security reasons, the only time the Consumer Key and the Consumer Secret values are displayed is on this confirmation page.
After you leave this page, these values cannot be retrieved from the system.
If you lose or forget these credentials, you will need to reset them to obtain new values.
Create a TBA Token and save your Token Id and Token Secret:
Log in as a user with the Access Token Management permissions.
Go to Setup > Users/Roles > Access Tokens > New.
The Access Token page displays.
On the Access Token page:
Select the Application Name.
Select the User.
Select the Role.
The Token Name is already populated by default with a concatenation of Application Name, User, and Role. Enter your own name for this token, if desired.
Click Save.
The confirmation page displays the Token ID and Token Secret.
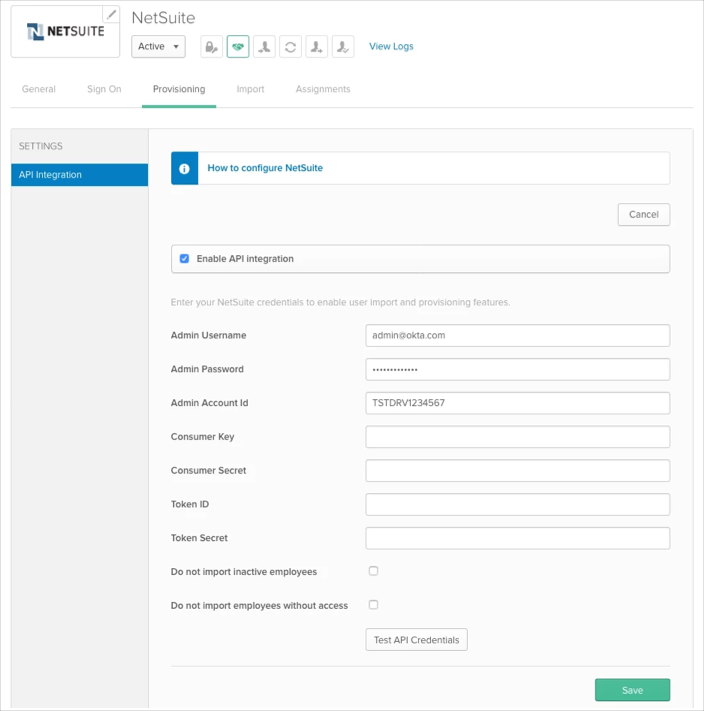
Configure your Provisioning settings for NetSuite as follows:
Check Enable API Integration.
Enter your NetSuite API Credentials:
Admin Account ID.
Consumer Key.
Consumer Secret.
Token ID.
Token Secret.
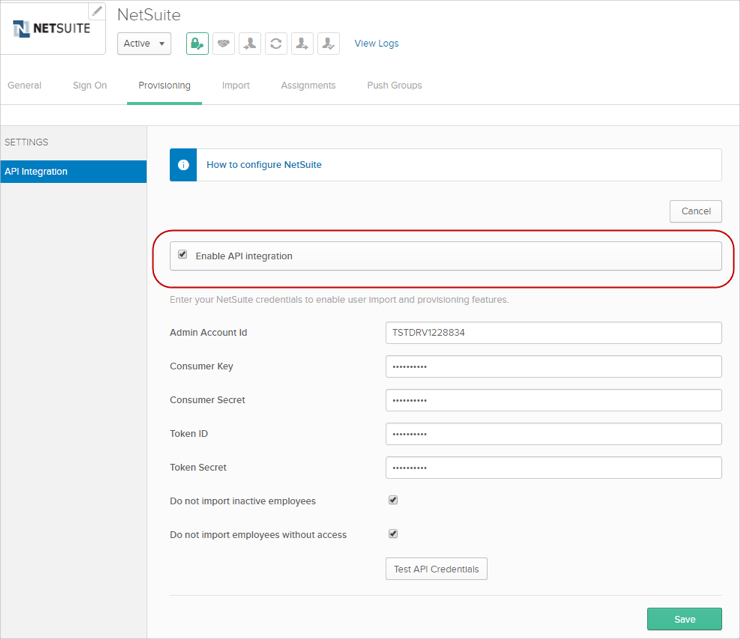
If you have configured Netsuite with Admin username and Password authentication, your API integration will look slightly different, as shown here:
In this case in order to switch to token based-authentication authentication, enter the following NetSuite credentials:
Consumer Key
Consumer Secret
Token ID
Token Secret
Once set, you can proceed. It's up to you to leave or clean admin credentials fields. Okta will use token based authentication whenever tokens are provided.
Select To App in the left panel, then select the Provisioning Features you want to enable, then click Save.
You can now assign people to the app (if needed) and finish the application setup.
User Provisioning Notes:
Okta only supports managing Employees.
If you have the UD features enabled, Okta offers the added functionality to set the Employee's Supervisor attribute. This attribute can only be set for users who are imported into Okta from Active Directory. The Employee's Supervisor attribute maps to the supervisor's User ID in NetSuite.
If you are setting up NetSuite as source, inactive users and users with insufficient access levels in NetSuite will be deactivated in Okta if you have the following provisioning options enabled in Okta:
Do not import inactive users
Do not import users without access
If you already have set up NetSuite application with Admin Username and Admin password authentication, your existing settings will still work. However if you need to change any provisioning settings, you will have to switch to Token-Based authentication.
NetSuite supports User's Schema Discovery, so you can add some extra attributes to User's Profile, to do that, follow the instructions below:
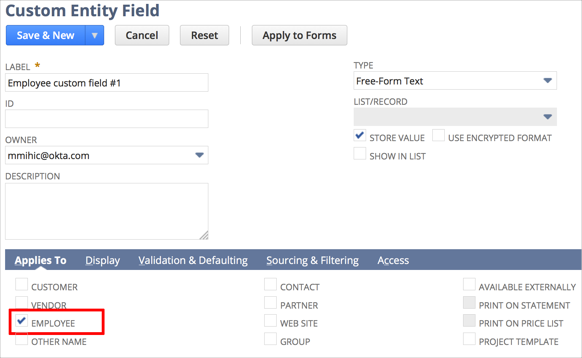
Before you begin, note that the following Custom Entity fields are supported:
To add extra attributes to a User’s Profile:
Ensure you have selected EMPLOYEE in the Applies To section on the NetSuite side for the Custom Entity field you want to use.
In Okta, from the Admin dashboard, select Directory > Profile Editor.
Select the APPS section in the left navigation bar, then find your app in the list.
Check the list of attributes, and if you decide you need more, click Add Attribute. A list of extended attributes will appear:
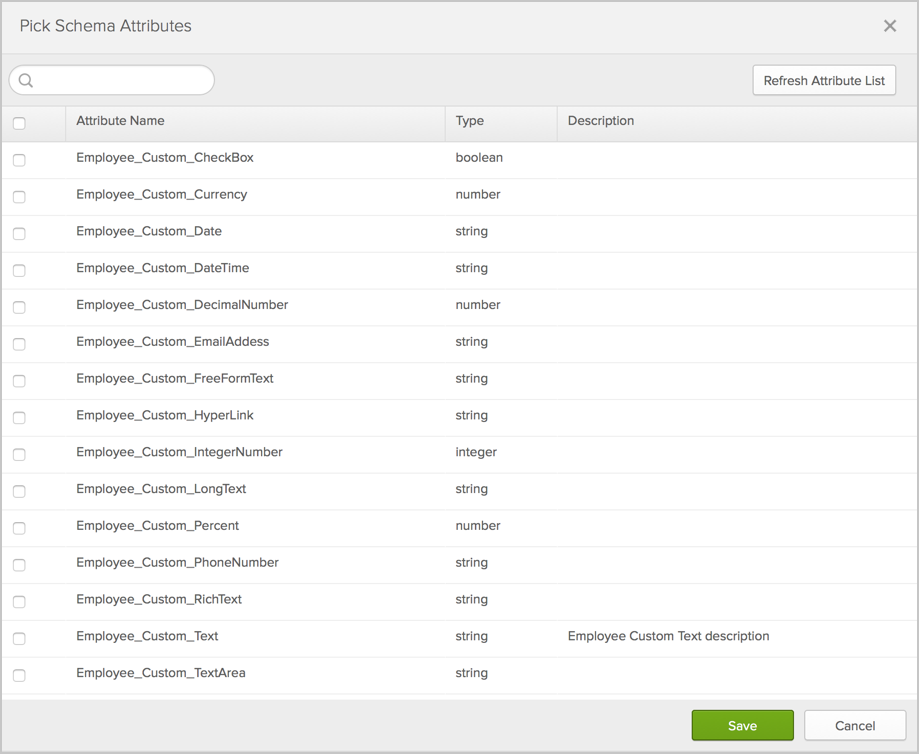
Select the attributes you want to add, then click Save.
You can now import and push these user attribute values to/from NetSuite.
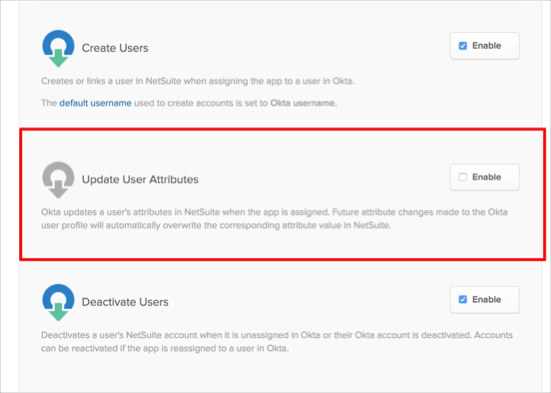
Disable the Update User Attributes provisioning feature in Provisioning options. This must be done in order to prevent mass de-provisioning from NetSuite once your instance is upgraded to the latest user profile.
Contact OKTA Support to migrate your AppUser profile to the latest version.
Note: Keep a screenshot of your current mappings before the migrating the AppUser profile. This helps ensure that any existing mappings have not been tampered with.
Re-authenticate your NetSuite application instance using Token Based Authentication (see instructions earlier in this document).
Perform a user import by clicking the Import Now button from the import tab of NetSuite application. Once completed this import overwrites Give access values for all assigned users with the correct value.
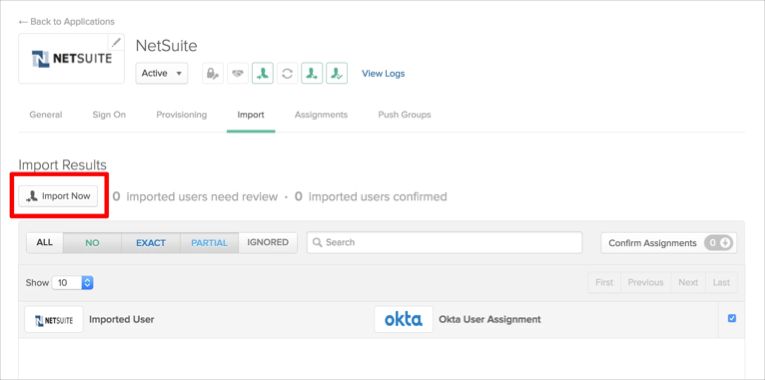
Ensure users were populated with correct data and that the given access value is set to true for all users who should remain provisioned in Netsuite.
Enable the Update User Attributes provisioning feature in Provisioning options that you disabled in step 1. Note that in case of many users, it is possible you may experience rate limit errors and may need to retry failed updates.
Assigning roles to an employee with no assigned roles:
Set giveAccess to true and assigning roles to users who have no access and no roles is available but SWA authentication will be broken as Okta has to reset the employee password according to NetSuite limitations.
Drop externalID employee property:
Using the UD version of NetSuite application allows you to set the externalId property for a user, but it can be dropped or set to blank.
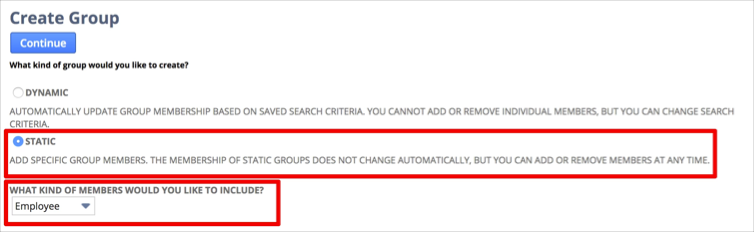
Group type:
Currently we only support the Employee's group of type STATIC:
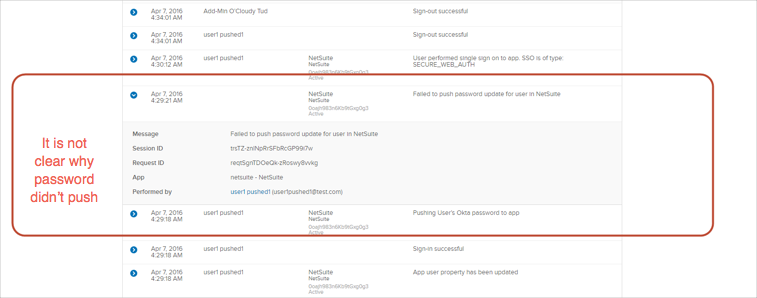
Password Push Policy:
Okta and NetSuite share the same password policy and NetSuite will not accept any passwords that are simple such as ABCD1234. If you do push a password as such you will run into the issue below:
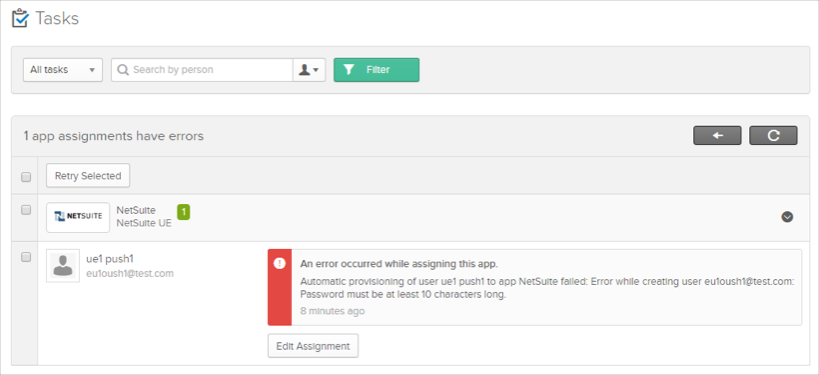
NetSuite requires strong passwords for employees and if you this message when creating new user: Password must be at least 10 characters long, you need to update password policy on the Okta side to match NetSuite one. To do this, navigate to Security > General > Password > Minimum length.
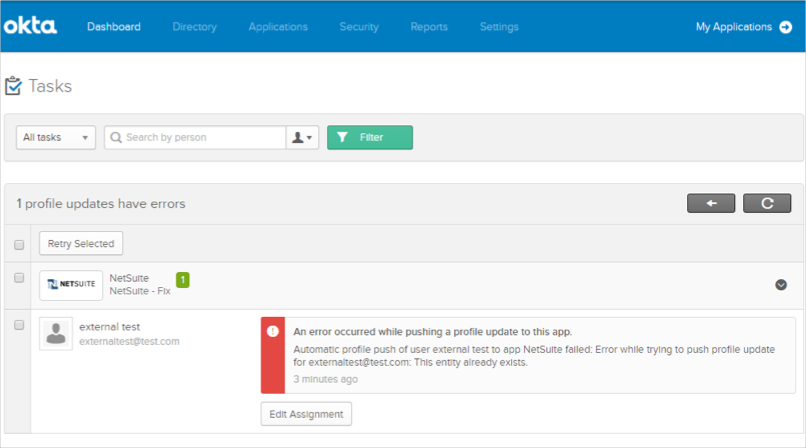
If you are in the process of creating a NetSuite app instance and encounter an error similar to the following during the app assignment flow:
The workaround for this is to first create the app instance without assigning it to any user/group. Once the app instance exists, you can then assign the app to the respective people by either:
By User: From the Okta admin dashboard, navigate to Directory > People then assign apps to users.
By Application: From the Okta admin dashboard, navigate to Applications then assign apps to users.
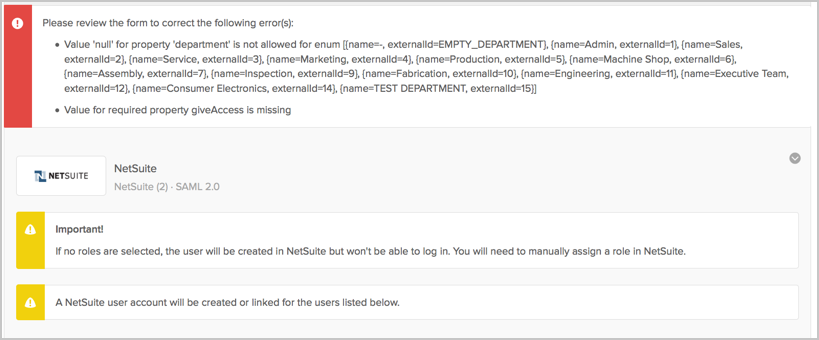
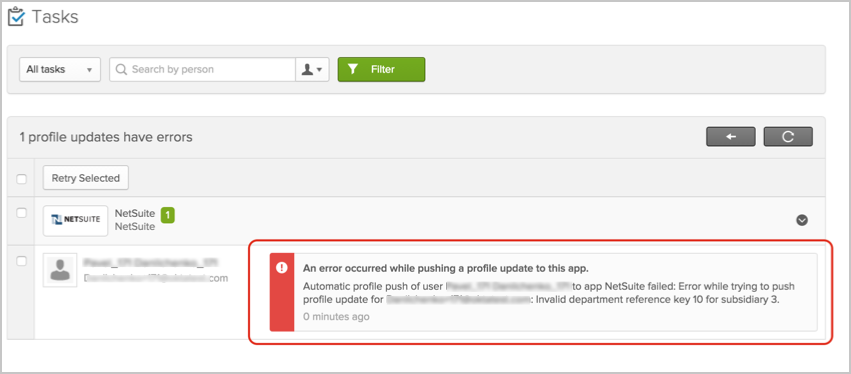
Make sure that the attribute subsidiary has dependency on department. There are not all departments available for each type of subsidiary and as result you may see an error during Push New Users or Push Profile updates, as shown below:
For applications with UD features disabled only: Changing the Subsidiary property for user on the Okta side won't be reflected on the NetSuite side.
In case of problems pushing users to NetSuite that result in a This entity already exists error message (UD version only); this error may be a result of trying to provision users with the same external ID: