Enabling SAML will affect all users who use this application, which means that users will not be able to sign-in through their regular log-in page, if you enable SP initiated SSO. Users will only be able to access the app through the Okta service.
Backup URL: Workday provides a backup log-in url where users can sign-in using their normal username and password in the following format: [Your Workday URL]/login.flex?redirect=n
If you log into: https://acme.workday.com/login-auth.html, [Your Workday URL] is: https://acme.workday.com.
These SAML instructions contain Single Log-Out (SLO) and Force Authentication configuration steps that are optional. If you are not going to use SLO or Force Authentication, skip the steps that are marked as [Optional SLO] or [Optional Force Authentication], and highlighted in blue font.
The Okta/Workday SAML integration currently supports the following features:
For more information on the listed features, visit the Okta Glossary.
You will need to copy and paste the following variable throughout the following configuration steps:
IdP SSO Service URL
Sign into the Okta Admin dashboard to generate this value.
Sign in to Workday with administrator privileges.
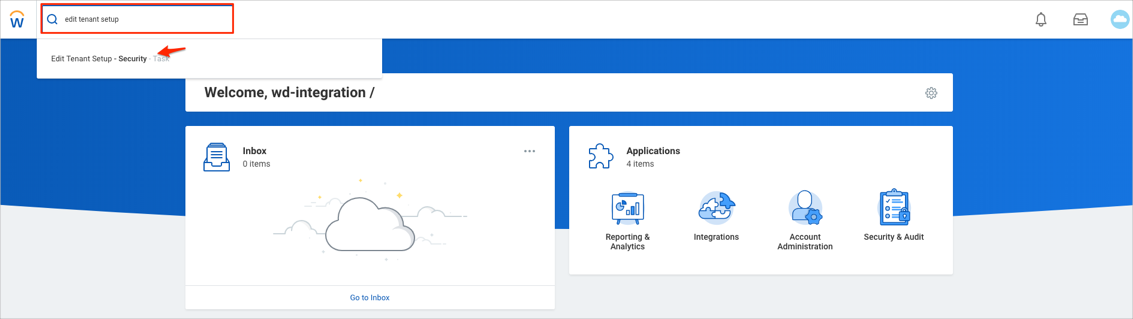
Navigate to the Edit Tenant Setup - Security page. To do this search for Edit Tenant Setup in the home screen search box, then click the Edit Tenant Setup - Security link in the search results:
Scroll down to the Single Sign On section and expand it, if not already expanded.
Click on the plus icon underneath Redirection URLs to add a row. Then enter the following (see screenshot at end of step for reference):
Login Redirect URL: Enter the following:
[org URL]/login-saml2.flexLogout Redirect URL: Copy and paste the following:
Sign into the Okta Admin dashboard to generate this value.
Mobile App Login Redirect URL: Enter the following:
[org URL]/login-saml2.flexMobile Browser Login Redirect URL: Enter the following:
[org URL]/login-saml2.flexEnter an Environment.

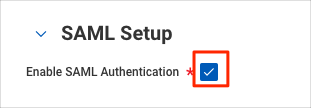
Scroll down to the SAML Setup section.
Check the Enable SAML Authentication box:
Click on the plus (+) icon underneath SAML Identity Providers to add a row, then enter the following:
Identity Provider Name: Enter Okta.
Issuer: Copy and paste the following:
Sign into the Okta Admin Dashboard to generate this variable.
x509 Certificate: Do the following:
Click the icon in the x509 Certificate field.
Click Create x509 Public Key in the dialog box.
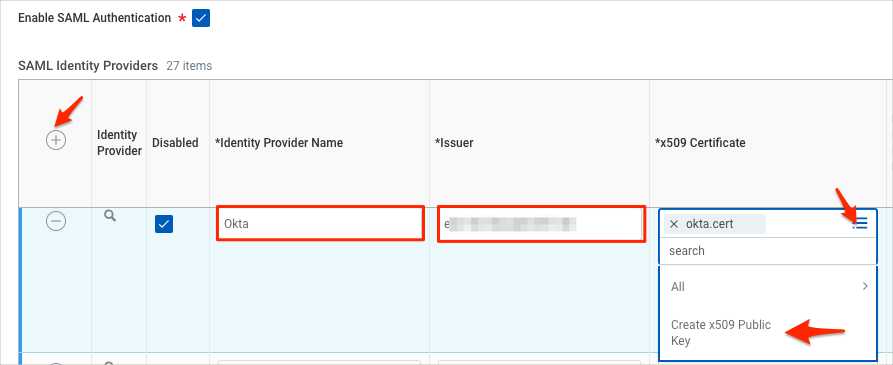
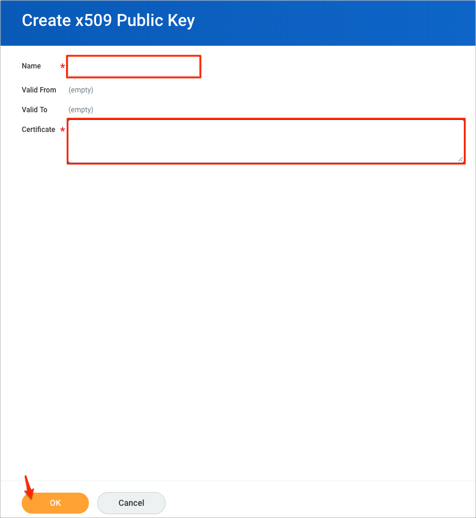
In the Create x509 Public Key screen, enter a unique name for your certificate, for example, okta.cert.
Copy and paste the certificate listed below into the Certificate field:
Sign into the Okta Admin dashboard to generate this value.
Click OK to save your certificate and return to the Edit Tenant Setup - Security screen.
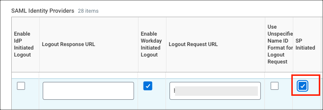
[Optional SLO]: Check the Enable Workday Initiated Logout option in order to enable SLO.
[Optional SLO]: Logout Request URL: Copy and paste the following:
Sign into the Okta Admin dashboard to generate this value.
IdP SSO Service URL: Copy and paste the variable generated at the top of these instructions, here.

[Optional SLO]: For x509 Private Key Pair, do the following:
Click the icon in the x509 Private Key Pair field.
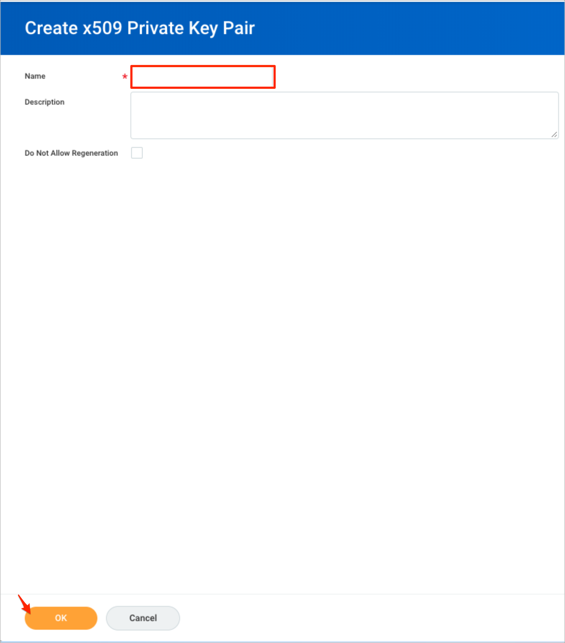
Click Create x509 Private Key Pair in the dialog box:
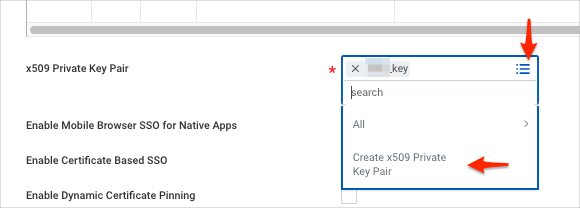
Enter a unique name for your certificate, for example, workday_key.
Click OK.
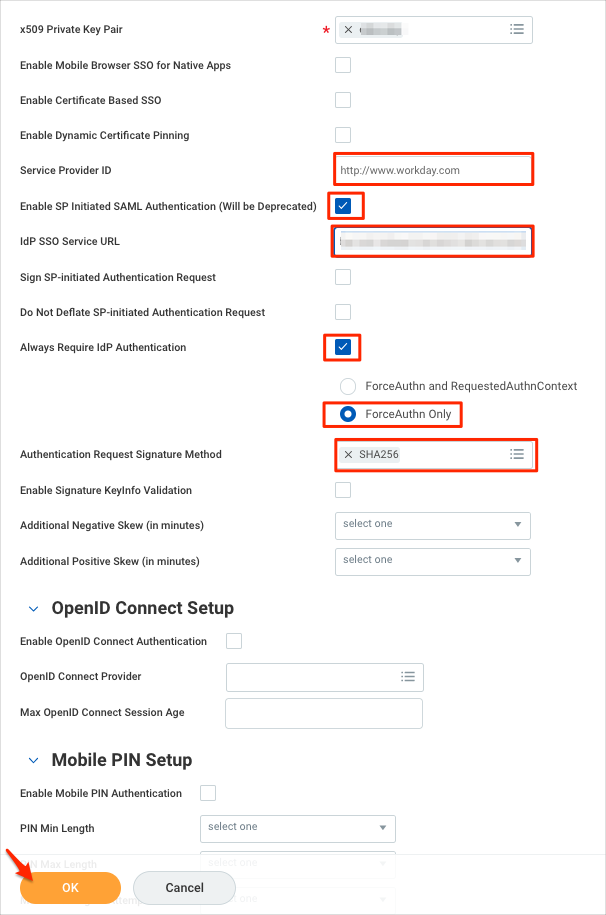
Service Provider ID: Enter the following value: http://www.workday.com.
IdP SSO Service URL: Copy and paste the variable generated at the top of these instructions, here.
[Optional Force Authentication]: Always Require IdP Authentication – check the option and select the ForceAuthn Only radio button in order to enable Force Authentication. This step should be used in conjunction with the Force Authentication option in step 19.
Authentication Request Signature Method: Select SHA256.
Click OK:
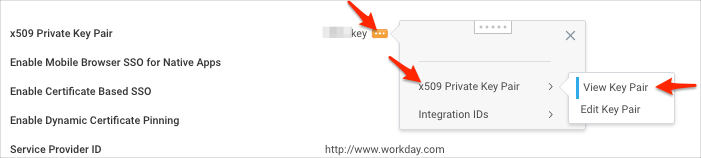
[Optional Force SLO]: Select the Actions menu near the workday_key x509 Private Key Pair:
Select x509 Private Key Pair > View Key Pair:
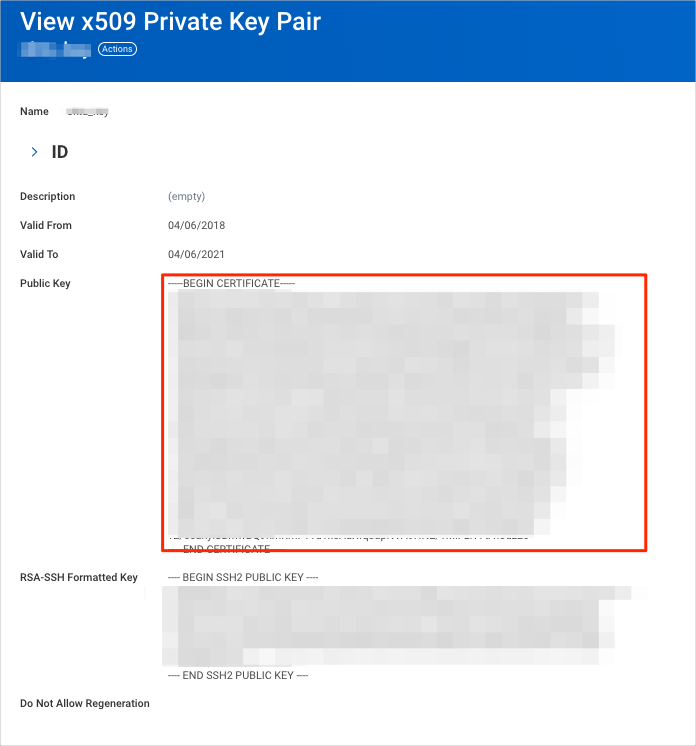
On the View x509 Private Key Pair screen, copy the Public Key value and save as workday_key.cert file:
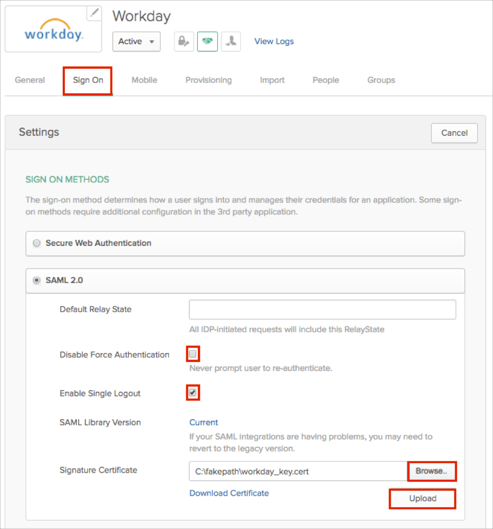
[Optional]: In Okta, select the Sign On tab for the Workday app, then click Edit.
[Optional Force Authentication]: Uncheck Disable Force Authentication in order to enable Force Authentication. This step should be used in conjunction with step 15.
[Optional SLO]: Check Enable Single Logout.
[Optional SLO]: Click Browse to select the workday_key.cert.
[Optional SLO]: Click Upload.
Click Save.
Done!
Make sure that you entered the correct value in the Your Workday site URL field under the General tab in Okta. Using the wrong value will prevent you from authenticating via SAML to Workday.
Open your Login Redirect URL (step 4):
[org URL]/login-saml2.flex