The Okta/Smartsheet SAML integration currently supports the following features:
For more information on the listed features, visit the Okta Glossary.
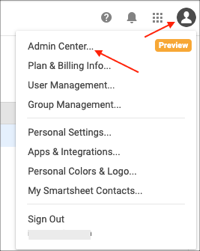
Click on your account, then select Admin Center:
In the Authentication section, select SAML.
Click the edit configuration link for the SAML option.
In the SAML Administration window that opens, select Add IdP.
Enter the following:
IdP Nickname: Enter Okta.
Idp Metadata: Copy and paste the following:
Sign in to the Okta Admin app to generate this variable.
Click Save.
Save the SSO URL.
Optionally you can edit the CNAME. For more information about the CNAME, refer to the Smartsheet documentation located here: https://help.smartsheet.com/articles/2476141-configure-saml-sso.
Click Edit in the Domains (advanced) section, then do the following:
Enter your domain into the corresponding field.
Click Add domain.
Click Close.
In Okta, select the Sign On tab for the Smartsheet app, then click Edit.
Scroll down to the ADVANCED SIGN-ON SETTINGS section.
Paste the following ACS URL into the corresponding field:
https://sso.smartsheet.com/Shibboleth.sso/SAML2/POST
Paste the following Audience Restriction into the corresponding field:
https://sso.smartsheet.com/saml
Click Save.
Go back to Smartsheet and click Activate to activate your IdP.
Done!
The following SAML attributes are supported:
| Name | Value |
|---|---|
| givenname | user.firstName |
| surname | user.lastName |
| emailAddress | user.email |
Open the URL you saved in Step 7, above.