How to Configure SAML 2.0 for SecurityCompass eFront LMS
This setup might fail without parameter values that are customized for your organization. Please use the Okta Administrator Dashboard to add an application and view the values that are specific for your organization.
- Sign into the eFront application as an administrator.
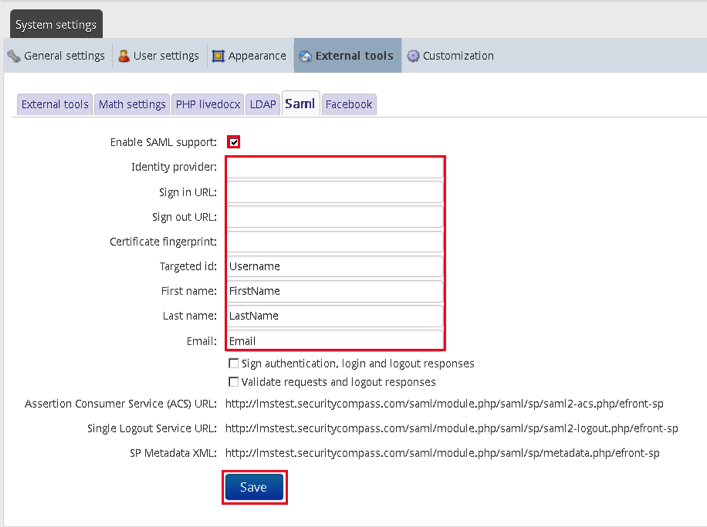
- Navigate to System settings > External tools and select the Saml tab.
- Check the Enable SAML support box, as shown below.
-
Enter the following Identity provider, as shown below.
Sign into the Okta Admin dashboard to generate this value.
-
Enter the following Sign in URL, as shown below.
Sign in to the Okta Admin dashboard to generate this value.
-
Enter the following Sign out URL, as shown below.
Sign in to the Okta Admin dashboard to generate this value.
-
Enter the following Certificate fingerprint, as shown below.
Sign into the Okta Admin Dashboard to generate this variable.
-
Enter the following Targeted id, as shown below.
Username
-
Enter the following First name, as shown below.
Firstname
-
Enter the following Last name, as shown below.
Lastname
-
Enter the following Email, as shown below.
Email
- Select Save, as shown below.
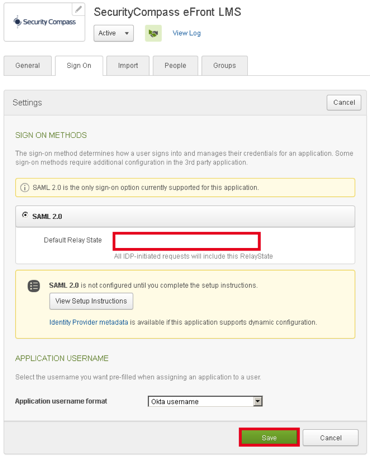
- In Okta, go to the Sign On tab for the SecurityCompass eFront LMS app, as shown below. Enter the following Default Relay State: <yourBaseURL>/index.php?ctg=saml where <yourBaseURL> is the URL for your SecurityCompass domain.For example, if your SecurityCompass domain is acme.securitycompass.com, enter https://acme.securitycompass.com/index.php?ctg=saml for the Default Relay state. When done, select Save.
- Done!
Note: IdP-initiated and SP-initiated flows are supported.
For SP-initiated SSO, go to <yourBaseURL> (for example, https://acme.securitycompass.com) and select Sign in with SAML