If you have an AWS instance that was configured to use the Amazon AWS IAM role as the Sign On mode, and and remove an optional child account from that instance, you will be warned in the UI that their role provisioning will be removed and an event will be generated in the System Log.
Before going through the setup instructions below, make sure that your AWS app is created by clicking Done on the Sign On Options step:
The Okta/AWS Account Federation SAML integration currently supports the following features:
Okta's integration with Amazon Web Services (AWS) allows end users to authenticate to one or more AWS accounts and gain access to specific roles using single sign-on with SAML. Okta admins have the ability to download roles from one or more AWS into Okta, and assign those to users. In addition, Okta admins can also set the duration of the authenticated session of users via Okta.
When logging in to AWS, end users will be presented with an AWS screen with a list AWS roles assigned to them in one or more AWS accounts. They can select the role to assume for login, which defines their permissions for the duration of that authenticated session.
If you are connecting multiple AWS accounts, follow the instructions here: CONNECT OKTA TO MULTIPLE AWS INSTANCES VIA USER GROUPS
This method has no upper limit for the number of accounts that can be supported. Access to specific AWS accounts is managed via group assignment either in Okta or from another system of record like AD or LDAP. Each time you add an AWS account you need to create a new group that represents that account and allow access. In AD or LDAP you can use nested groups to simplify the assignment of access based on user roles (described in more detail in the configuration section of this document).
Connecting Okta to your AWS instance to provide SSO into AWS roles for your users is a simple four step process:
In order to use SAML for AWS, you will have to set up Okta as an identity provider in AWS and establish the SAML connection. The steps in this section will walk you through this process.
Sign in to your AWS Console.
Go to Identity and Access Management (IAM) Service.
Select Identity Providers in the menu bar.
Click Create Provider to create a new instance.
On the Configure Provider screen, enter the following:
Provider Type: Select SAML from the dropdown menu.
Provider Name: Enter the name of your preference; for example, Okta.
Metadata Document: Upload the following metadata file:
Sign into the Okta Admin dashboard to generate this value.
Finish provider configuration.
Locate the Identity Provider you just created in the list of Identity Providers and copy its Provider ARN value. You will need it later during this configuration.
Now that you have configured Okta as the Identity Provider in AWS, you can create or update existing IAM roles that Okta will be able to retrieve and assign to users in Okta. Note that Okta will only be able to provide SSO for your users to roles that have been configured to grant access to the Okta SAML Identity Provider you configured in the previous step (Step 1: Configure Okta as your Identity Provider in your AWS Account).
To grant SSO access to existing roles in your account:
Select the Trust Relationship tab for the role, then click Edit Trust Relationship.
You now need to modify the IAM trust relationship policy to permit SSO into Okta using the SAML IDP you configured in the previous step:
To grant SSO access to a new role:
Go to Roles > Create Role.
Use SAML 2.0 federation type of trusted entity.
Select Okta (name of your identity provider) as the SAML provider and Allow programmatic and AWS Management Console access, then proceed to Permissions.
Select your preferred policy to be assigned to the role you're creating.
Finish Role configuration.
You now need to create an AWS User with specific permissions so that Okta can dynamically fetch a list of available roles from your account. This makes assigning users and groups to specific AWS roles easy and secure for your administrators.
From the AWS Console, go to IAM > Users.
Select Add user.
Enter a User name; for example, OktaSSOuser, select Programmatic access as the Access type, then proceed to Permissions.
Select Attach existing policies directly, then Create Policy.
Use JSON to enter the Policy Document and replace the content with following:
{ "Version": "2012-10-17", "Statement": [ { "Effect": "Allow", "Action": [ "iam:ListRoles", "iam:ListAccountAliases" ], "Resource": "*" } ] }Review policy. Refer to AWS documentation for details if needed.
Enter your preferred Policy Name and compete the policy configuration.
Return to your Add user tab and attach your newly created policy.
Refresh the list.
Search for the policy you've just created and select it.
Proceed to the final screen that displays your Secret access key and Access key ID. Make a copy of these values as you will need these later to configure the AWS app in Okta. Finish user creation.
Now you have finished the required steps to be performed in the AWS console, open the AWS Account Federation app integration configuration in Okta and perform the following steps to complete the set up:
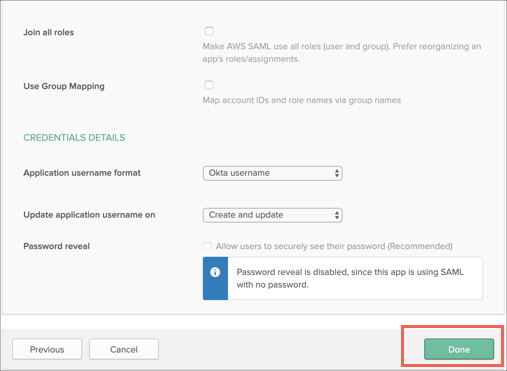
In Okta, select the Sign On tab for the AWS Account Federation app, then click Edit.
Join all roles: This option enables merging all available roles assigned to a user as follows:
For example, if a user is directly assigned Role1 and Role2 (user to app assignment), and the user belongs to group GroupAWS with RoleA and RoleB assigned (group to app assignment), then:
Still in Okta, select the Provisioning tab for the AWS app, then click Edit.
Note: The AWS Account Federation app integration does not support provisioning. This setup under the Provisioning tab is required to provide API access to Okta to download a list of AWS roles to assign during the user assignment. It allows you to assign multiple roles to users and pass those roles in the SAML assertion.
Connected Accounts ID (optional): Provide a comma-separated list of all of the IDs of your connected accounts. You can find this in each AWS account from the My Accounts page in the top-left hand corner of the AWS Console.
Note: If you have an AWS instance that was configured to use the Amazon AWS IAM role as the Sign On mode, and remove an optional child account from that instance, their role provisioning will be removed and an event will be generated in the System Log.
Click Test API Credentials to verify API credentials are working:
To be able to update Roles and Permissions from AWS you need to enable Create Users and Update User Attributes:
Note: As a reminder, you are not creating or updating any users in AWS, but this activates necessary parts of the API to allow Okta to retrieve Okta-trusted roles from the AWS account.
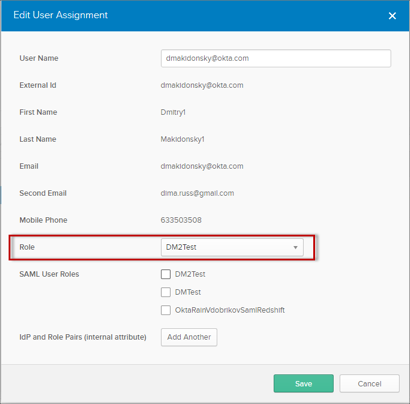
In the User Assignment screen, go to SAML User Roles, and select all the roles you would like to assign to this user, then click Save. In this example, we have assigned two roles to our test user:
IMPORTANT: If you see the attribute IdP and Role Pairs (internal attribute), ignore it. It is an internal attribute and it doesn't affect user assignment.
The user will be presented an AWS screen with a list of roles assigned to it in Okta. Here, select the role to assume when logging in to AWS.
Note that connecting multiple AWS accounts via the API is no longer supported. Use the following instructions to switch to multiple AWS accounts role management via groups.
Note that although the following instructions apply to all applications, including AD/LDAP, profile-sourced ones. Local Okta groups can be used as well.
A group must exist in Okta for each specific account and role combination that you want to provide access to. You can think of these groups as AWS Role Specific Groups. The group name should follow a particular syntax (more details in Set Up Instructions).
Any user who is a member of these role specific groups is granted a single entitlement: access to one specific role in one specific AWS account. These groups can be created by a script, exported as a list from AWS, or created manually.
However, it does not scale to manage user access by assigning each user to specific AWS Role Groups. To simplify administration, we recommend you also create a number of groups for all of the distinct user-sets in your organization that require different sets of AWS entitlements.
These groups may already exist in your Okta or AD/LDAP hierarchy in the form of different department-specific groups, but can also be created solely for AWS.

Each of your AWS accounts must be configured for SAML access. This entails adding Okta as a trusted IDP to your AWS account and then creating a trust relationship for each of your roles that permits access via the new IDP. These are the same steps that one would follow to provide SAML SSO into any single AWS account, but must be performed across all of your accounts. For advanced organizations, this can be automated with Cloud Formation or AWS API scripts for a simple SAML setup in each account.
This type of integration doesn't use Provisioning functionality
There is no limitation on AWS accounts / roles count
First, setup all of your AWS accounts for SAML access with Okta.
Begin by creating a new AWS app in Okta and select SAML from the Single Sign-On tab.
Perform steps 1 and 2 of CONNECT OKTA TO A SINGLE AWS INSTANCE:
Do this for all of your AWS accounts and roles that you want to grant users access to – and ensure that all of your accounts have been set up with the same exact SAML metadata and have been named the same exact name. Any account with a different SAML provider name or metadata document will not be accessible.
Once all AWS accounts have been configured for SAML, groups must be created in AD for each AWS role in each account that you want users to have access to. This can be accomplished in a few different ways:
Option 1: Script between AWS and AD/LDAP connected to Okta that creates AD groups for each role in each account
This offers the greatest possibility of automation, but requires coordination between your AWS management teams and AD / LDAP management teams for the script to be configured. In the future, Okta hopes to provide sample scripts to help simplify the setup, but these are currently not available.
Option 2: CSV Export from AWS
If a scripting approach between AWS and AD/LDAP is not possible, a lighter weight approach may be to simply export a list of role names for each of your AWS accounts in a CSV that you can later import to Okta.
Option 3: Manual Creation
You can also create AWS Role Groups in Okta manually. This model is the simplest, however, it will require upkeep as well as ample setup time to create groups in Okta for each of the roles in each of your accounts.
Regardless of how you choose to create these AWS Role Specific Groups in your directory, we recommend the following format for the group names:
aws#[account alias]#[role name]#[account #]
For example:
aws#northamerica-production#Tier1_Support#828416469395
If you prefer to use your own group syntax, make sure to include account alias, role name, and account # with recognizable delimiters in between each. This will also require you to be able to create a custom regex expression in later steps and therefore should only be done if you are comfortable with these advanced topics.
Once the groups have been created/imported into Okta, the AWS app you set up earlier must be configured to translate AWS Role group membership into entitlements that AWS can understand syntactically:
Go to the AWS app you set up earlier.
Select the Sign On tab, then click Edit.
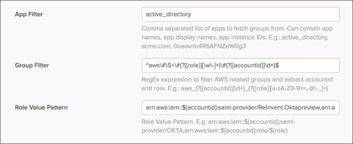
Locate the App Filter, Group Filter, and Role Value Pattern fields. These fields control how Okta maps your AWS role groups into entitlements for this feature. Configure these fields as follows:
App Filter: This filter narrows the list of groups that Okta can use for AWS entitlement mapping to a specific app or directory. This exists for security purposes, to avoid possible situations where rogue admins create groups following a certain syntax in order to intentionally gain unauthorized access to a specific AWS account/role. If you created your groups in Active Directory, you can input active_directory, if you want to limit usage by local Okta groups, input okta. For other application(s) you can use values such as bamboohr for Bamboo HR app or okta, egnyte for Okta + Egnyte groups.
Group Filter: This filter field uses a Regex expression to only inspect groups from your chosen app filter that follow a specific syntax. If you did chose to use the Okta recommended default AWS role group syntax listed above, then you can simply use the following regex string:
^aws\#\S+\#(?{{role}}[\w\-]+)\#(?{{accountid}}\d+)$
This regex expression logically equates to: find groups that start with AWS, then #, then a string of text which contains only non-whitespace characters, then #, then the AWS role which contains word characters or minus sign, then #, then the AWS account ID
If you didn’t use the default recommended AWS role group syntax, then you must create a regex expression that properly filters your AWS role groups, and captures the AWS role name and AWS Account ID within two distinct Regex groups named {{role}} and {{accountid}} respectively.
Role Value Pattern: This field takes the AWS role and account ID captured within the syntax of your AWS role groups, and translates it into the proper syntax AWS requires in Okta’s SAML assertion to allow users to view their accounts and roles when they sign in.
This field should always follow this specific syntax:
arn:aws:iam::${accountid}:saml-provider/[SAML Provider Name],arn:aws:iam::${accountid}:role/${role}
Replace [SAML Provider Name] with the name of the SAML provider that you set up in all of your AWS accounts. The rest of the string should not be altered, only copied and pasted.
Lastly, now that the AWS app has been properly configured to map AWS role groups to entitlements, assign all of your AWS Management Groups to the application in Okta. This will automatically assign all of the appropriate users to the AWS app, and the instructions you completed in the step above will ensure that they only see the appropriate entitlements they should have access to.
Setup is now complete! Verify that users can access the AWS app from their Okta end-user dashboard and sign-on is seamless.
If you create another new IAM Role after setting up the API integration in Okta it does not get populated in Okta automatically. To get this new role, do the following:
Go to the Applications tab, click More, then click Refresh Application Data.
This downloads the latest roles, profiles and groups from apps configured with user provisioning. Okta uses this data when creating new users in those apps.
The Role attribute is used for Federated User Login and Amazon IAM Role SSO mode. It may also be used as a default value for SAML 2.0 if no SAML User Roles are selected.
The SAML User Roles attribute is used for SAML 2.0 as SAML supports multiple roles. If no values are selected for SAML User Roles then value from Role dropdown list will be used as a default role.
You can select multiple roles:
